Showing posts with label decoupage. Show all posts

Friday, July 20, 2012

Pretty Paper Lantern

Well, I haven't mod podged butterflies onto anything for you lately so I thought I better fix that.

I'm hoping to host a little birthday party in my yard next month so to get ready I've already started making some of the decorations.

paper lantern, decorate paper lantern, pretty lanterns, how to paper lantern
 
Here's what you'll need if you want to make your own pretty lanterns:


Supplies:
-purchased paper lantern
-mod podge, sponge brush (not shown)
-scissors and pencil
-paper to make your pattern
-napkins (or lightweight scrapbook paper)
-miscellaneous ribbons, lace, or trim for a hanger (not shown)

Steps:
1) Decide what shape you would like to use for your pattern.  I traced some vinyl adhesive butterflies I had onto to some craft paper to use as templates. ( If I had tried to use the actual vinyls they probably never would've come off the napkins)

Use different sizes to give your design variety~

2) Place your templates on the back of your napkins.  Trace with a pencil and cut out.

3) Most napkins are 3 ply.  Make sure to take off at least one layer before you start gluing.  If you don't do this the paper will naturally separate itself and cause a bit of a mess.  If you go down to 1 ply, printed paper only, you might find that it's too fragile to work with.  For me, two layers of paper worked perfectly.


4) Construct your paper lantern.

You were expecting a globe weren't you??!?
5) Now, you must be very patient and work slowly and very GENTLY on these next few steps.  Apply a layer a mod podge onto the back of your napkin shape.  Make sure to get right to the edges.


6) Place your napkin shape onto your paper lantern and very gently press into all the grooves.


I didn't apply another outside layer of Mod Podge like you do with most decoupage projects but you can if you want a little extra sheen.  I figured I was lucky not to have destroyed the napkins or the lantern so far and I didn't want to press my luck.

7) Cut some ribbon, lace, or whatever you have on hand to use as a hanger.  You can add some more pieces to the bottom too as a sort of tassel decoration.

And there you have it!  Easy Peasy!  A one of a kind gorgeous paper lantern:

Ahhh, the perfect place to relax
after a hard day of crafting~
I can't wait to throw the party and show you what else I have in store!

Until then, keep on crafting!

Here are some pins that inspired this project:

Source,Green Wedding Shoes,GlueArts

Friday, January 13, 2012

Paper Doily Shower Curtain

Mod Podge is a wonderful thing, isn't it???  Did you know that you can use it on plastic?  Don't believe me? Check out today's project!

I really needed a new shower curtain(s) (my clawfoot tub needs two).  I like to get just a plain see through curtain because, number one- no one is around to check me out while I'm in the shower so it doesn't need to be opaque, and number two-I need to keep an eye on my battling cats, even when I'm in the shower.

But plain see through can be very boring.  I thought about buying some plastic by the yard and painting it, but come on, that's just craziness when you can perform magic with Mod Podge!

Here's what you need:

I ended up not using the Sparkle Mod Podge
I held back for once in my life on the glitter~

Steps:
1) After I cut my shower curtain the right length for my tub I just decided which side was the outside and layed it out on the table.  The rest is just like any Mod Podge project.  Slap some Mod Podge onto the wrong side of your paper doily, working from the centre outwards.

2) Randomly place your doily glue side down onto the outside of your shower curtain and then add another layer of Mod Podge over top.  The Mod Podge will dry quickly and the paper doilies are a little fragile so be patient, work fast, and don't forget to smooth out any air bubbles that happen.


Make sure to go slightly over the edges to seal it in and get in and around all of the little openings of the doily.  Just use a damp cloth to wipe around the edges if you get too much on the plastic.


This is so beyond easy but I have to admit the first one took a little longer than I wanted.  Once I got a rhythm and a method though it was smooth sailing and I am thoroughly pleased with the end result!


So much prettier than anything I could've bought and so much better than just plain see through plastic~

DIY Shower Curtain, Mod Podge Shower curtain, Mod Podge Doilies, Decoupage Shower Curtain, Decopuage Doilies, easy craft, how to mod podge, how to decoupage


You could really go to town on this with loads more doilies.  Or you could print something on them before you glue them down.  Or try your kids fav cartoon characters printed from your computer.  I can think of so many fun ideas now that I know the Mod Podge will work on plastic! 

What do you think?  Will you give your washroom a little injection of personality with some Mod Podge?  Leave a comment below and let me know what you think!
This project was featured here:


Friday, September 30, 2011

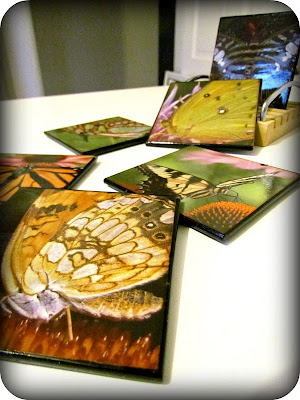
Butterfly Coasters

OK, I have a few bad habits.  Well, maybe more than a few, but today I'm going to confess only one to you....I cannot throw out old calendars. 

I have many.  Some of them have beautiful photos of travel destinations, some have pics of pretty flowers, some mean absolutely nothing to me at all , but I still can't throw them out.  I always think, someday I'm going to use those calendar shots for something.

So, that's exactly what we're going to do today.

Here's what you need:


I picked up this set of six glass coasters at the second hand shop for $3.00.  Everything else I already had on hand.


And this is the calendar that I'm using, it's a mini with cool super close-up pics of butterflies.


Steps:
1) First you should take apart your calendar and decide which photos you're going to use.

 
Normally this step would stop me in my tracks and I'd be paralyzed with indecision for weeks.  But I decided to throw caution to the wind and just picked six pretty shots of butterflies~

2) Next, wipe down your coasters so that they're nice and clean.  Then place your coaster on top of your calendar photo face down to decide how your going to crop your shot.  Using a sharp blade, cut around your coaster.


You'll probably need to do a bit more trimming to make sure it fits the way you want on the front of your coaster.

2) You could just leave your pics as is, or you can take a stamp pad and gently ink the edges to give it a subtle antiquey kind of feel.


Because of the glossy paper it really is very subtle, but if you used a darker colour it would show up much more.

3)Now we're ready to Mod Podge!  Yay!  My favourite easy thing to do!  Just slap down a layer of Mod Podge onto your coaster.


4) Place your calendar pic on top and burnish down with your fingers to make sure you don't have any air bubbles underneath.


5) Add another layer of Mod Podge over top.  Make sure to get right over the edges of the paper so that it's sealed right in.


6) I did two coats of Mod Podge and the coasters looked OK, but who goes to all this trouble to make something that's just OK?  Instead,  I decided to experiment a bit and added a third layer of Mod Podge using the Dimensional formula.


I used this Mod Podge when I made my Paper Jewellery and it worked great.  Here's a great tip though, which I read on the back of the bottle right after I gave it a good shake...don't shake the bottle!  It makes it bubble more.

Just squeeze out a little pool onto the middle of your coaster and then gently drag it across with a brush till almost the edge.


7)Now you just let them dry.


They'll have a milky look to them at first but don't worry, the Mod Podge will dry clear eventually.

This is a super simple craft but I'm a true believer in seeing beauty in the simple things in life.  And oh my gosh....look at them.... they're so nice and super glossy!


DIY Coasters, Easy DIY, Coaster Craft, Easy Kids Craft, Butterflies, Mod Podge, Easy Mod Podge, Decoupage

Because I used multiple coats of Mod Podge I'm going to let them sit and cure for a few days before I use them.  And then ...let the glasses of pink lemon-aide pour. (Yes, I still drink pink lemon-aide even though it's fall ~ )
You can check out other calendar art projects that I've done here and here .

If you not as neurotic as me and you've thrown away your old calendars try scrapbook paper or gift wrap or even wallpaper samples.

Leave a comment and let me know what you think.  What are the simple things in life that you enjoy?

Don't forget to enter the 300 Follower Giveaway  for your chance to win a gift certificate to buy your own craft molds at Mold Muse .

Have a great week everyone!  See you on Monday for the linky party~

Friday, March 11, 2011

Butterfly Vase

I've been out of town for much of this week, travelling for work, so today's project is a bit on the easy peasy side.  Sometimes I think those are the projects that are the best though. 

I haven't opened my Mod Podge (or as I like to call it Modge Podge) for awhile, so I thought I'd dust it off and pretty up a vase I got with some flowers for Valentine's day.  I'm dreadfully allergic to flowers but it's still nice to have a pretty vase around for silk flowers.

Here are the supplies I used:


Steps:
1) Using a tiny little hole punch, punch out some tiny little figures from pretty gift wrap or scrapbooking paper.  Mine, of course, are butterflies.


2)  Do a dry run on your vase to make sure you have enough little punch outs.  When you're sure you have enough, just paint some regular old Mod Podge onto the front of your vase.


3) Quickly place your punch outs onto the Mod Podge.  Hurry!  It dries quickly.

4) Let it dry and then add a second layer of Mod Podge to seal in the paper.  For a little extra something I used Sparkle Mod Podge.


5) Let it dry again, add some flowers, and that's it!  You're done.  See?  Easy Peasy.

Mod Podge, Easy Mod Podge, Mod Podge Vase, decoupage, Easy Papercrafts, Paper punch, Butterfly Vase, Sparkle Mod Podge


If I had a Cricut the sky would be the limit on this one.  I'd do a lace design or delicate filigree or something.  (I figure if I complain enough times that I don't have a Cricut, eventually someone over at Cricut will notice and send me one to blog about.  Wishful thinking????  Maybe I should start tagging all my posts with "I need a Cricut!")

Leave a comment and let me know what design you'd like to see.  I still have another vase, exactly the same shape as this one that's waiting to be Modge Podged to death.

And don't forget....if you're a follower and you have a blog of your own,
make sure to add a link on the "Follow My Friends" tab up top.  I'll come visit and so will other Etcetorizers,
and from time to time I'll do a full feature post on one of you, like I did
 here .

Have a great week!

Friday, October 8, 2010

Desk Set

Well, today is your lucky day, because today you are getting two tutorials in one!  I did the first part of this project a few weeks ago but then noticed that there were already several other posts in the linky parties for the same project.

Not wanting to waste a good post that was already written I started to think about ways that I could add to it.  So, here it is, the beginings of a very pretty deskset that I think we might be able to add onto in the next little while.

Because I did each part of the project separately, I'll show the steps separately for you, but I think this is something you could do all together at the same time and would probaby end up saving you time and clean up.

Part 1-Pretty Clips

Here are the materials you need:
(paint is optional)

Steps:
1)Apply Modge Podge to one side of clothes pin and place onto wrong side of paper.  If you line up one side of your clothes pin with the outside edge of the paper you don't have to make as many cuts.


2)Using a sharp blade cut your paper as close to the clothes pin as you can.


3)Apply another layer of Modge Podge on right side of paper for a nice sleek finish.


If you're really industrious and want something that looks uber professional you can paint the clothes pin.  I decided that I liked the natural wood look....and painting seemed like it would get pretty messy.


Mod Podge Clips, DIY Clips, Embellished clothes pins, DIY Clothes pins

I tried a few different kinds of paper (origami, tissue, scrapbooking) but had the best results with some beautiful paper napkins that I had.

You can adhere magnets on the back to use on magnetic surfaces like your filing cabinet or fridge or just use them to keep all of those important papers together.  Try adding embellishments or using stamps.  The possibilities are endless!

Now for Part 2!-Pretty Pencils

Here are the supplies you need:


After I took this photo I realized you might want to add a pencil or marker.
Steps:
1)Place your pencil onto the wrong side of your paper with the metal end at the bottom flush with the edge of the paper. Or, just measure the length with a ruler.  Cut your paper the desired length.  Don't worry if your off a bit, the pencil will need to get sharpened eventually so any extra won't even show.


2)Roll the paper around your pencil to figure out the width that you need.  I used standard pencils and needed just over 1" but you should double check in case in your pencils are different.  Cut your paper the desired width.


3)Cover the wooden portion of your pencil with Modge Podge


4)Place the pencil onto the wrong side of your paper.  Roll the pencil and press the paper until you get a smooth finish.

5)Apply another layer of Modge Podge to the right side of the paper to seal the seam and to give it a nice shiny finish.  (I tried my new Sparkle Modge Podge for this step on some of the pencils and absolutely love, love, love the effect!)


6)Let Dry.  I propped mine up against some styrofoam.  Make sure whatever you use that your pencils don't stay stuck to it.

Mod Podge Pencils, DIY Pencils, Pretty pencils, embellished pencils, Easy Crafts, Mod podge
I found that the thinner the paper is, the easier it is to use.  The scrapbooking paper was the most difficult to roll and to stay put.

So, here you go!  The beginnings of a very pretty set of accessories for your desk at work or at home:


mod podge, mod podge pencils, easy DIY craft, kids craft, DIY decorative pencils, DIY desk set


I did try sharpening the pencils and they still look beautiful...


These will make great stocking stuffers or thank you gifts throughout the year.  What do you think?  What else can you use them for?  Don't be shy...leave a comment.

This weekend is Thanksgiving in Canada, so...Happy Thanksgiving everyone! Have a great weekend~

(This project will be posted throughout the week at the linky parties from the linky party tab above.  Check out the sites for more great ideas!)

 The Shabby Chic Cottage was my top referrer last week, so go visit Gina and
check out her site for other fab ideas!


As always, don't forget to check out Todays Creative Blog for more fun ideas.

Linkwithin

Related Posts Plugin for WordPress, Blogger...