Friday, February 28, 2014

Flashback Friday: Book Jewellery

I hope you're having as much fun as I am looking back at some of my old projects.

I originally shared this next project with you back in 2011.  I had only been blogging for a few months but it's still one of my favourite things I've made, probably because I love books so much.  (I should have loads of great book reviews for you when I get back from travelling!)
------------------------------------------------------

Have you ever had one of those weeks where time seems to drag on and on, but you still haven't found the time to do all of the things you meant to do?  That's what this week was like for me, so today's tutorial is something easy peasy that you can do in a snap when you just need a few minutes to feel creative.  At the end, I'll give you some ideas for how to take it to the next level, just in case you're more organized than I am and actually did do everything on your to-do list already.

Here are the materials I used:
 
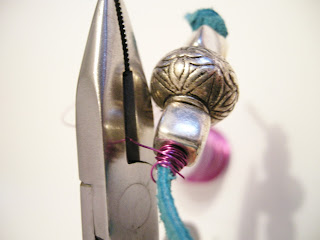
All I had handy were these wire wrapping pliers,
but you really just need ordinary or round nose pliers.

Steps:
1) Cut your strip of leather at least 15 1/2 " (39.5cm) long and tie a knot in one end.


2) String on some bulky beads.


Make sure you choose beads with a large enough hole to fit the leather.  I originally wanted to use these cute ladybug beads, but clearly, it was not going to happen:


 3) Tie another knot or wrap some wire at the end of your beads.  If you go the wire route, make it bulky, to stop the beads from falling over it.


4) Cut the wire and smoosh down a bit with your pliers to get rid of any sharp edges

5) Measure approximately 9" (23 cm) down and either tie another knot or wrap another piece of wire.


6) Add some more beads. This time if you're using the wrapped wire version, fold the end up. If you're using the knot method, tie another knot and you're done!


7) Wrap wire around the two layers of leather to secure.


8) Now for some extra blingity bling, thread some pretty beads onto an extra long head pin.  Make sure the holes in these beads aren't so big that the pin goes right through them.  You can also add a smaller bead at the bottom to make sure your beads are secure.


If you don't have any head pins you can just create your own version like this one:


9) Using your pliers, gently bend the tail of the head pin so that it will wrap through the leather loop.  Twist it to secure.


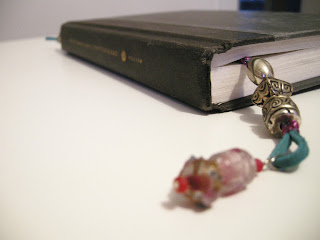
 Tah dah!  Now your books will look as pretty as you!


Book Jewellery, DIY Book Jewellery, DIY Bookmark, Beaded Bookmark, Bookmark Craft, easy to make bookmark, how to make a book mark
See the black on top?
I just used the knot method and it took me
less than 5 minutes to make it~

And when they're on the shelf they look just like jewellery~


What do you think?  If you want to take it a level higher, try using ribbon instead of leather.  Or, braid/macrame some embroidery floss.  Use tassels instead of beads.  As usual, you're only limited by your imagination.
--------------------------------------------------

I love projects that more than just pretty, they're useful...and they use up supplies that I already have on hand.  So this one really hits the mark.

When I first posted this project I had less than 100 followers, so if you remember it from the first time around you're a star and one of my very favourite people because you've stuck around for so long!  If this is your first time seeing it, I like you too!  It's very inspiring to have other people interested in what you're doing so I appreciate every visitor that stops by.

So....what do you use to keep your place in your books?  I have been known to use receipts and even other books!  Leave a comment below.  And if you want to catch up on my book reviews you find them all over on Goodreads.com.  Just search for me as Etcetorize~

Thursday, February 27, 2014

Things to Make

My largest Pinterest board is the one that holds all of the things I see that inspire me to create.  When I make something from this board it gets move to my "Pinned it, Did it" board.  Of course, my "To Make" board is exponentially larger, so I'll never run out of great projects to try~


Cute Cheap Heart print high-low T-shirt B13220019 - T-Shirt Online Shopping Free Shipping

15 T-shirt DIY Crafts

cute emery board sleeves, christmas gifts for next year

How-To  Votive Candleholder Covers

Sometimes I throw things in here that aren't craft projects, but I still want to go for it and try to make my own version...

Nina Ricci F/W 2012 rtw

Tree stump tables

For the sources of all these great images, or to follow me on Pinterest just click HERE.

What's your biggest pin board?  Do you use the ideas or do you just love to collect beautiful pictures?  Leave a comment below~

Wednesday, February 26, 2014

Shephard Hook Bookmark

I picked up a package of Shephard Hooks when I went to the Creativ Festival in Toronto a few years ago. I figured that it was about time to put them to use.


The arm of the hook is nice and flat so that it doesn't damage your books.  All of the beads were collected over the years from my travels but the cute little owl is from a package Wholeport sent me awhile ago.


I have some more bookmark projects coming up on Friday so make sure to return for some fun ideas.

Tuesday, February 25, 2014

Wholeport Giveaway!!

My lovely friends at Wholeport.com have agreed to pass on my monthly stash of goodies to one of you this month!!


The winner of this giveaway will have $30 to spend online with Wholeport.  Believe me, $30 can go a very long way there.

You'll find beads...


And fabric....


And paper...


Even baking supplies!


And loads more.

What do you have to do to win?  Just use the rafflecopter widget below. (Be patient, sometimes it take a minute or two to show up depending on what type of system you're using)

a Rafflecopter giveaway

You have until March 4th, 2014 to get your entries in.  I'll draw the winner when I get back from holidays and let you know who the lucky duck is then!

Good luck!

Monday, February 24, 2014

Movie Monday - Land Down Under


Did you honestly think I would end my tribute to Australia without playing this song?!?!?


Friday, February 21, 2014

Flashback Friday: Paper Doily Shower Curtain

It's time for a look back at one of my most favourite projects that I've completed over the past few years (because I wasn't organized before I left on my overseas trip to have new posts ready to go while I was away).

For lots of projects I could tell you what inspired me or where I found the idea but this one, I have no idea.  It just came to me out of nowhere but then I couldn't rest until I had actually completed it.  And it turned out just as lovely in real life as it was in my head!  How often does that happen?!?!
------------------------------------------------------

Mod Podge is a wonderful thing, isn't it???  Did you know that you can use it on plastic?  Don't believe me? Check out today's project!

I really needed a new shower curtain(s) (my clawfoot tub needs two).  I like to get just a plain see through curtains because, number one- no one is around to check me out while I'm in the shower so it doesn't need to be opaque, and number two-I need to keep an eye on my battling cats, even when I'm in the shower.

But plain see through can be very boring.  I thought about buying some plastic by the yard and painting it, but come on, that's just craziness when you can perform magic with Mod Podge!

Here's what you need:

I ended up not using the Sparkle Mod Podge
I held back for once in my life on the glitter~

Steps:
1) After I cut my shower curtain the right length for my tub I just decided which side was the outside and layed it out on the table.  The rest is just like any Mod Podge project.  Slap some Mod Podge onto the wrong side of your paper doily, working from the centre outwards.


2) Randomly place your doily glue side down onto the outside of your shower curtain and then add another layer of Mod Podge over top.  The Mod Podge will dry quickly and the paper doilies are a little fragile so be patient, work fast, and don't forget to smooth out any air bubbles that happen.


Make sure to go slightly over the edges to seal it in and get in and around all of the little openings of the doily.  Just use a damp cloth to wipe around the edges if you get too much on the plastic.


This is so beyond easy but I have to admit the first one took a little longer than I wanted.  Once I got a rhythm and a method though it was smooth sailing and I am thoroughly pleased with the end result!


So much prettier than anything I could've bought and so much better than just plain see through plastic~

DIY Shower Curtain, Mod Podge Shower curtain, Mod Podge Doilies, Decoupage Shower Curtain, Decopuage Doilies, easy craft, how to mod podge, how to decoupage


You could really go to town on this with loads more doilies.  Or you could print something on them before you glue them down.  Or try your kids fav cartoon characters printed from your computer.  I can think of so many fun ideas now that I know the Mod Podge will work on plastic! 

What do you think?  Will you give your washroom a little injection of personality with some Mod Podge?  Leave a comment below and let me know what you think!

This project was featured here:


--------------------------------------------------------

The only thing I would change if I ever make this craft again is to get a good quality shower curtain that is mold resistant.  The cheapy ones that I used here didn't get moldy but they did have to be replaced in just a few months so I had to throw all my hard work away.

I'm also happy to report that since this project was originally posted I have finally repainted my washroom to a nice crisp white and those sickly pinky lavendar walls are long gone~

What do you like to use for shower curtains?  Do you like clear or printed?  Plastic or fabric?  Leave a comment below~

Thursday, February 20, 2014

Bohemian Living

I'm very drawn to all things "bohemian".  I can easily fall into this style in all parts of my life...except my home.  I think the messiness and business of it all would drive me a bit mad...still I can't stop pinning images from other people who can handle living inside of so much prettiness~

Bohemian Living

a little shabby...a little boho

awesome bed

Necklaces holding curtain

Shawl valance <3

Style Inspiration: Dreamy bedrooms

I love all that colour and all of those layers.  For sources of all of these images and loads more gorgeousness just check out my Bohemian Living board on Pinterest.  Are you inspired by a style that you don't actually use?  Leave a comment below~

Linkwithin

Related Posts Plugin for WordPress, Blogger...