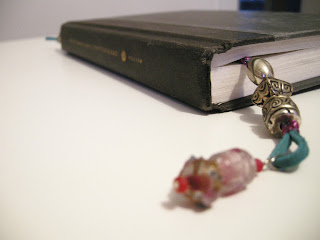
I originally shared this next project with you back in 2011. I had only been blogging for a few months but it's still one of my favourite things I've made, probably because I love books so much. (I should have loads of great book reviews for you when I get back from travelling!)
------------------------------------------------------
Have you ever had one of those weeks where time seems to drag on and on, but you still haven't found the time to do all of the things you meant to do? That's what this week was like for me, so today's tutorial is something easy peasy that you can do in a snap when you just need a few minutes to feel creative. At the end, I'll give you some ideas for how to take it to the next level, just in case you're more organized than I am and actually did do everything on your to-do list already.
Here are the materials I used:
 |
| All I had handy were these wire wrapping pliers, but you really just need ordinary or round nose pliers. |
Steps:
1) Cut your strip of leather at least 15 1/2 " (39.5cm) long and tie a knot in one end.
2) String on some bulky beads.
Make sure you choose beads with a large enough hole to fit the leather. I originally wanted to use these cute ladybug beads, but clearly, it was not going to happen:
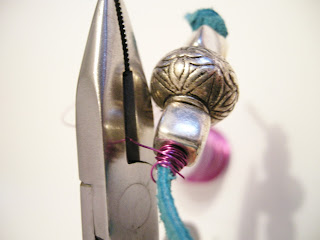
3) Tie another knot or wrap some wire at the end of your beads. If you go the wire route, make it bulky, to stop the beads from falling over it.
4) Cut the wire and smoosh down a bit with your pliers to get rid of any sharp edges
5) Measure approximately 9" (23 cm) down and either tie another knot or wrap another piece of wire.
6) Add some more beads. This time if you're using the wrapped wire version, fold the end up. If you're using the knot method, tie another knot and you're done!
7) Wrap wire around the two layers of leather to secure.
8) Now for some extra blingity bling, thread some pretty beads onto an extra long head pin. Make sure the holes in these beads aren't so big that the pin goes right through them. You can also add a smaller bead at the bottom to make sure your beads are secure.


If you don't have any head pins you can just create your own version like this one:
9) Using your pliers, gently bend the tail of the head pin so that it will wrap through the leather loop. Twist it to secure.
Tah dah! Now your books will look as pretty as you!
 |
| See the black on top? I just used the knot method and it took me less than 5 minutes to make it~ |
And when they're on the shelf they look just like jewellery~
What do you think? If you want to take it a level higher, try using ribbon instead of leather. Or, braid/macrame some embroidery floss. Use tassels instead of beads. As usual, you're only limited by your imagination.
--------------------------------------------------
I love projects that more than just pretty, they're useful...and they use up supplies that I already have on hand. So this one really hits the mark.
When I first posted this project I had less than 100 followers, so if you remember it from the first time around you're a star and one of my very favourite people because you've stuck around for so long! If this is your first time seeing it, I like you too! It's very inspiring to have other people interested in what you're doing so I appreciate every visitor that stops by.
So....what do you use to keep your place in your books? I have been known to use receipts and even other books! Leave a comment below. And if you want to catch up on my book reviews you find them all over on Goodreads.com. Just search for me as Etcetorize~


1 comment:
I love this idea! I'm a huge reader, I constantly have a book with me. I've used almost everything as a temporary bookmark. Most recently, I've been using the folded page corner method. I only do this on MY books, so for those of you who have lent me books, I promise they are safe and crease free!
Angi Mullis dj2isme@aol.com
Post a Comment