I was all set to troll the big 5 pattern websites for new fall patterns and then tell you all about them. But I couldn't find a single new pattern that I felt was worthy of a post. What's going on big 5?!?!
So, I strolled on over to Fabric.com and found something even better....new FREE Hotpatterns!
I really want to switch over to slinky pencil skirts and wiggle dresses for fall, but this awesome skirt pattern is making it hard for me to let go of my summer hippie ways.
I really wish I would've seen this great beach bag tote a few months ago~
This is such a pretty little top to transition into fall with.
Round out your new wardrobe with this cute retro playsuit to sleep in.
I think this is a great concept...a scarf that looks like a fun furry vest! It's perfect! All the style with no bulk.
Check out fabric.com for lots more FREE patterns~
Thursday, August 29, 2013
Wednesday, August 28, 2013
Shirred Dress Make-over
Last summer I showed you how to make a shirred sundress for yourself.
As much as I liked my maxi dress and got nice compliments on it, I just wasn't wearing it. It could have something to do with all of the other pretty maxi dresses in my closet but let's not go there.
Instead, let's just make it over so someone else can wear it!
Because the bodice is all elasticized with shirring I didn't even have to change the width at all, just the length.
I was able to cut enough off to use the extra fabric to add straps and a ruffle at the bottom.
She wore her new dress all day which is a pretty good sign that she liked it~
I'm done making summer clothes for myself, but think I have a couple more kids summer projects left to finish up before the weather really changes.
Have you started on fall projects yet or are you like me and still hanging onto summer? Leave a comment below~
As much as I liked my maxi dress and got nice compliments on it, I just wasn't wearing it. It could have something to do with all of the other pretty maxi dresses in my closet but let's not go there.
Instead, let's just make it over so someone else can wear it!
I was able to cut enough off to use the extra fabric to add straps and a ruffle at the bottom.
I'm done making summer clothes for myself, but think I have a couple more kids summer projects left to finish up before the weather really changes.
Such a great model! |
Tuesday, August 27, 2013
Cafe Press
Have you guys heard of Cafe Press?!?!
It's a fun website where you can find loads of different kinds of items that you can customize either for yourself or a gift!
You can design your own T-Shirts:
Simple 1st birthday invites or announcements
or funny birthday invites!
With Christmas coming up soon (I know, I know, groannnnnnnnn) you could let someone else take care of all your Christmas invites~
There's so much more to see there. You can choose from one of the designs on the site or create custom products. Imagine a shower curtain with a photo your family on it, lol, I think that would be pretty funny. Cushions or an iPad cover with your favourite pets photo on it. The options are pretty limitless.
Great for teams too!
Check it out and see what you find there~
*This is a sponsored post however I have not received any compensation and all opinions are my own. All images belong to www.cafepress.ca .
It's a fun website where you can find loads of different kinds of items that you can customize either for yourself or a gift!
You can design your own T-Shirts:
Simple 1st birthday invites or announcements
or funny birthday invites!
With Christmas coming up soon (I know, I know, groannnnnnnnn) you could let someone else take care of all your Christmas invites~
There's so much more to see there. You can choose from one of the designs on the site or create custom products. Imagine a shower curtain with a photo your family on it, lol, I think that would be pretty funny. Cushions or an iPad cover with your favourite pets photo on it. The options are pretty limitless.
Great for teams too!
Check it out and see what you find there~
Monday, August 26, 2013
Board Shorts
They're board shorts! Really they are! It's what all the cool boys in Hawaii wear when they go surfing! At least that's what I keep telling my nephew so he'll wear his new shorts that I made for him.
He's at a funny age where he a lot of rules about a lot of things....like boys shouldn't wear flowers~
We'v all told him that those aren't flowers but he's not buying it. I'm not sure if he'll ever wear these short again, but I still think they look pretty darn cool on him~
Do your kids have funny rules about things? Leave a comment below and share~
Friday, August 23, 2013
Filigree Box
I have two excuses for my late post today. First off, I have some wonderful little visitors at my house, which is always fun. Also, my Silhouette machine somehow developed a mind of it's own and went a little off the deep end taking me with it for a short while.
All in all it's worth it though, because here's what I ended up with:
The shades for my new bathroom lighting fixtures each came in it's own little cube box and I couldn't bear to throw them away. I figured that eventually I'd come up with a use for them. I had plans to cover them all and make a set but as I said above, my Silhouette machine h
ad other plans.
Here's what you need if you want to make your own Filigree boxes.
Materials:
-small box
-Mod Podge, sponge brush
-several sheets of plain paper, several sheets of small print paper
-acrylic paint that matches the colour of your plain paper
-Optional: Brayer
Steps:
1) Paint all of the edges of your box. If you want, go ahead and paint any flaps and the inside top as well.
2) While that's drying, cut out 5 pieces of your printed paper the same sizes as your sides and top of the box. Also, cut 5 in a filigree type design.
WARNING: here's where things went a little haywire for me. At first I tried a very intricate pattern with some Silhouette adhesive backed paper.
It cut but I had to poke out most of the little tiny pieces manually, which caused me to rip the paper from time to time, leaving little white edges everywhere. Not pretty.
Then, I found this lovely butterfly background in the Silhouette catalogue and tried it.
No go, still too much detail. My Silhouette just chewed up the paper.
So, finally I tried this lacey looking background. It worked! sort of. My Silhouette decided to cut the outside border anywhere it wanted to, usually right through the middle or off centre.
Argh! I fiddled with it for several days, so sure that this box design was going to change my life (kidding), and eventually I got it to cut properly, at least every second time I sent it through. I have no idea what's going on with my machine. It may be time to move to the States so I can start entering all the Silhouette Cameo machine giveaways I see all over blogland~
Anyway, enough ranting, now we're onto my favourite part of any project, the Mod Podging!
3) Once your paint is dry, slick a nice heavy coat of Mod Podge all over the side of your box.
4) Lay down a sheet of your printed paper. If you have a brayer this is an excellent time to pull it out and put it to use.
5) Repeat for the other sides and the top. Once everything's in place, go back over everything with another layer of Mod Podge.
6) This time, lay your cut pieces on top.
You can use your brayer again for this if you don't mind it getting a little Mod Podge on it. I used mine and the mess was minimal.
7) Lastly, just for luck, throw one more layer of Mod Podge onto the whole thing. This seals everything down and gives it a nice finish.
And finally, at long last....you are done!
It's actually pretty simple, and if your cutting machine doesn't go crazy you can make this project in about an hour.
It reminds me of the cut stone work that I saw all of India while I was travelling there. If you're brave, you could try this with vinyl and that way you could change out your designs if you felt like it. Try a solid colour behind or some gorgeous sparkle paper! oooh! I think I'm going to do that for Christmas! Look at that, I just inspired myself~
Have a crafty week everyone!
All in all it's worth it though, because here's what I ended up with:
The shades for my new bathroom lighting fixtures each came in it's own little cube box and I couldn't bear to throw them away. I figured that eventually I'd come up with a use for them. I had plans to cover them all and make a set but as I said above, my Silhouette machine h
Here's what you need if you want to make your own Filigree boxes.
Materials:
-small box
-Mod Podge, sponge brush
-several sheets of plain paper, several sheets of small print paper
-acrylic paint that matches the colour of your plain paper
-Optional: Brayer
Steps:
1) Paint all of the edges of your box. If you want, go ahead and paint any flaps and the inside top as well.
2) While that's drying, cut out 5 pieces of your printed paper the same sizes as your sides and top of the box. Also, cut 5 in a filigree type design.
WARNING: here's where things went a little haywire for me. At first I tried a very intricate pattern with some Silhouette adhesive backed paper.
It cut but I had to poke out most of the little tiny pieces manually, which caused me to rip the paper from time to time, leaving little white edges everywhere. Not pretty.
Then, I found this lovely butterfly background in the Silhouette catalogue and tried it.
No go, still too much detail. My Silhouette just chewed up the paper.
So, finally I tried this lacey looking background. It worked! sort of. My Silhouette decided to cut the outside border anywhere it wanted to, usually right through the middle or off centre.
Argh! I fiddled with it for several days, so sure that this box design was going to change my life (kidding), and eventually I got it to cut properly, at least every second time I sent it through. I have no idea what's going on with my machine. It may be time to move to the States so I can start entering all the Silhouette Cameo machine giveaways I see all over blogland~
Anyway, enough ranting, now we're onto my favourite part of any project, the Mod Podging!
3) Once your paint is dry, slick a nice heavy coat of Mod Podge all over the side of your box.
4) Lay down a sheet of your printed paper. If you have a brayer this is an excellent time to pull it out and put it to use.
5) Repeat for the other sides and the top. Once everything's in place, go back over everything with another layer of Mod Podge.
6) This time, lay your cut pieces on top.
You can use your brayer again for this if you don't mind it getting a little Mod Podge on it. I used mine and the mess was minimal.
7) Lastly, just for luck, throw one more layer of Mod Podge onto the whole thing. This seals everything down and gives it a nice finish.
And finally, at long last....you are done!
It's actually pretty simple, and if your cutting machine doesn't go crazy you can make this project in about an hour.
It reminds me of the cut stone work that I saw all of India while I was travelling there. If you're brave, you could try this with vinyl and that way you could change out your designs if you felt like it. Try a solid colour behind or some gorgeous sparkle paper! oooh! I think I'm going to do that for Christmas! Look at that, I just inspired myself~
Have a crafty week everyone!
Thursday, August 22, 2013
Shabbilicious
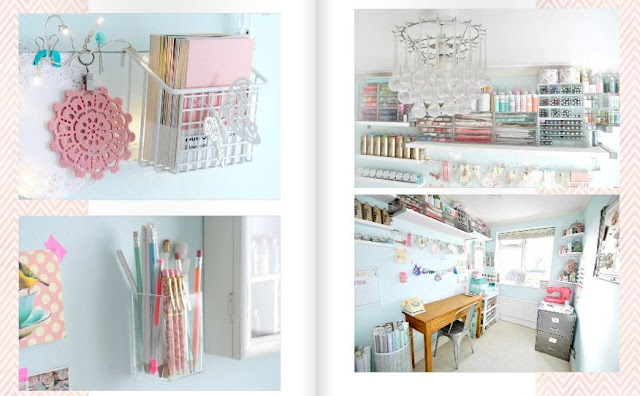
Have you seen the latest edition of Simply Shabbilicious?
The Simply Shabbilicious magazine is created by Kerry-Anne, an Australian artist/blogger.
It's FREE and there's 60 pages of great ideas and inspiration.
The magazine highlights other artists, their creatives spaces, and the shabby chic style.
There are even directions on how to make a little display box like this one.
So pretty! Check it out HERE or go straight to ISSU.com.
Wednesday, August 21, 2013
The Last Summer Dress
I'm trying to hang onto summer but as the mornings and evenings get cooler and cooler, reality has started to seep in and I've realized that this might be the last summer dress I make for myself this year. Boooo hooo!
The fabric is a fabulous coral linen that I picked up from the bargain bin for only a couple of dollars/metre.
New Hairdo! My colleagues at work told me it makes me look younger....so I think I'll wear my hair like this for the rest of my life ;) |
I have made this pattern before, only with sleeves. I love the way the other dresses turned out, I need convincing on this one though.
The yoke looks intimidating but it's surprisingly easy to accomplish~ |
You can see my other two versions HERE.
What about where you live? Are you lucky enough to have an extra long summer or gorgeous weather all year round? Leave a comment below and let me live vicariously through you~
Tuesday, August 20, 2013
Why We Blog
Have you seen this funny video about life as a blogger? (Warning: there are a few swear words used in this video. If this offends you please don't watch.)
I think my favourite line from the whole video is "Sometimes my photos are very bad~". Lol
Sometimes I wonder why I do all this but I can't seem to stop. Why do you blog? Can you relate to the video? Leave a comment below~
I think my favourite line from the whole video is "Sometimes my photos are very bad~". Lol
Sometimes I wonder why I do all this but I can't seem to stop. Why do you blog? Can you relate to the video? Leave a comment below~
Monday, August 19, 2013
Easy Bookmarks
If you've taken to the habit of only reading e-books you may find today's quickie craft a little strange. But for the rest of us who still love to feel the pages between our fingers, this one's for you.
I used my Silhouette to make these but they're so easy you could do them in the same amount of time with a pair of scissors or a craft knife.
Just cut out a shape similar to the one below and then decorate and embellish any way you like.
with measurements:
Use medium to heavy weight double sided paper for the best results.
I'll use just about anything to mark my page, even other books! Most often I end up using a receipt or ticket or something else that's less than pretty. I like these bookmarks much better~
Happy reading!
Subscribe to:
Posts (Atom)