Monday, March 31, 2014
Movie Monday: Crystal Gayle
I'm not sure why but I've been on a big vintage country kick for awhile now and can't seem to get enough of Crystal Gayle.
Maybe I'm just remembering a time when women had real talent and didn't have to walk around on a stage practically naked singing about nothing but sex just to get attention. Or maybe I just really like this song~
Friday, March 28, 2014
Easy Spring Necklace
The sun is shining, the snow is melting, and I can finally go outside without my earmuffs on!! Spring is well on its way!!
I got these pretty fabric covered beads from Wholeport ages ago but didn't know what to do with them until today~
This necklace is pretty simple to make but is so pretty I know it will have big impact when it's on.
Just string your beads onto some clear fishing line, cap the ends, add some jump rings so that you can attach a chain, and then add your closure. See? Super easy!
Is it springtime where you live? After our deep freeze winters up here Spring is a pretty big deal. It'll be a couple of months before we can start thinking about planting but the sunshine brings us hope. Tell us all about spring where you live, leave a comment below~
*This post is sponsored by Wholeport however no compensation was received other than the products shown and all opinions are my own.
Thursday, March 27, 2014
Tell a Tale: Cane River
I know people will sometimes not read a book just because it was an Oprah pick, but don't pass this one by.
Cane River by Lalita Tademy |
Real plantation in Cane River (source) |
It's truly heartbreaking to imagine fellow human beings treated as anything less, but it happened, and all we can do now is remember and learn from that tragic time in history where people owned other people and called them slaves.
What struck me most about these women is that so many of them saw a future for themself that was better than the drudgery they were living. With no reason to hope, that is exactly what many of them dared to do, hope.
Stories like this help me to grasp the incredible progress that has been made in recent times and to fully appreciate the tenacity, the drive, and the accomplishments of people like Barack Obama, Oprah Winfrey, and their predecessors. Their accomplishments could not even have been imagined 200 years ago.
I loved this book, I loved the characters, and I love that Lalita Tademy was able to piece it all together to share it.
Wednesday, March 26, 2014
Some Bunny Loves You
Here's another fun project that you can use with your Silhouette Bunny Shape that I showed you how to make last week~
Inside is just a simple note that I'll add to later:
The inspiration for this card came from this cute card from Sue's Stamping Stuff:
And some beads I got from Wholeport. Make sure to come back on Friday and I'll show you what I made with the beads!
Have you started getting ready for Easter yet?
Inside is just a simple note that I'll add to later:
The inspiration for this card came from this cute card from Sue's Stamping Stuff:
And some beads I got from Wholeport. Make sure to come back on Friday and I'll show you what I made with the beads!
Have you started getting ready for Easter yet?
Monday, March 24, 2014
Movie Monday: Recycled Container Crafting
Here's a great video for all of you who love to craft and recycling at the same time!
Lori has lots of fun projects inspired by Pinterest over at MyCraftChannel. I like that she shares the original inspiration along with her own version as well. Check it out to find your next project!
What's your favourite thing to recycle in crafting? Leave a comment below~
Friday, March 21, 2014
Stenciled Gift Bags
You know how much I love to Mod Podge, so when Amy from Mod Podge Rocks asked if anyone wanted to try out the new Mod Podge stencils that she's designed with Mod Podge, I put my hand up and waved it around with a loud YES, PLEASE PICK ME!!!
While I was off on the other side of the planet a wonderful little package showed up on my doorstep with all of this in it!
I got some lovely gifts for my birthday in these pretty bags and thought if I jazzed them up a bit that they'd be perfect for Easter.
Here's what you need if you want to refashion your own gift bags:
Supplies:
-plain gift bags
-Mod Podge
-Mod Podge Peel and Stick Stencils
-sponge brush
-glitter
-piece of paper to catch your glitter & a spare dry brush to wipe the glitter down
Steps:
1) These stencils are so easy to use. Just peel if off of the plastic backing and place on your bag. I lined mine up with the bottom and even used the outside frame for an additional border.
2) Get your Mod Podge into all the nooks and crannies of your stencils. Don't worry, it's stuck right down so it won't go underneath.
3) Cover the whole thing with glitter!
4) Important: Peel the stencil off while the glue is still wet. This way you can wash it off and reuse your stencil on other projects.
5) It's a mess but let all the extra glitter fall onto a tray or piece of paper (you can reuse that too) and gently brush away any excess.
Check out that chevron pattern. I just love when you can get really crisp detail with glitter and that's hard to do without a stencil.
I've never used Mod Podge with a stencil so this project was a lot of fun for me. Have you ever used Mod Podge in a different way? Leave a comment below and tell us all about it, or leave a link to your project.
*The products above were received free of charge however no other compensation was made and all opinions expressed are my own.
While I was off on the other side of the planet a wonderful little package showed up on my doorstep with all of this in it!
You can see the other stencil designs here. These stencils are Peel and Stick so they stay put, which is nice with such intricate patterns, and they're re-useable!
The hardest part about this project was trying to find something in my house that I hadn't already Mod Podged~
I got some lovely gifts for my birthday in these pretty bags and thought if I jazzed them up a bit that they'd be perfect for Easter.
Here's what you need if you want to refashion your own gift bags:
Supplies:
-plain gift bags
-Mod Podge
-Mod Podge Peel and Stick Stencils
-sponge brush
-glitter
-piece of paper to catch your glitter & a spare dry brush to wipe the glitter down
Steps:
1) These stencils are so easy to use. Just peel if off of the plastic backing and place on your bag. I lined mine up with the bottom and even used the outside frame for an additional border.
2) Get your Mod Podge into all the nooks and crannies of your stencils. Don't worry, it's stuck right down so it won't go underneath.
3) Cover the whole thing with glitter!
4) Important: Peel the stencil off while the glue is still wet. This way you can wash it off and reuse your stencil on other projects.
5) It's a mess but let all the extra glitter fall onto a tray or piece of paper (you can reuse that too) and gently brush away any excess.
Check out that chevron pattern. I just love when you can get really crisp detail with glitter and that's hard to do without a stencil.
I've never used Mod Podge with a stencil so this project was a lot of fun for me. Have you ever used Mod Podge in a different way? Leave a comment below and tell us all about it, or leave a link to your project.
*The products above were received free of charge however no other compensation was made and all opinions expressed are my own.
Thursday, March 20, 2014
Tell a Tale: The Flower Boy
When you backpack, you rely on "Give a Book/Take a Book" shelves at each stop you make. That way, your pack doesn't get too heavy. Some stops you'll find nothing but horror books written in German, but once in awhile you really luck out and find an incredible gem, like this one~
The Flower Boy by Karen Roberts |
Summary (from Goodreads): The charming and resourceful 4-year-old at the center of Karen Roberts's The Flower Boy enjoys roaming around his environs, and who wouldn't: this 1930s Ceylon tea plantation is so splendid and enchanted that "one almost expected to see a gnome scuttling away into the undergrowth, or a couple of fairies swinging from the vines." But Chandi's mother is a housekeeper, his father is too poor to give up his job in a distant village, and the child dreams of "a house of his own, not a room off the kitchen. " In other words, he wants the life of John Buckwater, the English planter his mother works for. And although Chandi has an enterprising business of hawking stolen flowers to the English upper crust, he sees a trip to England, where everyone "seemed to have huge bungalows and beautiful books and red-and-green checked shorts," as a faster way to achieve his goals. As the years go by, the slowly developing relationship between Buckwater and Chandi's mother, Premawathi, gives him hope that someday he'll continue his education in England.
Lush with period detail, Roberts's debut is elegant and moving. These are decent people following their hearts--yet in a situation where doing so will lead to disappointment, if not tragedy. Roberts is most effective when showing how this reality, intertwined with a distant war and the crumbling of an empire, cuts through Chandi's naive perspective and willed paradise. -
Ceylon 1930's (Modern day Sri Lanka) (source) |
You will fall in love with the characters, even the ones who you want to shake some sense into, as they each meander in their own clumsy way through 1930's and 40's Ceylon.
I loved how the characters developed and changed as time marched on. I hope I'm not giving too much away to say that I wasn't overly satisfied with the ending though. I wanted different things to happen and for life long dreams to be fulfilled. Instead I was heartbroken and felt like the last words on the last page came far too abruptly.
That being said, I think it's a the sign of a good book to make you feel this way. It's the goal of every writer to make the reader become so invested in all of the characters and the storyline that they become passionate about it all and never want it to end.
Tuesday, March 18, 2014
Shopping for Fabric in Australia
One of the highlights of my trip to Australia last month was a day I spent in Cairns with fellow blogger Jill from Creating My Way to Success (Jembellish.com). I've been following Jill's blog for quite some time and try to participate in her weekly linky party whenever I have a project to share, so I was thrilled when she agreed to meet up!
Jill was so lovely. She even invited me to her home where we had a nice lunch and talked blogging and crafting. (I can't tell you how nice it is to talk to someone else who's into blogging and doesn't look at you like your nuts when you talk about things like linky parties, sponsors, and stats.)
Then I twisted her arm (pretty easily) and asked her to take me to her favourite fabric store in town, so we went to a place called Spotlight.
Spotlight is sort of like Micheals here in North America, except that Micheals doesn't have fabric and housewares like Spotlight does.
Look at this super cool fabric we found!
I know what you're thinking...Big deal, you found a crocheted throw...but no! It's printed cotton!!
Isn't that cool?!?!?! If the exchange rate on the Canadian dollar hadn't been so bad I definitely would've picked up a metre of this stuff. You could make so many fun projects with it.
Luckily for Jill, I didn't turn out to be a big hairy and scary man (inside joke) and we had an awesome day.
Of course, I was on the lookout for fabric/craft stores everywhere I went though.
I just happened to glance up at the right time when I saw this sign in downtown Cairns.
Other than the massage sign, the laneway didn't look too scary so I went down to check it out.
JACKPOT!!! Along with $3 fabric, this place is a trim lovers dream!
I broke my No New Supplies fast and bought a couple of metres of rainbow coloured stretchy elastic for more homemade undies.
I also found another great store in downtown Sydney. For the life of me I can't remember the name but they also had EVERYTHING you could ever need.
Love that pre-gathered, pre-shirred, pre-ruffled pink fabric at the top. Just make it into a tube and you'll have a little girls dress lickety split.
I even managed to find the fabric store in Vanuatu!
The prices were great here but I only had a little bit of Vanuatu currency left so I had to settle for only 1 metre of the green floral in the bottom right corner.
The great thing about travelling with a backpack is that you really have to consider every purchase, because you'll be lugging it around with you everywhere you go. So, even though I kept my purchases to a minimum I had a ball just checking things out.
Do you search out fabric stores when you travel? Have you ever met up with a fellow blogger? Tell us all about it below!
PS...thanks again to Jill for a wonderful day! Make sure to check out her blog (she knows how to refashion an recycle like a pro) and join her linky party every Monday~
Jill from Creating My Way to Success & Me in Cairns, Australia! |
Then I twisted her arm (pretty easily) and asked her to take me to her favourite fabric store in town, so we went to a place called Spotlight.
Spotlight is sort of like Micheals here in North America, except that Micheals doesn't have fabric and housewares like Spotlight does.
I know what you're thinking...Big deal, you found a crocheted throw...but no! It's printed cotton!!
Isn't that cool?!?!?! If the exchange rate on the Canadian dollar hadn't been so bad I definitely would've picked up a metre of this stuff. You could make so many fun projects with it.
Luckily for Jill, I didn't turn out to be a big hairy and scary man (inside joke) and we had an awesome day.
Of course, I was on the lookout for fabric/craft stores everywhere I went though.
I just happened to glance up at the right time when I saw this sign in downtown Cairns.
It says "15 metres down the laneway" |
JACKPOT!!! Along with $3 fabric, this place is a trim lovers dream!
I broke my No New Supplies fast and bought a couple of metres of rainbow coloured stretchy elastic for more homemade undies.
I also found another great store in downtown Sydney. For the life of me I can't remember the name but they also had EVERYTHING you could ever need.
Love that pre-gathered, pre-shirred, pre-ruffled pink fabric at the top. Just make it into a tube and you'll have a little girls dress lickety split.
I even managed to find the fabric store in Vanuatu!
The prices were great here but I only had a little bit of Vanuatu currency left so I had to settle for only 1 metre of the green floral in the bottom right corner.
The great thing about travelling with a backpack is that you really have to consider every purchase, because you'll be lugging it around with you everywhere you go. So, even though I kept my purchases to a minimum I had a ball just checking things out.
Do you search out fabric stores when you travel? Have you ever met up with a fellow blogger? Tell us all about it below!
PS...thanks again to Jill for a wonderful day! Make sure to check out her blog (she knows how to refashion an recycle like a pro) and join her linky party every Monday~
Monday, March 17, 2014
One Way Trip
Have you heard about the planned colonization of Mars???? (Yes, I'm serious, it's real.)
This is a short film covering conversations with 5 of the people who are still in the running to be chosen to go.
Mars One Way from VITA BREVIS FILMS on Vimeo.
I find it a bit troubling that most of these people seem to be wanting to escape Earth more than they want to embark on a monumental journey of discovery, but what do I know?? Maybe they all just need a great big hug and then they might change their minds.
You can learn more about the entire project HERE. What makes me the most nervous about it all is that I would've thought that the people who are organizing it would have far more education and experience in the fields of study like engineering, physics, mathematics, science, etc. Some of these people only have a Master's or a B.A degree!
I wish them all luck, but I think I'll be watching this one from afar~
Friday, March 14, 2014
Bunny Build on Silhouette
I don't normally even notice Easter is here until a couple of days before, but for some reason I couldn't get bunnies out of my head.
You can purchase bunny shapes for your Silhouette cutting machine from the online store, but I found that it was just as easy to make my own.
All you need is the Silhouette software and machine and some pretty papers.
Let's start with the basic bunny shape and then I'll show you what you can do with him
Steps:
1) Start with a basic circle. This can be any size, you can always shrink or expand the shape once you've completed the whole thing if you want.
2) Add another, slightly larger circle below and overlapping just a bit at the bottom of the first circle.
3) Now we need to add some ears. Use your circle button but don't hold down the shift key. This way you'll be able to make a nice long skinny oval.
4) Use the mirror right button to make the other ear.
5) Now select everything and group it.
There you go! You made a super cute little bunny. Now for some even easier projects!
IMPORTANT:
Before you start the first project make sure to make a copy of the shape above and set it to the side.
Bunny Card
Steps:
1) Using the replicate button, copy the shape two times to the right and then move them over just slightly so that they're overlapping on the sides.
2) Select everything and group it.
3) Keep your shape selected and hit the Mirror Above option. Again, move the shapes just a tiny bit so that they're overlapping at the ears.
4) Select everything and group it!
5) Select your shape and hit the Offset option in the bottom left hand corner of your screen.
6) Now just move the inner bunnies off the page so that you can cut the background piece from some plain cardstock.
7) Move the background out of the way and cut the inner bunnies from some pretty printed paper.
8) Using your favourite adhesive, glue the pieces together and fold down the middle.
9) Use a pompom or a cotton ball to add some cute little tails and just add your sentiments inside~
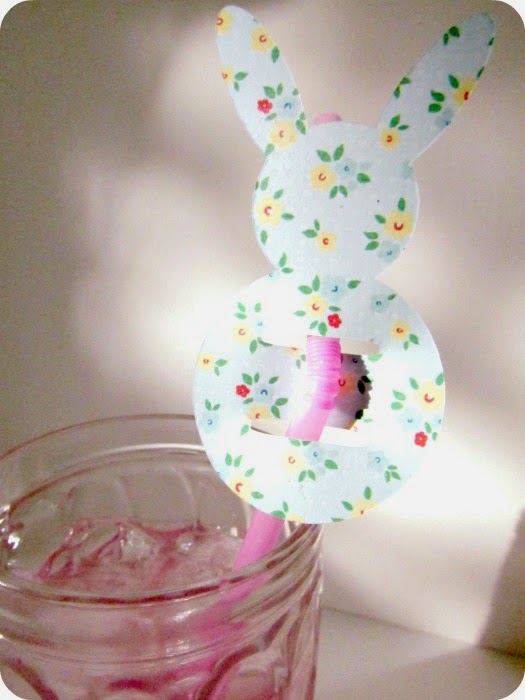
Straw Holder - Once you have your bunny shape completed this project couldn't be any easier.
Steps:
1) Remember that little bunny copy that you put to the side earlier? Now is the time to pull it out into the spotlight. Now just use your oval tool to add two little slits in the body of your bunny, group it, and you're ready to cut!
There you go! I might even make a banner with this shape, or some more cards! What will you make??
Leave a comment below~
You can purchase bunny shapes for your Silhouette cutting machine from the online store, but I found that it was just as easy to make my own.
All you need is the Silhouette software and machine and some pretty papers.
Let's start with the basic bunny shape and then I'll show you what you can do with him
Steps:
1) Start with a basic circle. This can be any size, you can always shrink or expand the shape once you've completed the whole thing if you want.
This will be the head. |
3) Now we need to add some ears. Use your circle button but don't hold down the shift key. This way you'll be able to make a nice long skinny oval.
4) Use the mirror right button to make the other ear.
IMPORTANT:
Before you start the first project make sure to make a copy of the shape above and set it to the side.
Bunny Card
Steps:
1) Using the replicate button, copy the shape two times to the right and then move them over just slightly so that they're overlapping on the sides.
6) Now just move the inner bunnies off the page so that you can cut the background piece from some plain cardstock.
7) Move the background out of the way and cut the inner bunnies from some pretty printed paper.
8) Using your favourite adhesive, glue the pieces together and fold down the middle.
9) Use a pompom or a cotton ball to add some cute little tails and just add your sentiments inside~
Straw Holder - Once you have your bunny shape completed this project couldn't be any easier.
Steps:
1) Remember that little bunny copy that you put to the side earlier? Now is the time to pull it out into the spotlight. Now just use your oval tool to add two little slits in the body of your bunny, group it, and you're ready to cut!
Leave a comment below~
Subscribe to:
Posts (Atom)