Wednesday, September 29, 2010

Show & Tell-Beaded Jewellery

Last week I showed you some hemp jewellery I made ages ago.  I thought I'd continue the theme this week and complete my jewellery era.

For a few years I focused most of my crafting efforts on jewellry making.  I amassed quite an inventory of  pretty beads and findings, most of which I still have.  Somewhere along the line it became too tedious and I went back to my first love ... sewing.

So, here's a little trip back in time looking at some of things I used to do.  As with most things I create, I tried to keep the pieces simple but stylish:

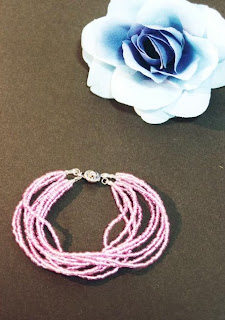
beaded bracelet, DIY beaded jewellery, pink beads, DIY beading, DIY Jewellery

Floating necklace, DIY jewellery, beaded jewellery, DIY beading project, flower necklace, DIY Jewellerybeaded hairpins, DIY beading, flower pins, floral hair pin, floral beads, beaded bobbypins, DIY bobbypins, DIY Hair Accessories


beaded rings, DIY beading, DIY beading project, DIY rings, beaded jewellery, DIY jewellery
beaded rings


beaded jewellery, beaded rings, DIY jewellery
More beaded rings


DIY jewellery, DIY beading, DIY anklet, beaded anklet

Is there anyone else out there who throws themselves into something, collecting everything you could possibly need to create almost anything, and eventually finds some other sparkle that catches your eye? 

This is the one and only reason that I've held myself back from scrapbooking.  There are just way too many fun things to purchase.  I think I'd end up spending all my time in the store, and very little time actually scrapbooking.  Let me hear all about your craft inventories so that I know I'm not the only one!

Friday, September 24, 2010

Calendar Art

Here's something you don't know about me yet....I love shoes.  I mean, I really L-O-V-E shoes!

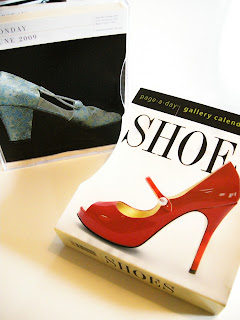
Last year I got a beautiful Page-A-Day calendar that treated me to a different image of an incredible shoe every day.  It was the best way to start my day.

shoe calendar, calendar crafts, calendar art


At the beginning of this year, I tried to reuse my calendar.  I thought that as long as I only paid attention to the number of the day and ignored what day of the week the calendar said it was that I could still enjoy it for another year.  Of course, it didn't take long for me to get confused and to start booking work meetings on the wrong days. 

So, in the drawer it went.  But I missed all the pretty shoes.  What to do???

Create some art...

I didn't take pics of every step but this is another one of those 'it's so simple it doesn't need a tutorial' projects.  I think you'll figure it out as we go along:

Here are the supplies I used:   
-small canvases
-acrylic paint and a sponge brush
-clear photo corners
-straight edge and rotary cutter or scissors
-calendar images


Steps:
1)Paint your canvases with the paint.  Don't forget about all of the sides.  Let dry.

2)Crop images to delete any dates and to fit on top of your canvas.


3)Once dry, measure the centre of the canvas to determine placement of the image.

4)Place a photo corner on each corner of your image and pull off any backing.


5)Place image on canvas and press down photo corners.


6)Hang on wall and enjoy!  (I'm loving the 3M adhesive strips for placing light weight art on my walls)


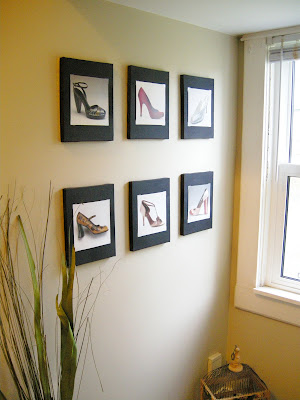
Shoe Calendar as Art, DIY Art ideas, Shoe Art, calendar recycle, easy crafting, easy dIY, easy DIY art, dollar store art
Tah Dah!
I have this up in a funny little alcove in front of my basement door.  It's the perfect small space for this project.

If you have a really beautiful calendar like I do, you've got 365  images to choose from.  The fun part is, because you didn't glue down the actual image, now you can change out your calendar pics as often as you like!

For Christmas I'm going to pull out all of the pretty red shoes.  In summer I might use all of the sandals.


This line of calendars also does one for purses that I'd love to get my hands on.  A travel calendar would be awesome to use too!

What do you think?  Any ideas for other images you could use? Try it out and let me know how it looks in your home.

(This project will be posted throughout the week at the linky parties from the linky party tab above.  Check out the sites for more great ideas!)

 BetweenNapsonthePorch was my top referrer last week, so go visit Susan and
check out Metamorphosis Monday for other fab ideas from her linky party!


(The biggest linky party happens on Tuesdays over at todayscreativeblog.)

Wednesday, September 22, 2010

Show & Tell-Hemp Jewellery

I've been hopping around the blogosphere alot lately and am so inspired.  I don't know how so many people out there are able to raise children, go to work, make crafts, and post every day.  How do they do it all?  It boggles my mind...but it inspires me too!

So, if they can get all that done then I think I can add an extra surprise post every once in awhile.  I have so many different things that I want to show you so, I've decided to try to add a "Show and Tell" post from time to time.  I'll show you some clothing, jewellery, and other things that I've made for myself or other special people in my life that don't make it into the Etcetorize Etsy Shop.  There won't be any tutorials on these posts, just fun pictures to look at.

I thought I'd start with some Hemp Accessories: 

It seems like a lifetime ago that I used to live in Japan.  While I was there I really immersed myself into the craft culture.  They have the most amazing craft and fabric stores there.  And so many gadgets!  I wouldn't mind taking a trip back there just to see what they've come up with while I've been away.

One of the things that I spent alot of time on  while I was there was all kinds of jewellery making.  I learned beading, weaving, wire working, and knotting.  Today I'll show you some of the more interesting pieces of Hemp accessories that I made while I was overseas.

blue hemp choker, hemp necklace, hemp crafts, DIY jewellery, hemp jewellery, macrame jewellery
Blue Choker

hemp necklace, hemp crafts, hemp jewellery, DIY jewellery, macrame jewellery
Squiggle Choker


hemp accessories, hemp crafts, , DIY Jewellery, hemp jewellery, macrame jewellery
Jean Accessory

hemp accessories, Chopsticks, embellished chopsticks,DIY Jewellery, hemp crafts, hemp jewellery, macrame jewellery
Chopsticks (for your hair)
 I became so obsessed interested that I even started reading about sailors knots and tried a little macrame.  I remember I had big plans to wrap all kinds of cutlery and wine glasses but I never did get around to it.  Probably a good thing...my bags coming back were heavy enough already!
Japanese crafting books are the ultimate.  If you ever come across one, don't let the language scare you away.  They're so well illustrated that they're not difficult to follow at all.


Most of the Japanese crafting books that I have start out with a technique guide to show you the basics.  Then it gives you loads of beautiful pictures of great projects.  This little book has over 20 projects...and all for under $5!!

What do you think?  Have you ever tried learning a new craft in a different language?  I hope this inspires you to look at hemp knotting differently and maybe even give it a go in a new and exciting way~

(These projects will be posted throughout the week at the linky parties from the linky party tab above.  Check out the sites for more great ideas!)

Friday, September 17, 2010

Pretty Tacky

If you read my post on inspiration boards you'll remember how much I enjoy collecting images for inspiration to post all around me in my studio.  I have three cork boards that I use for this and have gone to some effort to make them all pretty so that they coordinate with the rest of decor in the room.

So, the boards are pretty, and the pictures are pretty, but what about what you use to keep the pictures up there?  Not so pretty~

You could go out and spend a fortune on beautiful designer tacks (I've seen them as high as $20 for a package of 4!) or you could easily make your own in a matter of minutes and at a fraction of the cost.

This is so super easy that it doesn't really need a tutorial but here it is anyway...

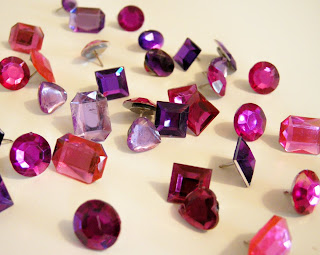
1) Here are the supplies that I used:


2) To make things quick and easy, turn all of your rhinestones and tacks face down on the table.  This makes them easier to pick up when hot glue is oozing out of your gun.

3)Place a small amount of hot glue or other adhesive onto the back of your rhinestone and apply to the top of the tack.


4) Let dry


DIY Decorative Tacks, Bulletin Board Crafts, Creative Tacks, Easy Crafts, Pretty Tacks, Embellished tacks

It's that easy!  Aren't they pretty?!?  Get creative with what you use.  You could try buttons, silk flowers, chipboard shapes, etc.  Anything goes.  Try it and let me know what you come up with~


(This project will be posted throughout the week at the linky parties from the linky party tab above.  Check out the sites for more great ideas!)

This project was featured here: 

Small Things


Friday, September 10, 2010

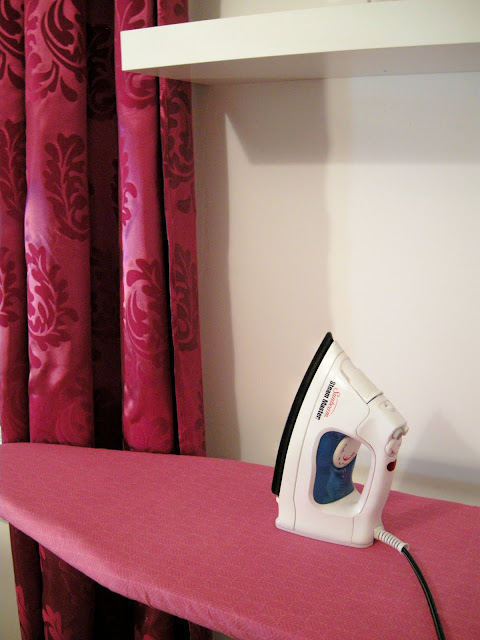
Super Hot (Super Easy) Ironing Board Cover

This is a project that I've been putting off for way too long.  Like anything that we procrastinate about, in the end it was painless and I'm so happy that I've finally made the change.

I moved into a 'new' house two and half years ago.  And when I did, I changed the colour scheme of my studio.  It used to be lovely shades of blues and ivories in floral and paisley patterns.  Now it's pure white with a few splashes of hot, hot pink.

Everytime I need to use my ironing board, which is almost every day, I cringe at the sight of it.  I started looking for a new cover 2 years ago that would match the rest of the decor but I have yet to find a hot pink cover that fits the board.


I know, I know, I can already hear you saying "Tamara....you're a sewer aren't you?  Why don't you just make one????"  Good question.

My excuse was that because I didn't want a seam across the middle of the board that it would take alot of fabric, so economically speaking I thought I'd be further ahead by just buying one.  But after patiently waiting for the past two years, I had to admit I was just avoiding it for no good reason at all.

So, finally, at long last, my quest for the perfect ironing board cover has come to an end!  I found some nice pink cotton fabric for a steal and I even bought extra so that I can make other matching items for the room.  (Note, if you plan on doing this project, you should pre-wash your fabric and if you're really nervous about colourfastness add a little salt to your wash water.)

Of course, it was the easiest thing in the world and requires very little sewing.

1) Lay out your fabric and trace the shape of your ironing board onto the wrong side, giving yourself an extra 3.5 inches to fold underneath.

I have a great little tracing wheel with chalk that I used to mark 3.5 inches but you can use anything.  If it leaves a mark it will be on the underside of the board and who goes down there???

2) Cut your fabric out.


3) If you have a serger, serge the edges.  If not, either zigzag or just fold under.


If you're really a perfectionist and you're still worried about people going underneath and seeing an unfinished hem you could always use bias tape to bind the edges. 

4) Make a narrow casing all around the edge.  Sew a simple half inch seam all the way around, leaving a small opening at the straight end of the board to pull your lacing through.


5) Measure a piece of ribbon, string, or elastic that will be several inches shorter than the length of the casing.  I had some hemp string left over from my jewellry making days so I just used that.

Pin a large safety pin to the end of whatever type of string you're using and thread it all the way through the entire casing.


6) Now just place your cover onto your ironing board, make sure there are no creases, and pull the string as tight as you can and tie tightly

Voila! That's it.  I left my old covers on underneath to give it some padding and to ensure that I don't accidentally heat up the metal frame underneath.
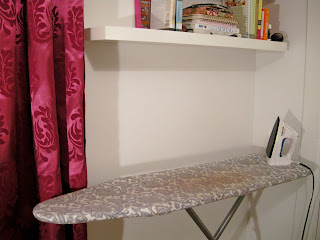
 

Old Cover


DIY Ironing Board Cover, Fabric Ironing Board Cover, Sew an Ironing Board Cover, easy Ironing board cover
Tah Dah!!!

Doesn't that look so much nicer?  The whole project took less than a half an hour!  I have no idea why I put it off so long.

What do you think?  Do you like before or after?  Are you going to go for it and add some pizazz to your ironing routine? Let me know.

(This project was posted on all of the linky party sites on the linky tab above)


Friday, September 3, 2010

Inspiration Boards

I found myself admitting to a friend this week that I have a small obsession, and it started when I was very young.  I absolutely love going through old magazines, travel brochures, and the internet looking for images that catch my eye.  I can't help but cut them out and add them to my already huge collection.

My mom recently found my very first scrapbook and gave it to me.  We had a good laugh as we looked through it.  And then laughed some more when I said, "You know, I still do this!"

My First Scrapbook
When I was little, my mom must've felt very sorry for her little girl who looked through her magazines over and over, each time returning to the same pages just to look at the pretty pictures of Breck girls, coloured Easter eggs, Barbies, and ruffled bed spreads.  Finally, she bought me a book and let me cut the pictures out so that they would all be in one place, and probably so that I would stop asking to look at her magazines~  I think this may have been a very early version of what we now know as Vision Boards.

I've progressed somewhat.  I have nice books and folders that I put my collections into.  And everything is sorted by travel, fashion, hairstyles, home decor, colours and textures, etc.  You name it and I probably have a book full of pictures of it.


I thought I had come up with the best solution when I start pinning up inspiration pics on cork boards in my studio:


And then I found Pinterest!  It takes this whole thing to the next level!

Pinterest is a place where you can pin online images onto boards that you create online!  You can view other people's boards and re-pin images of theirs that you like.  If you don't mind giving up some control you can even open your boards up so that other people can add to them.  (I haven't tried this feature out yet~) 


You have to create an account once you've received an invitation to join, and then there's a bit of downloading involved, but in the end, it's worth it!

It's a great way to waste time and to avoid doing all kinds of other things I should be doing.  It's also a very convenient way for me to see photos and images of things that I love and am inspired by.

Try out pinterest and let me know what you think.  Do you have other ways of collecting inspiration?  Leave a comment and let me know!

Coming soon: ironing board cover

Linkwithin

Related Posts Plugin for WordPress, Blogger...