Showing posts with label beadwork. Show all posts

Friday, November 16, 2012

Beaded Headbands

Party season is coming up soon and today's project is the perfect way to add just a bit of sparkle and pizzazz to your outfit without blinding your dance partner.

DIY Beaded Headband, Make your own headband, DIY Hair accessories
Here's what you need to make your own:


Materials:
-headband
-small gauge wire (make sure your beads will fit onto it)
-beads
Optional: Round nose pliers

Steps:
1) Cut a piece of wire at least 1 metre (39") long.


2) Using your pliers wrap one end of the wire to make a small ball.  If your wire is soft enough you can probably  just bend it with your fingers.  There is no technique to this, you just want something that will stop the beads from sliding right off the end.


3) Start loading up your wire with various beads.  Use different sizes, some matte some sparkly, etc.  This will give it more variation and create more interest.


4) Once you've filled up your entire metre of wire with beads create another 'knot' at the end, again this is just so that the beads won't fall off.


5) Wrap your beaded wire around your headband.


6) You should have enough wire to circle back to create a criss-cross pattern.


7) Tuck the end in and bend it so that it's secure and that's it!  You're ready for the party!


I had another headband that I never wear so I created another bead mix out of these beads:


and made this one!


I added a little beaded bouquet of flowers to this one too.

As you can see, I don't really wear my headbands the traditional way with hair pushed back.  I wear them more like little crowns or tiara's.  They feel more special that way~

DIY Beaded Headband, Make your own headband, DIY Hair accessories

I know someone will ask, so I'll just say now, that they don't hurt when you put them on, at least not any more than any other headband does.

What do you think?  Are headbands just for little girls or would your wear something pretty like this yourself?  Leave a comment~

This project was featured here:

Beyond The Picket Fence

Friday, July 13, 2012

Bead Buster Garden Ornament

I am determined to use up what I have.  I have so many crafting supplies and fabric in my stash that it's a little out of control.

So today's project is a great way to use up all of those left over beads that you don't know what to do with (even the wonky ones!).

 
Here's what you need:


-wire coat hangers
-assortment of colourful beads, all shapes, sizes, and colours
-medium guage wire
-heavy duty wire cutters, jewellery making pliers/cutters

Steps:
1)  Using your heavy duty wire cutters, cut the top of your hanger off.


2) Straighten out your hanger and bend into a shape you like.

Look at the gorgeous blue sky!
I couldn't possibly sit inside crafting today~
3) Cut a piece of medium guage wire about 18" (46cm) long.

4) Make a small loop at one end to make sure your beads won't fall off.


5) String on your beads.  Don't worry about design or pattern, just have fun and throw them on willy nilly.


6) When your wire is almost full, make another small loop at the other end to make sure your beads stay on.

7) Wrap your beaded wire around the hanger wire shape that you made.


8) Repeat all of these steps using your second wire hanger.

9) Hold your two pieces of decorated hanger together and bind together with the medium guage wire.  I bound mine in two places but you can do as much or as little as you want.


And there you go!  Beads used up!  Ugly wire hangers recycled!  And a pretty ornament in your garden to catch the light.


I know, it sort of looks like something that my five year old niece made at day camp but, I love how the beads sparkle in the sunshine.  And...it almost looks like a butterfly, don't you think?!?!


This would be lots of fun to do with kids!  Add beads that hang or glow in the dark! Give it a try and let me know how yours turns out~

Happy Crafting Everyone!

Wednesday, December 21, 2011

Holiday Recap: Wine Gems

Here's another fun and super duper easy project that I shared with you all last year.  In case you missed it the first time around, here it is again:

Wine Gems
(originally posted December 8, 2010)

Right before Halloween I saw something similar in a store for a crazy amount of money and I thought, 'Hey, I can do that!'....so I did.


Naked Wine Glasses


DIY Wine Gems, DIY Wine glass holder, DIY Wine glass decoration, embellished wine glasses, easy Christmas craft, Christmas wine glasses
Christmassy Wine Glasses!

  The hardest part about this is making sure that none of them are the same ... oh, and cleaning up all the little seed beads that don't make it onto the wire~

Let me know what you think.  Someone I know will be getting a set that aren't quite so holidayish.  That way they can be used all year round!  How do you think these would go over for the beer drinkers out there?  Maybe they'd like a little pizazz on their beer bottles too~

------------------------------------------------
Only a few more days left!!!  Are you almost ready?!?!

The Make it Great Monday linky party is still open, make sure to add your creative treasures before Christmas~

Thursday, December 8, 2011

Ornament Challenge: Beaded Icicles

OK, I've been playing it pretty simple in the great Christmas Ornament Challenge that my good friend Gen from Cabin Fevered Gem has challenged me to.  I thought because she's fairly new to crafting that I would take it easy on her, but she has proven to be a worthy opponent.  So, now there's no holding back!  Let's make some ornaments!

Today I'm going to draw on my jewellery making skills, and huge stash, to come up with something really special.

Here's what you'll need:


Steps:
1) Cut different lengths of wire from 3" - 5" inches long.  You only need as many as your jewellery finding can hold. (Note, I would normally use monofilament instead of wire but I didn't have any crimper beads.  You can substitute whatever works best for you, just make sure it fits through your beads and findings first.)


2) String one end of the wire through a hole in your finding and loop.


3) String various beads onto your wire.  Use different colours and shapes to add some special interest.


4) At the end, use your round nose pliers to make another small loop to secure the beads.


5) Repeat until your finding is full.


6) You can use ribbon, beaded monofilament, or more wire to add a hanger to the top.

beaded icicles, DIY Christmas ornament, Beaded ornament, DIY Christmas, Christmas craft


Tah dah! How's that for some sparkle and pizazz for your tree?

I think it's the prettiest icicle I've ever seen~
 Head on over to Cabin Fevered Gem to see what she made today.  And if you're making ornaments along with us make sure to link up to the Make it Great linky party.  It's open all week.  I can't wait to see all of your beautiful ornament creations!

Only a couple of days left to enter the surprise giveaway...get your comments in before Saturday!

Friday, February 25, 2011

Butterfly Bookmarks

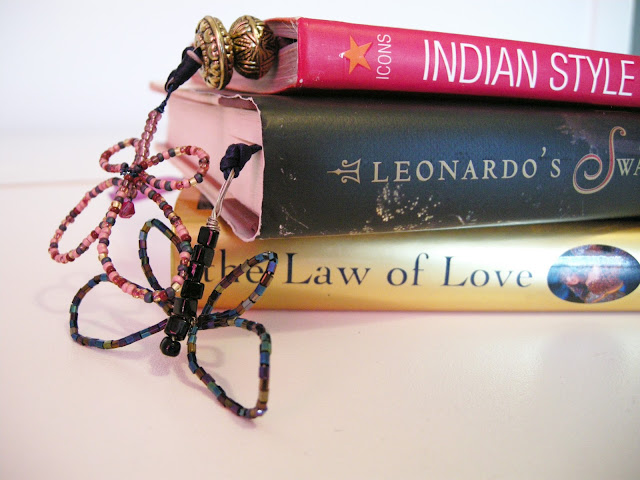
The weekend tutorials for the last two weeks seem to be pretty popular.  Last week I showed you an easy sewing technique to add Fluttering Butterflies to a top.  And the week before that we made some pretty Book Jewellery .  So I wondered....hmmm, what would happen if I put the two ideas together???

That means today we're going to make Butterfly Bookmarks!!

Here are the supplies you'll need:


Round nose pliers are optional.
Steps:
Body
1) Cut 1 piece of wire approximately 5" (13cm) long and gently bend it in half.


2) Thread two medium size beads onto the wire, meeting at the bend.  Now create a loop in the bent end by twisting the wire.

This is the head of the butterfly.

3) Thread 6-10 medium size beads onto both wires to create the body.


4) Twist the wire at the bottom of the beads, creating another larger loop.  Secure the wire by twisting and winding.

Wings
1) To make the wings of your butterfly cut 1 piece of wire approximately 12.5" (32cm) long.  Gently bend it in half and secure onto the butterfly body approximately 1/3 down the body.


2) On one side, thread approximately 40-50 small seed beads onto your wire.


3) Gently bend the wired (with the beads) to make the top wing.  Twist the bottom of the wing near the body to secure the beads.


4) Now thread 30-40 more small seed beads onto the remaining wire to create the bottom wing.


5) Again, gently bend, twisting at the bottom to secure the beads.  Make sure to leave a small bit of wire as a tail to secure the two wings together.


6) Repeat these steps on the other side.


7) Twist and wind the tails of wire together until you feel like everything is secure.  Make sure to flatten out any sharp wire edges with your pliers.  Cut off any excess.

Bookmark
1) Cut some ribbon approximately 25"-30" (65cm-76cm) long.

2) Thread your ribbon through the bottom wire loop of the butterfly and knot at the halfway mark.


2) You can stop here, but if you want to add a little extra pizazz, add one or two large beads and knot.


Make sure your beads have a large enough hole to accommodate your ribbon.  If you have problems you can try twisting the ends of your ribbon together so it will fit through.  Or, wrap the end with tape and cut it into a sharp point.  If that doesn't work, you'll probably need to find larger beads.


3)Near the bottom of your ribbon tie another knot, add another bead, and then knot again.


And voila!  You now have a very pretty Butterfly Bookmark!


It looks like alot of steps, but in reality it's very easy and goes by quickly.

You can get super creative and try different combinations of beads and ribbons.  If you're a super perfectionist or true lepidopterist (someone who studies moths and butterflies), you may feel the need to get alot more symmetrical and colour accurate than I have.

Here are some other ones I've made:


Butterfly Bookmark, DIY Bookmark, Butterfly, Bookmark Craft, Beaded Bookmark, Beaded Butterfly, book jewellery, bookmark jewellery


So pretty, don't you think?  They're a great handmade gift for book lovers.  Leave a comment and let me know what colours you would make, or how you would add to this fun craft.

(   For the record...next week we will not make anything with butterflies or bookmarks  ;)    )

Check out the great linky party tab up top. I've been trying out some new parties and am so happy that I'm getting lots of new visitors!

Linkwithin

Related Posts Plugin for WordPress, Blogger...