Showing posts with label transformation. Show all posts

Friday, July 6, 2012

Summer Scarf Halter II

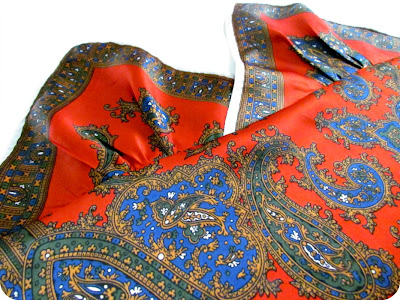
Apparently the dance of veils is not over...I still have two scarves left to make something with.  So, today, let's make a new version of the Scarf Halter top for summer.
scarf refashion, how to turn a scarf into a top, Scarf halter, Scarf top
Here's what you'll need:

Materials:
-Large scarf (mine is about 26" (66cm) square)
-thread, scissors, pins
-sewing machine and measuring tape (not pictured)

Steps:
1) Fold your scarf in half and cut along folded edge.
Now you have two pieces.


2) Take one piece and cut a 2-3" strip off the cut edge. (This step is optional if you need larger halter pieces and will make straps out of an alternate material.)


3) Cut your strip down the middle so that you'll have two long strips 1-1.5" wide.


4) With the remaining piece from step 2, fold over corners to create triangles on either end.  Cut the bottom layer of the scarf along the inside edges.


These are all of the pieces you should have.

2 long skinny pieces, 1 large rectangle (half of scarf), two small squares. Plus you'll have one small squarish piece that you don't need right now but hang onto it.

5) Fold the small squares to make a triangle.  Press the folded edge.  Zig zag or serge the unfinished edges and stitch along the inside of the finished edge.  This creates lined halter pieces.


6) Measure in approximately 3" in from each corner.  Stitch long basting stitches in between your marks to gather.


7) Find your large rectangle and mark the centre of the cut edge.  Place your halter pieces on either side.  You can overlap yours like I did to ensure good coverage, or if you're a little more daring and you're lucky enough to have cleavage that you like to show off, you can have the triangles meet at the centre. In either case, pin your pieces right sides down, raw edges even, and stitch in place.

8) Make sure you're happy with the fit and finish the raw edge with a zig zag or serger.  Pull out your basting threads and press the seam allowance down towards the bodice all along the entire edge.


9) I was originally going to use the long skinny pieces to create a band in between the bodice and the cups but changed my mind and decided to use them as straps instead (straps are pretty important in this project).  So, fold your skinny long pieces in half lengthwise with right sides together and stitch.  If you want wider straps use a smaller seam allowance.  I ended up using a 3/8 seam allowance for spaghetti type straps.


Trim your seam allowance and turn your strap so that it's right side out.  You can use a turning tool like I have or just use a small safety pin to guide the strap inside itself.

10) Attach one strap to each triangle bra top corner.


11) My scarf won't reach all the way around my back to overlap and secure closed.  So, remember that little square piece we had left over from all the cutting?  Well, just use it to make a couple of short straps just like we did in the steps above.  Attach them right into the seam allowance of the upper bodice edge.


Because of this back closure you won't really be able to wear a proper bra with this top.  You could try the whole stick on cutlet thing, which I find come in very handy in times like this, or use a much larger scarf that you know you'll be able to overlap in the back better.  The last option I can think of is to sew in bra cups either to the inside of the bra pieces or between the lining and the outer fabric.  Otherwise, I'm afraid you'll have to just be brave and go for it.

And now you're ready to go to the folk festival, picnik, or just go out and enjoy the hot summer day!

scarf refashion, how to turn a scarf into a top, Scarf halter, Scarf top
I bought these jeans at the second hand store to make cut-offs.
They're full of shreded holes.  So funny~
For something different you could mix things up by using different scarves for all of the pieces, or using a super duper big scarf for the bodice and make it into a tunic or dress!  Have fun with it and see what you come up with.

Remember, a scarf is just a square piece of fabric with finished edges.  If you can't find a scarf you like, use a square piece of fabric.

I hope you're enjoying these scarf transformations because I'm having a lot of fun coming up with ideas on how to make them. 

scarf refashion, how to turn a scarf into a top, Scarf halter, Scarf top

You can find all of these projects, plus lots of other ideas, on the Tutorials tab up top~

Have a crafty week everyone!

This project was featured here:

http://salttree.net/  It's a Blog Party   Seven Alive


Friday, November 18, 2011

Trash to Useful Treasure

I have yet another spool knitted scarf/cowl tutorial for you but I figured it would be nice to take a break from all of that knitting and do a quick little junk transformation today.  Besides, I'm still a little under the weather and needed something super easy and quick to do.

I picked up this little shelf at the second hand shop not too long ago.  All you need for this project is a junky shelf like this, some hot glue, crochet lace, and scissors (which of course I forgot to throw in the picture).


It's supposed to have wooden pieces across the fronts of each of the shelves and probably some little drawers or something in the bottom.  It's really pretty much trash but I figured I could salvage it for something useful though.


I had every intention of bringing it home and immediately coating it in white paint.  But after walking past it a few times I realized I sort of liked that cute folksy floral thing at the top and the colour kind of matches my kitchen table. 


So, I just cleaned it up a bit and started gluing.

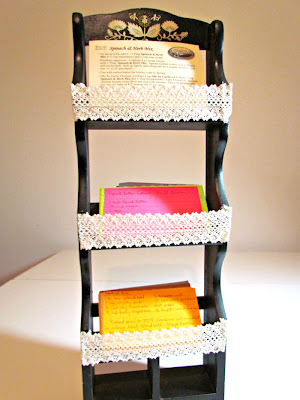
I put down a bead of hot glue along the side and then some crochet lace coming away from the shelf.  Seem strange?


Well, I didn't want any fraying raw edges showing, so this way you can lay down another bead of glue on top of the lace and fold it back over.  That way you get a nice clean edge.


A tiny bit of glue along the bottom of the shelf and on the other side secures the lace in place.


Then I just repeated on the other two shelves.

DIY Recipe Card Holder, Recipe Rack, Recipe Cards, Trash to Treasure, Junk Restyle, Spice Rack Transformation

And added my sad excuse of a recipe card collection.  (I don't really like cooking and trying new recipes.)

Here's where I usually keep my recipes:


It gets all greasy and gross on the outside because it sits right there on the stove.

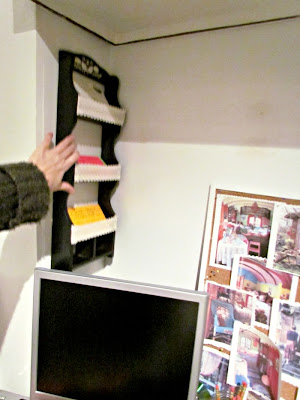
I have no idea what will go on the bottom just yet.  And if I ever get my little desk alcove in the kitchen finished this is where it will hang.  I'm planning on painting the back wall with magnetic and chalk board paint and that little tiny wall will get some cork board.


Tah dah!  And now my next task is to make some cuter recipe cards, but I've got all winter to do that~  For now, I'm just happy to have someplace handy to stash my recipes.  I think if they're out like this I might just remember to pull them out and use them once in awhile instead of just relying on whatever box or can Ican reach in the cupboard.
Where do you keep your recipes?  What do you think I should put in the bottom sections?  Leave a comment below with your ideas!

Have a great week everyone!

Don't forget to get your entry into the Big Plaid Giveaway.  The winner will be announced on November 24th!

Friday, September 2, 2011

Nail Polish Holder

I've been spending way too much time at the second hand shops lately, but wait until you see some of my steals.  Today I'm going to show you an amazing transformation on one of those things that you see at almost any thrift store...an old spice rack.

Here's what you need if you want to copy this super easy and fast project:


You may need a staple gun too...watch below to see why~
Steps:
1) Wipe down your spice rack and remove any ugly plasticky windows you might have.


2) Mask off any hinges or other parts you don't want paint on.


3) Now, you should probably sand it down a bit, but really, I don't have that much patience so I just got my trusty spray paint can ready with this awesome trigger gadget.


4) And then you just go to town spraying it all down.  Nice light even strokes.


5) I said, Nice Light Even Strokes!!


Kidding, I'm not yelling at you.  That's what I was saying to myself as I poured the paint on.  This is why I don't normally use spray paint...I'm not good at going slowly, evenly, or lightly.  Luckily this is in a part no one will notice and once I went over it a few more times you could hardly even see it.

The super thing with spray paint is that it dries so fast.  I just kept letting it dry and adding another coat until I like the coverage.

6)  Then I cut out some nice vellum paper to cover the window openings.


7)  And this is where I had to improvise.  I thought my handy dandy Mod Podge would do the trick and secure my paper to the wood.  But my paper was quite heavy, almost like plastic.  So it just wouldn't work.  The nice thing was that it held things in place while I positioned it and then stapled it down.  Without the glue first I think the stapling would have been quite frustrating.


So, I still recommend using some glue to get things in place.  And if your using a lighter weight paper that might be all you need.

8) And now look at this!!!

Easy Craft, DIY, spice rack transformation, Nail Polish Holder

Isn't it pretty?!?!  I was originally going to use it to hold my acrylic paints, but the truth is that it wouldn't hold even half of them.  So, my very smart friend suggested I use it for nail polish.  Such a great idea!


Easy Craft, DIY, spice rack transformation, Nail Polish Holder


 I love how all the colours of the polish bounce off of the white.  And the little drawer below holds my little gadgets I need whenever I redo my nails.

Easy Craft, DIY, spice rack transformation, Nail Polish Holder

There you go, ugly old spice rack to totally useful nail polish holder!  You could try using fabric or lace instead of paper if you have something similar.  Even one without doors would be totally cute too!


Easy Craft, DIY, spice rack transformation, Nail Polish Holder

What do you think??  Leave a comment below and let me know what else you can do with an old spice rack.

Make sure to check out the new linky parties on the tab above.  Happy crafting everyone!

Friday, August 5, 2011

T-Shirt Tote Bag

Today's tutorial is a little late but I have a good excuse.   The weather was absolutely amazing today and I had to sit outside in the sun and soak it up...all... day... long.  OK, so maybe it's not a good excuse, but it was a good day~

So, because I'm being a lazy beach bum we're going to make something that's super duper easy, but is super duper useful, and not to mention...super duper pretty.

Here are the supplies you'll need:


Steps:
1) I'm using one of my lovely '80s looking T-knit turtleneck tops that I picked up for two whole buckaroos.  Lay out your T-Shirt and make marks similar to what I have below:


It's actually a very nice teal colour.
The exposure on my camera was a little off for this shot~
3) Cut along your lines.  You should end up with something that looks like this:


4) Turn your top inside out, pin along the bottom and stitch closed.


5)  Turn back to right sides out.  Now, you could just leave it at that and have a cute little tote bag, but as most of you know, raw edges drive me crazy.  So I have to finish mine off.  Plus, by adding some bias tape to your edges you'll reinforce everything and the straps won't stretch out to Timbuktu. 

So, lay your bias tape down, right sides together, along the edge and pin.  I started with the "armhole" edges first and did the big one last.  (This took up almost an entire package of bias tape.  If you're making a bigger bag make sure to get enough tape to do all of your edges.)


Note:  Normally you want your bias tape to match your fabric and blend in.  My fabric store didn't have dark teal blue tape though so I got a contrasting colour that will match something fun I'm going to add after.

6) Stitch right in the little ditch of the bias tape, making sure to overlap your ends.


7) Repeat this step on all of your raw edges. 


8) This is what your edge will look like with the bias tape on it.


Now just fold it to the inside.  It should just naturally roll nicely.  Give it a good pressing.  Pin it down if you have to, and then stitch about a 3/8" hem to secure the tape down.


So, now again, you could call it a day and be done, but I think it's a little boring so far.


8) So, I got adventurous with my silhouette machine and made this cute little iron on transfer.


And now...TAH DAH, now you are done~ (Although you could still add buttons or fringe or something else to totally personalize it.)

DIY T-shirt transformation, Tote Bag Craft, DIY Tote Bag, Easy Tote Bag, Easy Sewing Project

I love how it turned out!  I think it'll be great for picking up groceries or taking to the beach.  If you have some cool T-shirts with great designs already on them you could make some awesome looking bags.  What do you think?  How would you personalize it?

DIY T-shirt transformation, Tote Bag Craft, DIY Tote Bag, Easy Tote Bag, Easy Sewing Project
Pin It
I'll be linking up at the usual parties throughout the week.  Make sure to check out the party page up top to find out where I hang out.

If you're new here, make sure to check out the "Follow my Friends" tab up top too.  If you're a follower and you have a blog you can link up your button for a chance at a free feature.  I'll come visit and so will lots of other Etcetorizers.

Have a great week everyone.

PS, Kadie over at Seven Alive made a bag from a sweater a couple of weeks ago.  Check it out for another great transformation~

Linkwithin

Related Posts Plugin for WordPress, Blogger...