Showing posts with label pendant. Show all posts

Friday, November 22, 2013

Faux Silver Pendant

Today's project is great either for yourself or as a quick and easy stocking stuffer.

polymer clay silver pendant, DIY silver pendant, DIY jewellery, DIY clay jewellery, silver leaf


Here's what you need to make your own~


Materials:
-Polymer clay
-Silver leaf
-craft knife
-optional:
   -pasta machine for flattening clay
   -soft brush
   -straight edge

Steps:
1) Condition your clay by warming it up in your hands and rolling it into a soft egg shape.


2) Run it through your pasta machine (used for clay only, not for food) on the thickest setting.  If you don't have a pasta machine for crafting just roll out your clay until it's about 1/8" thick or so.


3) Lay your flattened clay piece down on a cutting surface (I like to use a ceramic tile but anything will do), and cut it into a long skinny rectangle.

I may need a new 'straight edge'.

4) Tear off a piece of silver leaf and gently lay it on top of your clay rectangle.  Using a very soft clean brush gently brush it into the clay.


5) Use your knife to cut off the edges and then turn it over to do the back.


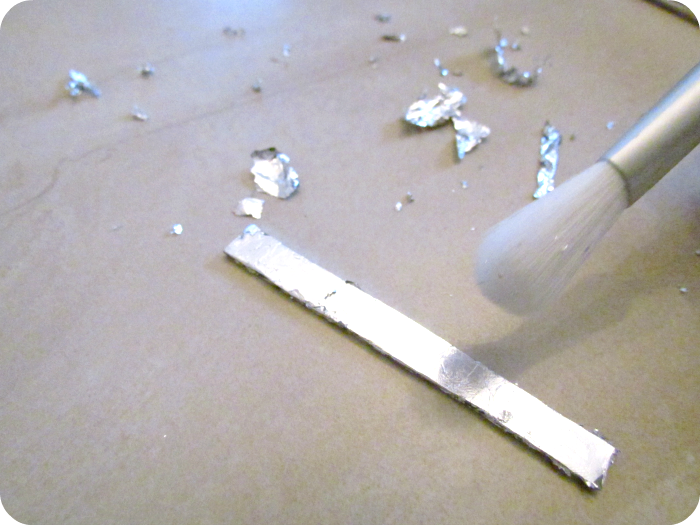
If your leaf splits or breaks don't worry about it.  Just lay another piece down and keep brushing until it blends into the other pieces.  It doesn't have to be perfect, that's part of the beauty of the piece.

6) Now, very very gently roll one end around a pencil or other smallish object to create a loop on one end.


The silver leaf will start to crack.  Don't freak out.  You can either just leave it or add more silver leaf on top and continue to brush it in.

7)  If you just want a nice plain bar, bake your clay piece in the oven following the directions on the clay packet.  If you want to add an extra special touch and you have a stamp that has lettering, you can personalize your piece to make it look like it's hammered.

"Love" & "Mom"

Once your piece is baked the silver is baked right onto the clay.  It shouldn't come off.  If it does though, you can seal your piece with some Mod Podge or Double Coat.  Either one will dry clear.


Don't worry if your loop at the top doesn't fully close.  As long as you aren't jumping on a trampoline or surfing, gravity should take care of holding things in place for you.

What would you print on your pendant?  Leave a comment below~

This project was featured here:

Adorned From Above  WP button250x250

Saturday, January 29, 2011

DIY Paper Jewellery

When I got out my jewellery making equipment last week to create my Gucci watch knock-off, I was not only reminded of just how much supplies I have, but also, how much I used to enjoy making jewellery.

So, I decided to make something super easy and fun that I can wear as an accessory this week.  I had bought some Mod Podge Dimensional glue ages ago and have been dying to experiment with it.  And yes, experiment is definitely the right word.  I have to admit, that this post is going up a little later than usual because not everything went exactly as planned, but here's what I ended up with:

Supplies:

Steps:
1) Trace or directly cut out a circle (any size) out of heavy weight scrapbooking paper.  If you want to weigh down your paper just a tiny bit more, cut out a second circle from another heavy piece of paper, just the tiniest bit smaller, and glue to the back of your scrapbooking paper.

(I'm still trying to get the knack of this cutter,
if anyone has any tips feel free to leave a comment below
)

2) Poke a hole at the top of your circle being careful to go close enough to the edge that you'll be able to insert a jump ring, but not so close that you rip the paper.


3) Now apply your Dimensionals Mod Podge, going right to the edge, and being careful not to cover up the hole at the top.  Watch for bubbles, and if you put too much on, just let it drip off onto some scrap.  It'll all even out eventually.

As you can see...I put too much on.
I ended up adding another coat though, once this one dried.
 Let dry for several hours.  My paper started to curl up a bit, so once it was no longer sticky I put something heavy on top to weight it down.

5) Add a jump ring and connect to a chain for a necklace or create some cute earrings.

Oooh la la????
Pin It
DIY Paper Jewellery, Paper Jewellery, Paper Crafts, DIY Jewellery, Mod Podge


Although I'm not super duper thrilled with the results it was still a fun experiement and I can think of other ways to improve the project.  I think I'll make some more and add a layer of Sparkle Mod Podge or glitter and other embellishments too just for fun!  And I'll definitely try adhereing the paper to something heftier next time.

There are loads of possibilities though, just think of all of the different shapes you could try if you have a template or a Cricut machine!  (oooooh, I'm very jealous of you cricuters)  Or, make a whole bunch of tiny pendants and string them together for a pretty piece.  Let your imagination soar and see what you come up with.  I'd love to hear about it.

Leave a comment and let me know if you try this out.
Could be a great last minute gift or just something fun to do with the kids.

As usual, I'll be posting at the linky parties throughout the week so make sure to check out the tab up top!

Happy Crafting~

Linkwithin

Related Posts Plugin for WordPress, Blogger...