Showing posts with label Halloween. Show all posts

Friday, October 24, 2014

Simple Trick or Treat Bag

Do you have some little goblins that you have to take out Trick or Treating soon?  Here's a fast and easy project to help you gather their goodies~

DIY Treat Bag, DIY Halloween Bag, Spider Bag


Here's what you need to make your own Trick or Treat Bag:
-Non stretch fabric
-ruler
-standard sewing kit

This is so easy and I was just whipping these up as a little scrapbuster so I didn't decide to do a tutorial until I had already completed a few steps.  Also, you don't have to follow these measurements exactly.  I was just using up a scrap of fabric I found tucked away and was just trying to use it all up.

Steps:
1) In any case, I cut 2 pieces of the large rectangle shape and 2 of the long skinny one. (That's 17" right from the top to the very bottom of the big one, just ignore the cut outs at the bottom until the next step.)


2) Now you can cut out 2 little squares from each bottom corner of the large piece.  Mine are about 1 3/4" square.


3) First we'll make some handles.  If you don't have enough fabric or you want something really sturdy you can use webbing.

Simpy fold each long skinny rectangle, right sides together, and stitch along the the entire long edge.  Zig zag or serge and then turn and press the seam along the centre back.  I'm using some kind of nylon lining type of material so kept my iron quite low and used a pressing cloth to make sure I didn't melt it.


4) Set your handles aside and stitch the bottom and two sides of the main body of your bag. Finish your edges (!) and press to one side.


5) Now pinch the bottom corners, meeting your side seams with your bottom seam.  Pin and stitch across.  You should get some nice sharp boxy corners.  If you're using a heavier fabric you might need to trim across the corners.  Finish the edges and turn your bag body right side out.


6) Finish the top edge of your bag body, fold about 1" towards the inside and stitch down.


7) Now just attach your handles.  Measure in an equal amount from each side and mark.  Turn the bottom of you strap up about 1".  Pin to mark and stitch down in an "x" pattern.  You'll want to collect as much candy as possible and this will make sure that your straps won't fall off half way through your neighbourhood rounds.


That's it!  Just throw on that Elsa costume that all the girls are wearing and head out from some treats!


I sent my bags to my niece and nephew along with a couple of little easy to  make pillow treat boxes.

Check out my Sharp Corners Ahead project and use the boxy corner method to make a cushion.

Are you dressing up this year?  Did you make your own costume?  Leave a comment below! (I've made some adjustments to my comment settings, help me out by testing it to see if it's any better, thanks)

Monday, October 28, 2013

Movie Monday-Ghostbusters!

Happy Halloween~

Do you remember how CRAZY popular this song and movie were?


Ah, the 80's...good times~

Monday, October 21, 2013

Movie Monday-CD Envelope Treat Holders

One last treat holder idea for the season~


Now, this video actually shows you how to make a standard treat envelope, but I actually really love the project idea that Dsscrapie shows you at the very beginning using CD envelopes.  Such a great recycle idea, but they look beautiful too!


Dsscrapie has lots of other fun projects as well as an Etsy shop, so head on over there to say hi and try out her awesome ideas~

Monday, October 14, 2013

Movie Monday-No Cut, No Stick Treat Bags

Just a few more weeks until the big day so here's another fun idea for your Halloween Treats.


This video is great because this lovely vlogger from Stamping T starts out with an Easter idea, turns it into a Halloween project, and then shows you how to customize it for your own treats.  Head on over to StampingT's channel to watch more of her awesome project videos~

Monday, October 7, 2013

Movie Monday-Quick and Easy Halloween Treat Packs

Have you started getting ready for Halloween yet?  


Did you know that there's more to it than just making a great costume?  Now you have to make great packages for all your treats!  I had no idea.

I love this project because it's so quick and easy but you can still add personal touches.


Head on over to Scrapdaworld and leave Tamika a nice comment if you like her project.

More fun Halloween projects to come~

Wednesday, October 31, 2012

Who wore it best?

Before my mom took her super duper awesome Angry Bird handmade costume to my nephew for his school Halloween party, I had to try it on myself first.

angry birds, DIY Angry Birds Costume

I'm just kidding about the title...obviously he wears it better...he won Best Costume at his school dance!  (Can you believe he's only 6 and goes to school dances???)


Here he is his with his little sister....you have no idea how appropriate this costume is for her~


And here's where my mom got the instructions, in case you want to make your own Angry Birds costume for next Halloween.

Friday, October 12, 2012

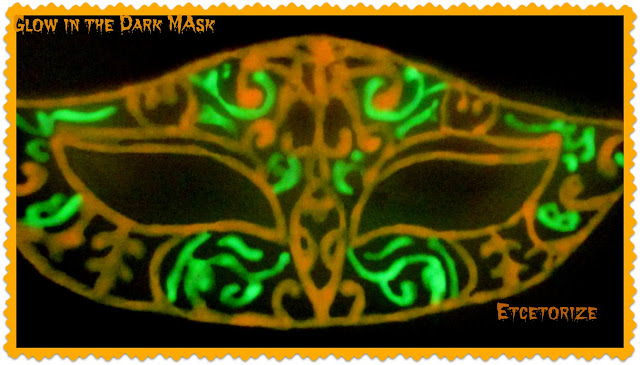
Glow in the Dark Masks

What perfect timing!  I was lucky enough to be sent a pack of fun new Glow in the Dark Dimensional Paint from Tulip and iLoveToCreate to show you this week!


With Halloween coming up soon I decided to try out a fun project I saw on pinterest.

Halloween, DIY Mask, Glow in the dark, Puffy Paint, Dimensional Paint


Here's what you need:


Materials:
-Tulip Glow in the Dark Dimensional Paint
- lace, netting, or other lightweight fabric
-scissors
-ribbon
-glue gun and hole punch (not shown...because I ALWAYS forget to include at least one thing in the materials photo!)
-mask template and plastic wrap

Steps:
1) I'm never very sure of my own artistic skills so the first thing I did was download a couple of different Halloween mask templates.  If you're a little more creative though, you can just make your own on a piece of plain white printer paper.

2) Tape your template down to your table and then tape some plastic wrap down on top of it.  This will stop the paint from seeping through your material, onto your paper, and possible through to your table.


3) Tape a piece of very fine, lightweight fabric over top of the plastic and the template and tape down.


4) Start with the outline of your mask and draw along the lines with your dimensional paint.  One of the best things about the paints I tested were the lovely fine tips.  It took a little practice but eventually I was able to get some very nice lines.


5) Let your paint dry overnight.  When your paint is completely dry, cut along the outside edge.  Then cut inside the eye holes.

6) Use your hole punch to create a hole on each side to slip some ribbon into.


7) Cut two pieces of ribbon, glue or tie to each side of the mask and then tie around your head.


So easy!  And it looks super cool when you're in the dark!

My niece and nephew had fun trying their masks on too~

For more fun dimensional paint ideas check out these projects or find iLoveToCreate on FacebookTwitter, or Pinterest:

*I wrote this post as part of a paid campaign with iLoveToCreate and Blueprint Social.
 The opinions in this post are my own.

This project was featured here:


Wednesday, October 10, 2012

Mummy Card

Here's the last of my Halloween Cards (look out Christmas here I come!)


This one is so beyond easy.  Just rip up some white copy paper and glue googly eyes on.  The only reason I embossed it is because I'm borrowing my friends Cuttlebug and have yet to put it to use.

This one is ALL over pinterest.  Just do a search for 'Mummy Card' to see all of the other variations.  Here's the one I pinned:

Want to see what other pins I'm working on?  You can find them all HERE.

This project was featured here:


Wednesday, October 3, 2012

In My Witches Brew

I picked up some pink polka dotted green ribbon while waiting in line at Michael's (and waiting and waiting.  I think it's a conspiracy.  The whole reason they're so slow at the tills is so that you'll load up on cheap crafty crap you don't need) and just knew I had to use it to make this card for Halloween.


Of course, I was inspired by something I found on Pinterest:


I love that sparkly tulle on the inspiration card!

Check out other cards I've pinned HERE.

What are you going to be for Halloween this year???

Wednesday, September 26, 2012

Spooky Ladies

I went through my pinterest boards last weekend and then went on a big card making spree.  Ahhh, feels so good to actually use my pins.

Here's the first Halloween card I made:

Halloween Card, Googly Eyes, Vintage Ladies Card

Aren't those ladies spooky??  And funny???

Here's what inspired me:


I'll share more over the next few weeks~

Are you getting ready for Halloween or are you already dressed up and ready to go?

If you want to check out my pinboard for cardmaking and other papercrafts just click HERE~

Wednesday, October 26, 2011

Halloween Treat Bags

Yahoo!  I whole new world has opened up for me on my Silhouette machine! I've been struggling with using imported images, which is the whole reason I bought the machine, but I finally got it to work today!  (You have to use the tracing tool for any other new Silhouetters out there.)

I have a couple of little kiddies in my life who get extra special treat bags for Halloween so this is what I made for them, sans frustation for once.


First I tried out my new glitter Cri-Kits gel pens in my machine (I won them in a blog giveaway!) and was surprised at how easy it was to write with the Silhouette.


I cut out the bat shapes and stuck them on the bags with some dimensional thingamadoies and stuck some googly eyes on them.


I didn't get a shot of what's inside but I think they're going to be pretty happy.  I know I wouldn't mind a bag filled with chocolate, gummy candies, pez, and other fun Halloween treats.  Those lucky little kids!

I can't wait to see what they dress up as.  They always look so adorable when they head out in their costumes~

Friday, October 22, 2010

Disco Pumpkins

Have you ever hid something away for safe keeping so that you wouldn't lose it, only to lose your mind looking for it a week later????

That's what happened to me this week as I was preparing for this week's project.  It's still driving me a bit bonkers because I still can't find my packet of hot pink glitter.  In the end I bit the bullet and bought another packet, a girl can never have to much glitter right?  (I know there's a Mariah Carey joke in there but let's just take the high road and move on...)

So, I may have mentioned before that I don't have any kids living with me.  And that's probably the only reason that I don't go all out for Halloween.  This year though I thought I'd do at least a little something, even if it's only for the trick or treaters that come by for candy.

There are lots of sparkly pumpkins out there in blogland but I wanted to try it out with something a little less traditional.  So, I used pretty hot pinks and purples to go with the rest of the decor in my studio.  Just imagine Halloween in Barbie's dream house and then you'll get the feel for what I'm going for.

The first pumpkin I did was pretty straightforward.

Here are the supplies I used:


Steps
1) I started with the small plastic orange pumpkin and began by applying glue to one section of the pumpkin at a time and then sprinkling glitter on that section:


2) Repeat step one on alternate side.  I'm not sure if this is true on real pumpkins, but fake ones always seem to be divided into 10 sections, so you can line up your colours across from each other to maintain consistency and avoid running two stripes of the same colour beside one another.


I used a dry brush when I was finished with the glittering to sweep it off the next section.  Then I had a clean area for gluing.

3)Continue this with all of the other colours of glitter that you have until all sections are covered.


DIY Halloween, DIY Glitter Pumpkin, Embellished pumpkin, glitter Halloween

4)Top off your pumpkin with a sparkly hat and you're done!  If your pumpkin will be handled alot and if you want to keep it for more than one year, I would also add a layer of some kind of spray varnish to seal in the sparkles.


DIY Halloween, DIY Glitter Pumpkin, Embellished pumpkin, glitter Halloween
I had also picked up the little glass jar pumpkin too and thought I would do the same treatment to it until I saw this painted glass pumpkin at keen inspirations where Sharon painted the inside for a nice glowy mood.

So, I decided to give the striped glitter method to the glass jar on the inside this time.  Tacky glue dries clear so it works fine.  I do wish I had a smaller brush though, the sponge brush made things a little messy.


Did I mention that this project is a little messy???

I started with the lid because I wasn't sure I wanted to commit myself to doing the whole jar on the inside.  Here's the finished lid from the inside:

Before the glue had dried I was a bit worried about the outside.  It looked pretty bad and I kept wondering if it looked like something I would've made in grade two.  But when it finally dried, I was pleasantly surprised.  It actually glitters and sparkles on both sides!

DIY Halloween, DIY Glitter Pumpkin, Glass Pumpkin, Embellished pumpkin


I did decide though that I don't have the patience to do the rest of the inside of the jar.  It makes it look a bit more like an acorn but that's ok.  I'm happy with it this way and now I can actually put some candies inside and not worry about them being completely covered in glitter when they come out....although, like I said earlier, you can never have too much glitter!

What do you think?  Now that I'm covered in glitter I think me and my little pumpkin buddy are ready for the disco.  Are you going to join us?

Happy Halloween!

Make sure to check back next week....I'll be announcing my first giveaway for anyone who has signed up to be a follower here at Etcetorize!

Between Naps on the Porch was my top referrer last week so go check out Susan's blog for more fun ideas and giveaways!


I'll be posting the disco pumpkins at the other linky parties throughout the week, check them out on the linky tab above.

Linkwithin

Related Posts Plugin for WordPress, Blogger...