Friday, May 31, 2013

Easiest Lace Skirt Ever!!

Well, it's the end of Lace Week here at Etcetorize so I thought I'd finish up with a fun tutorial.


Here's what I started with at the beginning of the week~


See that lace to the left?  Well, here's what it really looks like on it's own.


It's about 15" wide!


I originally picked it for my Wholeport shipment to make some sleeves on a pretty top but when I had it in my hands I could only see it as a pretty little mini skirt.

Here's what you need to make the easiest skirt ever!

Materials:
-Super duper extra wide lace and matching lining fabric
-standard sewing kit: sewing machine, pins, measuring tape, thread, scissors
-waist elastic

Steps:
1) The first thing you need to do is cut your lining to match your piece of lace.  My lace is just under 1 metre long and about 15" wide.  Consider this is size XS-S.  If you're making a larger size you'll need a longer piece of lace.  Just wrap it around your hips and add extra for a seam to figure out how much you'll need.

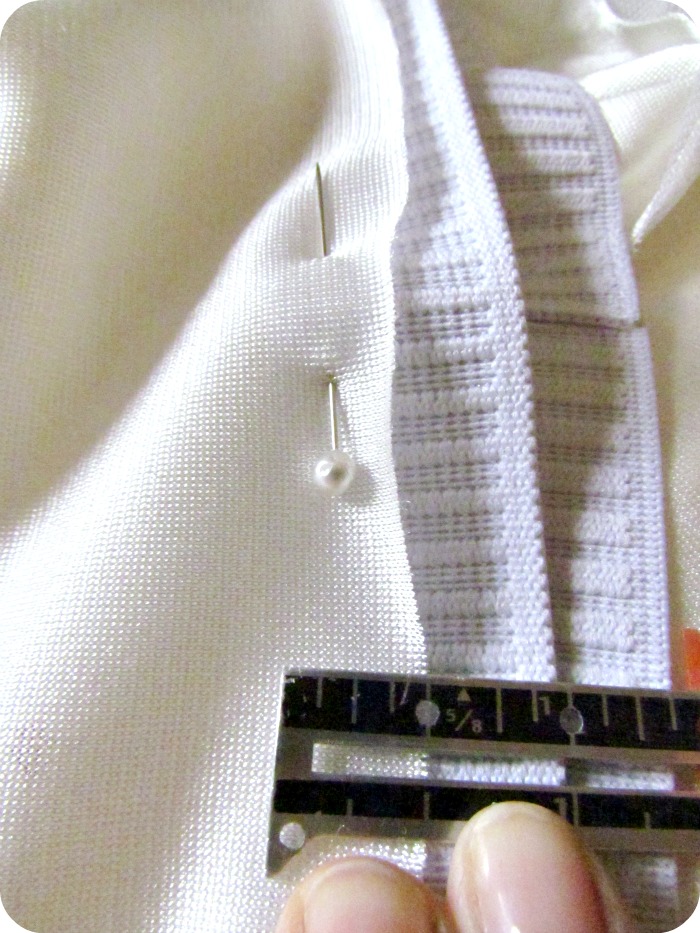
Pin your lace directly onto your lining fabric, one layer of each.  I didn't even hem my lining because it won't fray.  So, I lined up the bottom edge of my lace a little lower than the lining so that it won't show.  Be generous with your pins so that everything doesn't slip on you.


2) Even out your lace and cut your lining at the same time.  The top edge of my lace was pretty jaggedy so I gave it just a tiny bit of a trim.  I couldn't afford to lose too much on the length of the skirt so I trimmed the least amount possible.

Don't forget to make sure that your ends are also straight and even too.


3) Keeping your lace and lining together, make a tube and stitch the ends together.


4) Set your skirt body aside and cut enough elastic to fit comfortably around your waist plus about a 1" overlap.

Sew the ends together.


I usually don't care what my stitching on my elastic looks like because no one can see it in a casing, but there's a chance with this skirt that people might catch a glimpse of your waistline so try to be tidy with your stitches.


5) Divide your elastic and waistline of skirt into fourths.  Just pin directly across from your back seam, then bring those spots together and pin the ends again to find the fourths.  Do the same with your skirt body.  If you're making a larger size you may want to divide into eighths.


5) Now all that's left to do is to attach your elastic waistband to your skirt.  There are lots of ways to do this but like I said up top, I didn't want to lose any length of fabric of my skirt towards my waistband so I attached the elastic on the outside, right on top of the fabric.

Match up the pins your marked with in step 4 on the elastic and the skirt, overlapping the fabric onto the back of the elastic about a half inch.


6) Use a straight stitch to sew the elastic onto the fabric, gently pulling the elastic as it glides under your presser foot.  This will ensure a nice even gather.


Don't forget to remove all those pins that were holding your lace and lining together, because guess what?!?!!  You're done!


I'm pretty sure my mini skirt wearing days are long behind me but I just couldn't resist making this cute little wardrobe staple.  It's super easy to dress up and with a long light sweater you can wear it in the daytime too!


I hope you've enjoyed Lace Week!  Don't forget, if you want to find your own lace pieces for awesome prices, just head over to Wholeport....or join their Sponsorship Program and you can get your own supplies for free too!

So, how old is too old to wear a short skirt?  I know what all the magazines say but I want to hear what you think.  Leave a comment below and let me know if I can pull this off or if it's something I need to give to a younger friend~

Thursday, May 30, 2013

I Got a White Dress!

If you follow me on Pinterest then you might have noticed that I have a board called "I Need a White Dress".


I don't really NEED one, I just thought it would be really nice to have one.  For what occasion?  I have no idea, but I still want one.


So, remember the pile of lacey things I got from Wholeport?  I decided to finally make myself my white dress from that pretty white lace fabric above.

And here it is!
Sorry for the fuzzy photo.
I have something set wrong on my camera~
I ended up using the same pattern that I used for my latest LBD and my red dress but I altered it slightly.


I used bias tape instead of the facings, nixed the sleeves for a summertime look, and deleted the zipper in the back to a bit of flirtiness.


I have absolutely no idea where I'll wear this dress but I really like it.

You saw a sneak peek of this dress on
Tuesday with my sparkly crochet collar~
This lace is so soft and comfortable, no  scratchiness whatsoever that you can sometime get with lace by the yard.  I also love that it's not super duper blinding white but it's not ivory either.  It's somewhere just over the line between the two.

Where do you where lace?  Any ideas?  Leave a comment below.

*This is a sponsored post however I did not receive any remuneration other than supplies and all opinions are my own.


Wednesday, May 29, 2013

Crochet Back Inset

On Monday I showed you what I did with a front crochet lace inset that I got from Wholeport.  I also received this awesome little piece too!


I guess you could put it in the front as well, but I decided it would look best as an inset on the back of a cute little summer dress.


I have loads of maxi dresses so I decided it was time for something a little more casual.  I used the same basic tunic top pattern that I used on Monday but this time I lengthened it.

I used View C
but made it longer~
I used the same technique as the tunic from Monday.  I just put the top together as usual, minus the back neck facing.  I stitched on the inset and then did the side seams, armhole facings, and hem.


Make sure to overlap the shoulder seam
just a bit~
Once it's sewn down, trim the fabric underneath away~


It's a little plain in the front on it's own but it's easy to jazz up with a great necklace and my favourite sandals.


You can find this inset over at Wholeport.com for less than $2.  Check out their Lace/Applique section for more fun pieces too!


What style do you like best for summer?  Maxi dresses or short dresses?  Leave a comment below~

*This is a sponsored post however I have received no remuneration other than product and all opinions are my own.

Tuesday, May 28, 2013

Crochet Collar

Next up for lace week is the super cute sparkly crochet collar you see on top of my lace pile from Wholeport.


I love the sequins on it.

You could sew this directly onto a blouse or other top but in order to give you the most options here's the easiest thing to do.


Just add a hook onto the back corner!  You don't even need an eye~


Now I can wear it with any top or dress I feel like.

You can find this item over at Wholeport for less than $2 each!


*This is a sponsored post however I did not receive any remuneration other than supplies and all opinions are my own.


Monday, May 27, 2013

Summer Tunic

This week is Lace Week here at Etcetorize!!  Take a look at all of the fun goodies that Wholeport sent me this month.


We're going to start with this awesome crocheted inset.

Only $1.99!

Don't you love the flowers?

It even has it's own built in closure!

I started with this pattern and some batik type cotton I had on hand.

I made View C but lengthened it.

I started by making the top just as I normally would but left out the front facing.  Then I added the crocheted inset right on top.


Making sure to overlap the shoulder seam just a bit.


I stitched it on, cut away the fabric underneath and then completed the side seams, armhole facings, and hem as usual.

Tah dah!  Super cute casual tunic to wear all summer long!


lace inset, crochet, inset, crochet neckline, easy tunic, easy sewing

I was out in the garden so please ignore that green leaf
and my farmer's tan~
Come back tomorrow to find out what else I make with my Wholeport lace stash!


This project was featured here:


Linkwithin

Related Posts Plugin for WordPress, Blogger...