Sunday, April 29, 2012

Make it Great Monday

Did you click through all the great links from last week's party???  You should have...if you didn't here's a sample of some awesome projects that you missed:
Candace from Saltwater Quilts shared her Tumbler quilt:


Make sure to visit her to get a closer look at the beautiful vintage style fabrics, including the backing!

Jill from Create Craft Love shared a great tutorial on how to make your own hanging birdfeeder for outside:


I think it's so pretty!  And probably even more lovely when the birds hang out on it.

And I couldn't help myself, I fell in love with this bird feeder too!  (I am REALLY looking forward to spring) from Jo over at That's my Story:


Visit her blog to find out how to she added hardware and repurposed an old light fixture into something useful and beautiful!

And lastly, I know I mention my friend Gen from Cabin Fevered Gem all the time but does that mean she can't be featured?  I love her tatooed bangle project!


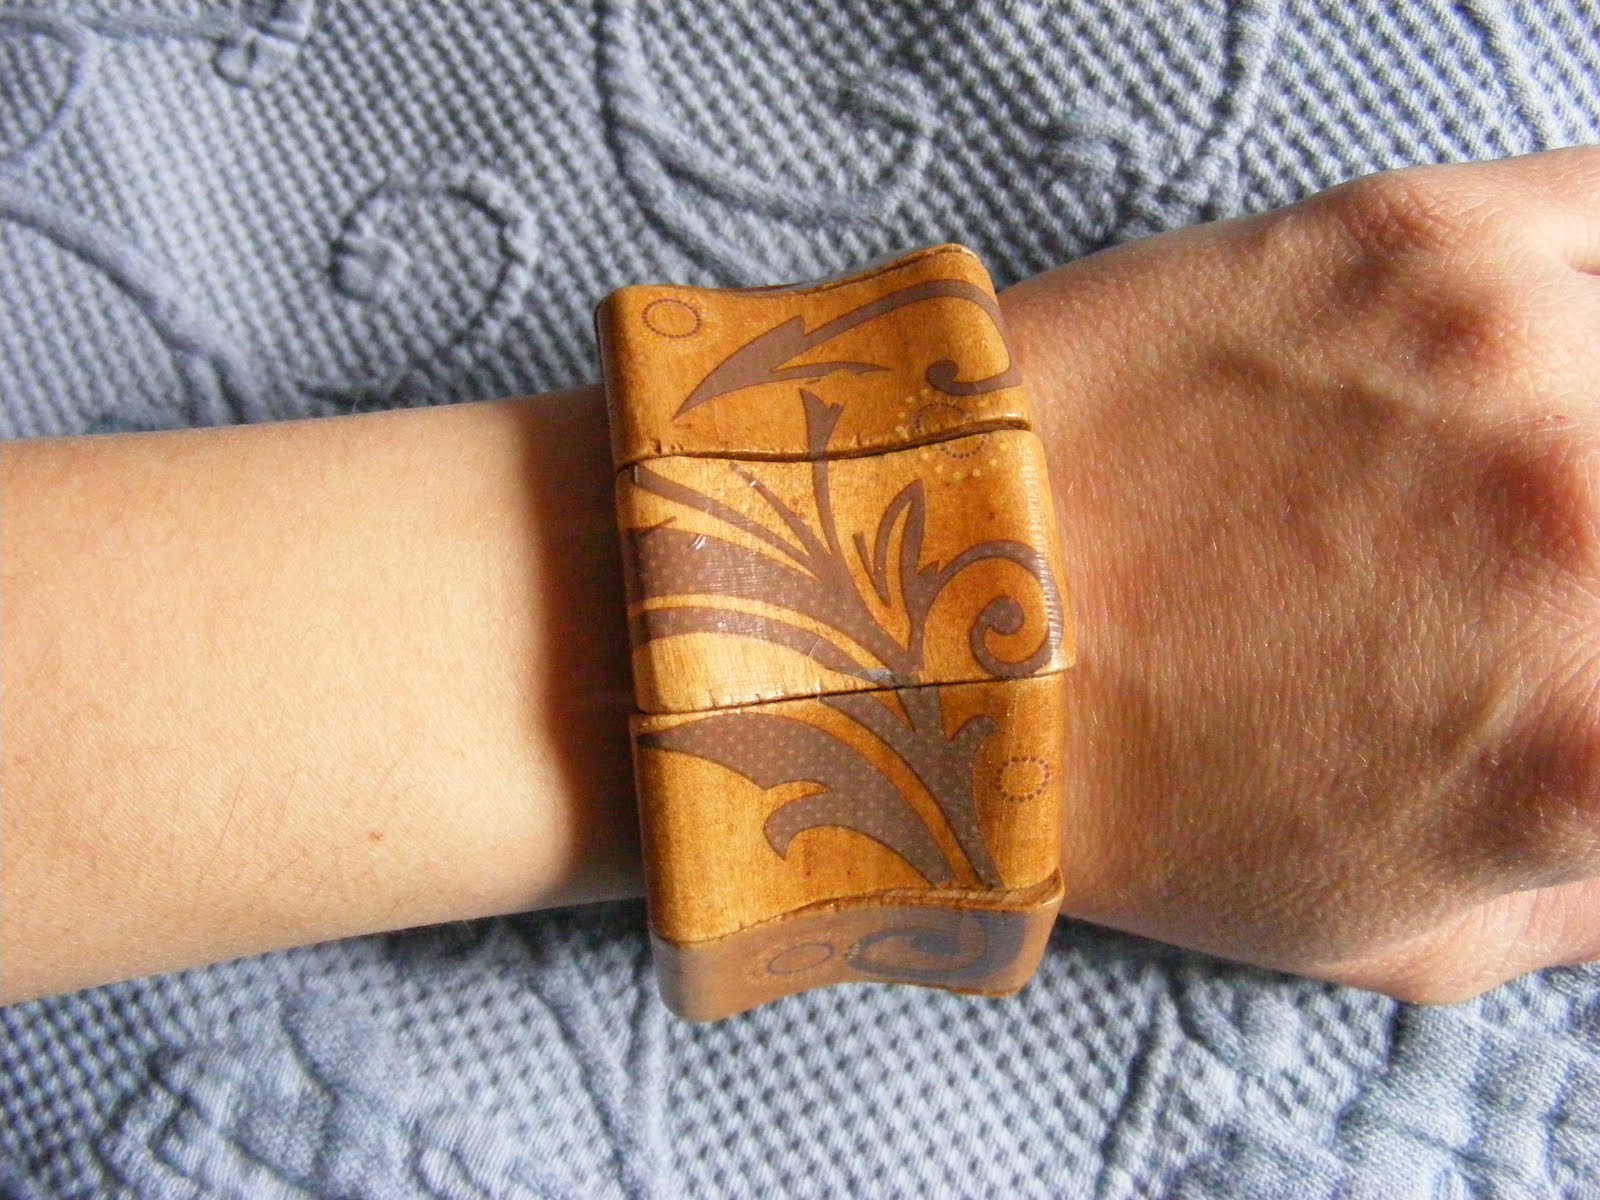
Go visit Gen to find out how she added all those pretty swirls, so much easier than you think!

And now onto you!

Please remember to only link:
1) To your Family Friendly Project Post that you've made yourself, not your main blog page
2) Maximum of 3 projects that you haven't link up before
3) Please, no shops or giveaways
4) Feel free to hit one of those Follow buttons on the sidebar ;)

And, not really a rule, but something you won't regret if you do....go visit some of the other links and leave a comment, we all love comments right~

If you link up, please post my button somewhere on your blog so more people can come join the fun:
Etcetorize
(If you link up you are giving me permission to tell the world how great you are and possibly post a picture or a link to your awesome project either here, on Facebook, or on Pinterest. Make sure you're ok with this before you link up.)

Make sure to come back tomorrow for an update on the new linky party that will start next week!


Friday, April 27, 2012

Oooooh! Look at all the butterflies!

My mind is all over the place this week.  I've got no less than 5 different projects going on my craft table this week and it's doing my head in.  So, today, you get not one, not two...but three crafts!  Lucky you~

I had a vague idea of what I wanted to do and I thought I wanted to do it with birds.  So, I went to the fabric store in search of beautiful bird patterned cotton, but nothing was really singing to me.

Then one of the sales ladies said, "Have you seen these?  We just got them in?"  I turned the corner and literally gasped out loud and quietly said "Oooooh!  Look at the butterflies!!!!". 

Luckily I know the sales lady fairly well and this was all par for the course for her.  She tried to steer me back to the birds but it was a lost cause, I was hypnotized by the butterflies.


Here are the supplies I started out with:


Steps:
1) I decided at first to cover a vase I had laying around.  I just cut my fabric slightly longer than my vase.


2) Painted on some Mod Podge.

3) Adhered the fabric, overlapping the ends just a bit.

4) For the top and bottom, you just make some little cuts across the extra fabric to give it just a bit more give around the rounded edges.


5) I added some pretty velvet ribbon and layered some other ribbon on top with a glue gun.


6) I felt like it was still missing something so I stuck on this pretty K & Company butterfly embellishment.

Mod podge, butterflies, butterfly vase, mod podge vase

It's pretty, but I didn't feel like it was my best work.

OH!  I almost forgot to show you my sad paper flower experiment.  I'm allergic to real flowers so I thought I could make my own out of pattern paper like I showed you from my pinterest board the other day.

paper flowers, flowers from sewing pattern, DIY Flowers

I'm less than impressed~

7) So, I got out this cute little jar with a lid.


8) Cut some butterflies out of my fabric.


9) And Mod Podged them onto the jar.  This time I just painted glue onto the backs of the butterflies because I wanted to keep the glass that wasn't covered clear.

What to put inside my pretty little jar????

DIY Candle holder,Butterfly candle holder, butteflies, mod podge

A candle looks gorgeous.

But then I remembered as I was wandering around blogland last week that I found an awesome recipe for a natural hand scrub from Whole New Mom .  It's so easy!  All I needed were these three ingredients.
You can use any kind of oil, any kind of sugar,
and any kind of natural oil. 
This is just what I had on hand~
Head over to Whole New Mom to get the recipe.

I poured my amazing smelling scrub into and my jar and voila!  I was finally satisfied.  I love it.  It feels amazing, smells incredible, and no, the carotino oil doesn't stain my skin! 

natural hand scrub, carotino oil scrub, butterfly container, butterflies, mod podge

OK, just 4 more projects to go~
What do you do when you mind is spinning out of control creatively?  I may need to take a break and watch some old movies tonight.  I'm sure I'll dive right back into all tomorrow though~

Have a crafty week everyone!  And feel free to send me some warm weather!!!  I think it might snow this weekend  :(

Thursday, April 26, 2012

Linky Party Changes

I'm working on something very exciting for you!  Starting in April there are going to be some changes with the Make it Great Monday Linky party!


I'm going to give you more bang for you buck, or link, and have something extra special for you to participate in that I think will motivate and inspire us all to keep on crafting!


I can't wait to tell you all about it.  Stay tuned!  More info to come next week~

Wednesday, April 25, 2012

Pinspired Birthday Card

I've mentioned before that I'm not a card maker.  But I decided to give it another go recently for my mom's birthday.

I was inspired by this pretty card from Cards by Eli.


Mine doesn't really look anything like hers but it's still what got me going.

I was trying for long time to not start collecting paper, because I can see that becoming something that will spin completely out of control.  But, I can't help it.  There are just so many pretty designs out there.  And now I need to start using it up!


I found the cute poem by  Joanna Fuchs here and let my Silhouette write it out for me using my sketch pens (same for the cover lettering and the badge on the next side). 


I had these cute little Martha Stewart Flags so decided to throw a badge together.  It's on pop dots.  If she's really into it, she can pop it off and wear it.  Unlikely, but could be fun~


I also tried out my circular edge punch for the first time.  It took a couple of tries but eventually I figured out what I was doing.

Paper is from the Stella and Rose pack from My Mind's Eye.  So many pretty papers!

Me and my Mom~
I have another card that I'm making for Mother's Day.  I can't wait to show it to you next month!  I've even surprised myself at how nice it's turning out~

Tuesday, April 24, 2012

What Have I Pinned for you Lately?

Oooh ooh ooh yeah! ....  If you sing the title of today's post to a very famous Janet Jackson song this will make much more sense (see below).

Here's just a sample of a few things that have made it onto my pinterest boards this past week.


Tissue poppies: http://howaboutorange.blogspot.ca
Butterflies: http://1bellehistoire.canalblog.com/archives/p3-3.html
Table runner: http://www.bhg.com
Pattern flowers: item was from etsy but the link no longer exists :(

I've got papercrafts on the brain!

Check out my Scrapbooking, Cards, and Papercrafting or Paper Flowers boards for more awesome ideas from around the web~

Ah...the good ole days, when musicians kept their clothes on~

Sunday, April 22, 2012

Make it Great Monday

Wow!  I just love it when you make it hard for me to decide which projects to feature.  It's great having so many awesome ideas all in one place.

I really got a kick out of these fun dolls from Jutta over at Creative Chaos.

I think they'd be great for siblings to have a pair.  You could make a whole family!

 
I love a good scrapbusting project, and these cute wristlets from Fifi over at About Blogging Time do just the trick.

Now, be prepared to be blown away.  Suesan over at Frou Frou Gal made this gorgeous quilt as a Pottery Barn Knock-off.  Keep in mind, this is a quilt...not a duvet cover.  Soooooo much  more work, but she shows you how to make your own with her awesome step by step tutorial.

146-001

And I just had to show you this gorgeous but simple "fancy" dress from Nancy over at Nancy's Couture.  I wish I had a dress like this when I was little...oh who am I kidding, I wish I could wear one just like this now!


If you want to know the secret of why this is so simple to make, you'll have to head over to Nancy's blog to find out~

Featured button is to the right, to the right...over in the sidebar~

And now onto you!  What have you been working on that you want the rest of the world to see?  Link up below...but before you do, please take 3 seconds to read the guidelines (come on...it's only 3 seconds):

Please remember to only link:
1) To your Family Friendly Project Post that you've made yourself, not your main blog page
2) Maximum of 3 projects that you haven't link up before
3) Please, no shops or giveaways
4) Feel free to hit one of those Follow buttons on the sidebar ;)

And, not really a rule, but something you won't regret if you do....go visit some of the other links and leave a comment, we all love comments right~

If you link up, please post my button somewhere on your blog so more people can come join the fun:
Etcetorize
 
(If you link up you are giving me permission to tell the world how great you are and possibly post a picture or a link to your awesome project either here, on Facebook, or on Pinterest. Make sure you're ok with this before you link up.)


Friday, April 20, 2012

Kitchen Caddy

This is what I currently keep all of my larger cooking utensils in, on my kitchen counter.

It's pretty ugly, but still passable...until you get really close and notice that it used to sit on top of my oven, in between all the burners, and got a little too hot at least once.


I did some deep down dirty spring cleaning last weekend and when I was all done I just hated putting that ugly thing back on my counter.  So I'm making a new one!

Here's what you need:

If you don't have a pasta machine for rolling out clay just substitute a rolling pin (that you will never use with food again).

Steps:
1) Take some polymer clay out of the package and start conditioning it by breaking it up and rolling it around between your hands.  Get it nice and soft and shimmy it around between your palms to make a large pebble shape.

2) Run your clay pebble through the pasta machine, starting at the highest setting and gradually going down until you get the thickness you like. 


My machine starts at 9 as the thickest and I went down to 7.


3) Using a small petal shaped cutter, cut out your shapes.  You can find cutters in the polymer clay section at the craft store, but check things out the baking section too because there's always loads more fun shapes there.


4) Just start sticking your clay petals onto your glass vase but gently pushing them down.  You can furl the edges up slightly to add some more texture.


5) One of the great things about polymer clay is that there is absolutely no waste.  Just take the clay that was left over from cutting your shapes out and repeat steps 1-4 until you have the design you want.
If this were paper it would be garbage.

But like magic, we have a whole new piece to cut from!
6) For the centres of the flowers I used this little flower shape to cover up all the uneven edges.


7) I was originally going to cover the whole vase, but I ended up loving the design when I got it this far so I just left it. 


Hmmmm, oorrrrrrrrrrrrrrrrrr not.  I actually baked this, filled it up, and let it sit on my counter for a few days but it drove me crazy.  Everytime I walked past it I thought "That doesn't look finished!"  So, I added more flowers and baked it again.


8) Following the directions on your clay, bake it.  I always like to double bake my clay projects but that's just a personal thing.  All that means is that I bake it once, let everything cool down, and then bake it exactly the same way again.  I feel like this makes the clay just a tiny bit stronger.

Obviously, do not use a plastic vase or anything else flammable. Even though the clay bakes at a very low temperature you can never take any risks.

9) If you want, after everything has cooled down, you can brush on a layer of Mod Podge or other sealant to ensure you clay stays in place, gives it an extra sheen, and will be easy to wipe down to keep it clean.

Tah Dah!  So much better don't you think???


Anthro knockoff, Anthropologie kitchen knock-off, DIY vase, polymer clay vase, easy polymer clay, How to make your own clay vase

Here's my inspiration, that I totally forgot I had pinned.  I thought I had come up with this brilliant idea on my own, but it looks like Anthropologie implanted it into my subconscious via pinterest when I wasn't looking~
Yours for only $78
(mine cost about $2.00)

What do you keep your kitchen utensils in?  Is it full of things you never use?  Leave a comment and share your ideas~

This project was featured here:


Linkwithin

Related Posts Plugin for WordPress, Blogger...