Friday, June 17, 2011

Summer Drink Umbrella - ella - ella - ellas

What's the best way to dress up a summer drink and make you feel like you're somewhere other than your backyard???   Turn up the Rhianna and add an umbrella to your glass!

Kidding, you can skip the Rhianna but a little drink umbrella never hurt anyone.  And to top it off, it's a super fast craft that helps you use up those pieces of scrap paper you know you've been saving for who knows what.

Depending on how many you're going to make, this will take you about 5 minutes, if that.  Even less if you  have a fancy dance cutting machine (like I do!!!!!)

Here's what you need:

Nix the glue gun, I didn't need it after all~
I'm going to do this the old fashioned way so that you guys don't think I've become a Silhouette snob.

Steps:
1) Use a circle template (or a tin can) and trace circles onto the back of your paper.  I used a 2.5"circle but you can make them as big or as small as you want.


2) Cut out your circles.


3) Mark the centre of your circle and draw a small pie shape to the outer edge.  You can also just wing it and go straight to cutting if you're confident.


4) Cut out the pie shape.


5) Dab some glue onto one edge of the circle where the pie shape came out of and press down the other side on top.
 6) I thought I would need a little dab of hot glue for this next step but you really don't.  Just take a toothpick and stab it through the point at the top.


Voila!

DIY Drink Umbrellas, Drink umbrellas, Easy crafting

Now, if I were Martha Stewart I'd probably be adding handmade vintage lace to the edges or something crazy like that but instead I  just made some slightly more fancy dancy ones with a scalloped edge with my new Silhouette machine~

DIY Drink Umbrellas, Drink umbrellas, Easy crafting

And of course, I can't let you out of here without this:


Have a great weekend everyone!!

Check out the linky parties for more fun ideas, and don't forget, if you've hit the follow button on the side bar, you can add your blog button on the "Follow My Friends" tab for free.  Check out the last bloggy friend feature here.

Thursday, June 16, 2011

New Addition

No, not these guys....

New Edition

Mr. and I have a new addition to our family!  It's all very exciting and a little scary, but she's beautiful and given a bit more time I think she'll fit in perfectly around here.

cat, kitten, pets

Her name is Katya, which is short for Ekaterina.  According to some dubious web sources, it supposedly means chaste.  Which I'm actually hoping is very true.

And before I continue, for all of you new Etcetorizers out there I should probably introduce you to Mr., which is short for Mr. Whiskers.  (He also answers to the name Monsieur from time to time as well.)

cat, kitten, pets

Katya showed up under my mom's shed in her back yard a few weeks ago.  She was beyond tiny and obviously hadn't eaten a good meal in a very long time.  We have no idea where she came from but, of course, we both couldn't resist feeding her, so she never left.  Who could blame her?  A little scratch behind the ears and some free kibble would do it for almost anyone.

My mom's cat wasn't interested in making new friends though.  And everyone I asked wasn't interested in taking her on so, I had a long discussion with Mr. and he agreed to give it a try.  He's such a great guy.  (He's been remarkably patient and nurturing since she moved in.  I'm not even kidding, I'm so amazed by him.)

Katya has had a pretty traumatic start to life though so she's taking awhile to warm up to him. I'm hopeful that in time the two of them will become best of friends.

Wish me luck.  So far there's only been one fur flying fight but I have to go out of town this week for work.  I'm hoping I don't come back to a house that looks like the day after a frat party.

Wednesday, June 15, 2011

Silhouette Haul

This is for any of you who enjoy those 'haul' You Tube videos from girls who go out and buy loads of make-up or clothes and then show you everything.  I didn't buy make-up or clothes though....


Yippi!!!  Let's get crafting!!!

If for some reason you aren't able to see the video above, you can see everything, along with video of it's Shopping Channel debut here .  You'll see why I couldn't resist.

Just a note:  neither Silhouette nor The Shopping Channel have reimbursed or paid me in any way to endorse their projects.  I will be paying them for this all on my own for quite some time~

I can't wait to hear from all of you silhouette or circutters out here.  Let me know what you did to get started and any tips or tricks you have.

Happy Crafting~

Tuesday, June 14, 2011

Garmz

If there's anyone out there who loves to design and illustrate fashion I have the website for you!

Garmz is a totally awesome website that makes garment production and distribution actually accessible to independent designers. 

Here's how it works:

How-it-works

There are so many cool and interesting designs to vote on.  Here are a couple of examples of recent successful projects:

  Image             Image               ImageImage

What's really cool, is that you get notified if something you voted for makes it to production.  So, if you really, really liked it, you then have the opportunity to pre-order it!

It's a fun site to see cutting edge design but it's also an incredible place to get noticed if you have design talent.  Breaking into the fashion business is probably one of the most difficult things in the world to do, but here's a fast track to getting your vision mass produced.

Check it out and see what you think~

Monday, June 13, 2011

Not the post I was going to write

I was going to write a nice long post today about all of the crazy goings on in blogland and with Blogger in particular. However, over the weekend, it seems that the blog gods have finally answered my prayers and somehow all of my gripes about Blogger and Google seem to have been answered.

I, and many others, have been having a lot of trouble leaving comments on Blogger blogs lately.  Of course, we were all blamed for not having the proper cookie settings and such.  Finally, at long last though, there are some solutions.


First off, if the blog has comments set as a pop-up window instead of embedded below the post, that really seems to help.  This is actually one of the work arounds you can find on the Google Blogger help forum.  The second thing you have to do though is make sure to NOT check off the box that says Stay Signed In".  This one little thing was wreaking havoc for so long, but no more!  Commenters unite!


The other thing I was going to whinge about was the fact that several months ago my AdSense ads just disappeared.  Despite adding a privacy policy and having a long and lovely email conversation with a google representative, nothing would bring them back to life.

All of a sudden, on a whim, I decided to try to install them just one more time to see what would happen.  Miracle of all miracles, they actually showed up!  I have no idea why but if you've been having trouble with your ads, try, try again, and who knows, maybe you'll get lucky!

So, no complaining from me today.  Once again  I am in love with Blogger and Google is back in my good books.  Or is it me that's back in their good books?  Hmmmm, maybe it's better not to question it and just get on with blogging and crafting.

So, because I'm in such a good mood now, why don't I introduce you to a 'new' Blog!

Momnivore\
Momnivore is a wife, mother of two adorable little boys, and lives with a dog who apparently likes to read.


She knows a lot about a lot of things.  She has a section on autism and a section on living gluten free.


There's a section on health and another section with what I can only assume are some great recipes because they look so good!  (Sorry guys, I'm a crafter not a cook(er).


So, if I don't cook, why do I hang out over there????  Because, on top of all that, Momnivore is also a crafter...


Kid Friendly Garden Gazing Ball


St Patrick's Day Bling
And she hosts a great weekly linky party every Thursday.

Photobucket

Head on over to Momnivore's Dilemma , say hello, and come on back here and let everyone know what you've found.

Have a great week everyone~

PS...I still don't know why I can't see the top 3 inches or so of my post in preview mode (IE8).  If you have any tricks let me know.

Friday, June 10, 2011

Mega Mod Podge Project

As most of you already know, I love Mod Podge.  It's think it's the wonder ingredient of the crafting world.  I especially love Sparkle Mod Podge, but for today's project I held back and just used the regular stuff.

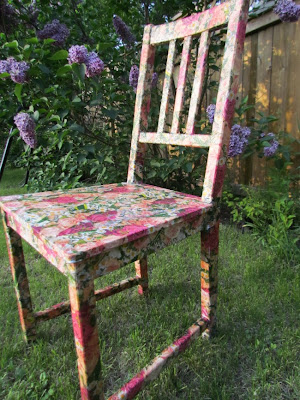
I've been wanting to do this project for awhile now and when I picked up this wooden chair for two whole loonies (that's 2 dollars for those of you outside of Canada) at a garage sale, I knew I was ready to go!

Here are the supplies I used:

Steps:

1) Check to see what the repeat pattern is on your napkin.  You could use tissue paper instead and probably get a big more bang for your buck, but I really liked these napkins.


You only need to do this for the seat.  Everything else will be pieced together and eventually you'll just start tearing and using scraps.  The first piece gets laid down as one whole piece though so you'll want to figure out which way you want the pattern to go.

2) My napkins were 3 ply.  The first one I glued down I kept getting air bubbles because of so many layers of paper.  I learned very quickly to take the layers apart first and use only the patterned layer.  The rest was for wiping the glue off of my hands.


3) Pour some glue out onto a paper plate and get ready to paint it onto your chair.


The rest is basic Mod Podge but I'll go through it anyway, just in case there's someone out there somewhere who hasn't taken the Mod Podge plunge yet.

4) Paint one layer of Mod Podge directly onto the chair.


5) Lay your napkin down and paint another layer of Mod Podge right on top of the napkin.  Mod Podge dries pretty quickly so you have to work fast.  Make sure you go over all of the edges to seal them.


It's OK if your napkin tears.  Sometimes it just can't handle all that glue and movement.  Once it dries you can just place another layer of glue and napkin and glue on top of the torn area.  No one will ever know~

6) Keep going all around the chair, making sure to get every little nook and cranny and spindle.  As you start getting into smaller spaces you can just tear your napkin.  Ragged edges are totally fine, if you have a busy pattern like mine it'll all just blend nicely.

By the way, I should probably mention that this is not something you want to do after an expensive manicure.  It does get messy.  I've got Mod Podge on my hands, my arms, my jeans, and I think even in my hair right now.  It all comes out easily, except when it's on top of nail polish, then it pulls the polish off too.

It's all worth it though, take a look!!


Pin It

Mod Podge, Floral Chair, Mod Podge Chair

Mod Podge, Floral Chair, Mod Podge Chair

I think it's just about pretty enough to be in the garden but it's actually going in front of a little built in desk in my kitchen.

Mod Podge, Floral Chair, Mod Podge Chair

Please excuse the mess of cords and the blahness of the walls.  This is the first step of an overhaul of my kitchen, almost the last room on my list of major make-overs.

I think this would be a fun craft to do with kids actually.  They like getting messy right?!?!  It took me a couple of hours and about 10 napkins to cover the whole chair.  I think it's fun and whimsical.  I can totally picture it with Mod Podge Sparkle but I'll try to ignore my 10 year old self and leave it as is.

Have you ever decoupaged something big?  While I was doing this I was thinking it would be pretty funny to do an entire dining room set or a bed frame or something.  You'd need a lot of Mod Podge but it could be fun.

Anyway, let me know what you think and if you're going to find something to cover in Mod Podge and Napkins.

I'll be linking up at the parties from the linky party tab up top.  Check them out to find loads of other great ideas.
 And make sure if you've hit the follow button on the side bar to add your blog button to the Follow My Friends page up top.

Have a crafty week!

Linkwithin

Related Posts Plugin for WordPress, Blogger...