Showing posts with label skirt. Show all posts

Wednesday, September 25, 2013

Chasing Elise Ward II

Last week I showed you my Elise Ward (Angelina Jolie in the Tourist) inspired dress.  Today I'm sharing a lovely long, skin tight pencil skirt I made with the same inspiration in mind.


It has a nice kick pleat at the back that makes for easy maneuvering.  The stretch suiting I used helps too.   I took it in on the sides a bit and angled in along the bottom of the side seams to give it a more sassy look.


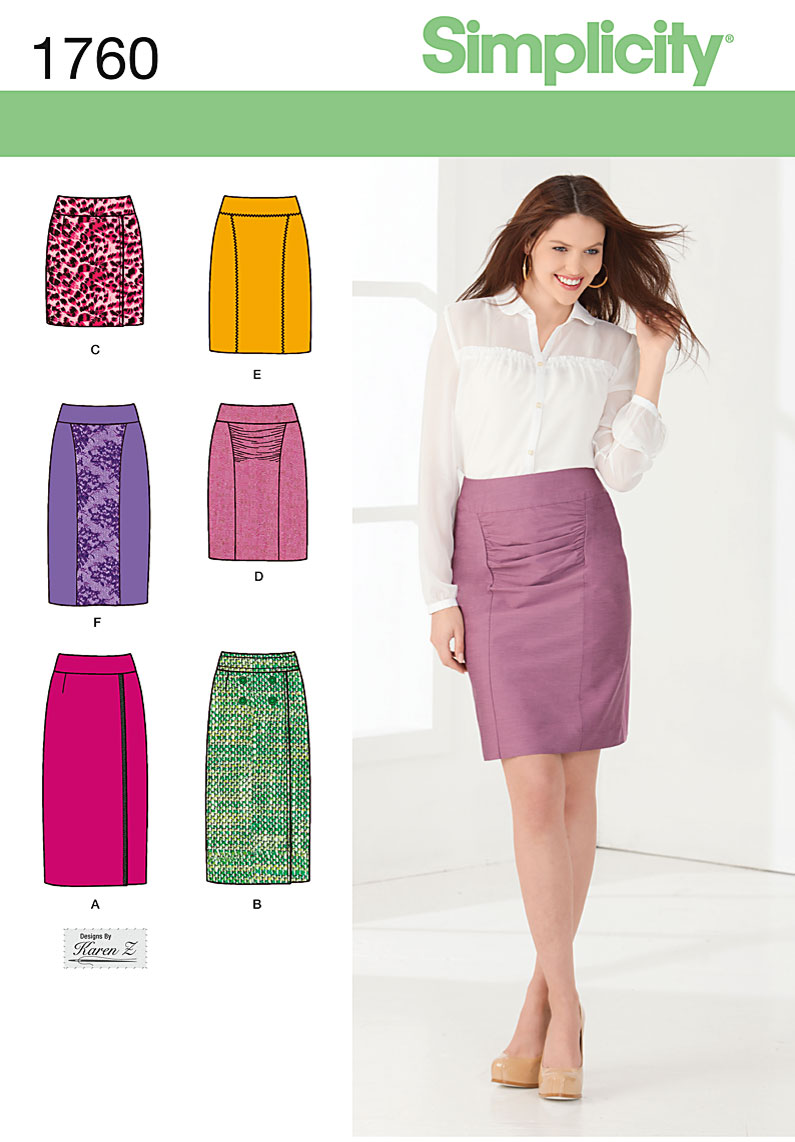
I made View F of this nice new Simplicity pattern:

Photo
View D is definitely on my
list of things to make.
If you make this pattern, beware the trap you might fall into if you use invisible zippers.  I didn't look ahead in the instructions and completely forgot there was a yoke.  Skip the zipper step and go back to it after your yoke is in, otherwise you will have a lot of stitches to pull....take it from me.

Unfortunately, I got some vexing news at my local fabric store.  They aren't going to carry Simplicity patterns any more.  Apparently Simplicity no longer has any distribution from Canada so a lot of stores have given up on them because they take so long to receive orders.  New Look is already next to impossible to find, now Simplicity too!

Good think I know how to shop online~

Wednesday, February 27, 2013

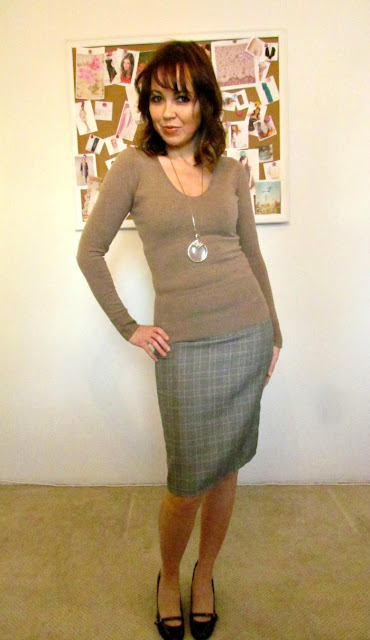
Pencil Skirt

So, I made this skirt last week.  I didn't think it was a big deal, it's just a plain old pencil skirt...so I wasn't even going to do a post on it.    And then I tried it on....

Dress it down with a sweater.
I really L-O-V-E this plain old pencil skirt!  It's like magic.

Here's the lesson ladies...just make your skirt the tiniest bit more snug than you think you should, pair it with a pretty blouse, cinch your waist with a great belt, and add just a bit more colour to your lips than you normally would and va-va-voom!


You will feel like a 60's bombshell that just stepped off the Mad Men set.  (I know I don't have the curves of a real '60's bombshell, but I still feel good in this skirt~)

It's surprising what you can do with a metre of $2.00 fabric from the bargain bin isn't it?!?!


It's just some kind of wool gabardine but I love the line of taupey brown line in it, it makes it so much more wearable with other colours.

I used this pattern from Vogue but like I said above, a pencil skirt is a pencil skirt, any pattern will probably look almost exactly the same as this one.


You can see some other pieces I made from this pattern here and here.

What's your favourite style of skirt?  Leave a comment below!

Friday, November 9, 2012

Winter Maxi Skirt

Well, I think I've already complained enough about the weather, but for those of you who are new to Etcetorize...it's winter here in Canada.

The problem is, I still like to wear a nice skirt sometimes.  How do you wear a skirt in freezing cold temps???  With nice thick leggings underneath!  And a maxi skirt is the perfect solution.  No one has to see your woolen legs and you still get to be stylish and toasty warm.

Here's what you need for today's project:


Materials:
-60" wide stretch knit fabric
-thread, scissors, pins, measuring tape/yard stick
-wide elastic for waist
-chalk marker/wheel

Steps:
1) I'm going to take the first couple of steps to show you how I folded my fabric.  Folding it this way will ensure the minimum number of cuts.

First, lay your fabric out, bringing the selvedges together in the middle.  Each outside edge should have a fold.

2) Now, fold under the right side so that the left side of your fabric consists of two folded edges and the right side has one selvedge, one fold, and then one selvedge.


Get it?

3) To get the measurement that we need to cut the waist follow this formula:

waist measurement divided by 4 +1 inch.

So, for easy math we'll say that your waist is 32" around...divide by 4 = 8".  Add 1" = 9"

This is how long you will draw a line along one end of your fabric using your chalk.


Personally, the last thing I need is lots of bulk and gathering around my waist, but if that's the look you want, add more inches and you can gather it later.

4) Now measure your hips and divide by 4.  Mark this measurement approximately 8" down from the end of the  waist measurement.


5) Decide how long you want your skirt to be.  Make sure to add 1/2" inch to attach to the waistband and a hem allowance.  Don't forget to add extra if you plan on wearing your skirt with heels!


You should have a shape that looks something like the picture above.  Now, go ahead and cut through all layers of fabric.

You'll end up with two trapezoidish shapes.

6) With right sides together, sew and finish your side seams.  Serge or zigzag along the top edge while you're at it.

7) Set your fabric aside and pick up your elastic.  Measure it around your waist so that it's comfortable, making sure to add a bit of overlap.  Cut and stitch together so that you end up with a circle.


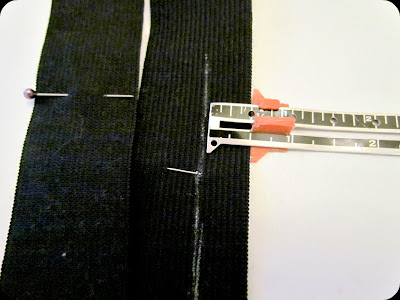
8) Quarter off both the skirt top edge and the elastic.  Just keep marking the middle of your folds with pins until you've marked off 8 points.


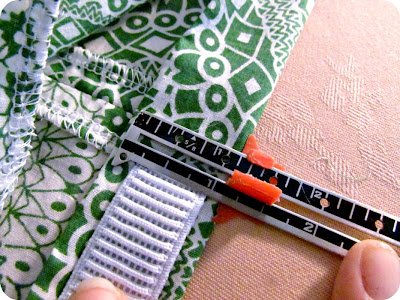
9) Before you stitch your elastic on, on the inside edge, mark 1/2" up from the bottom.  When attaching your fabric use this as a guideline and don't let your fabric edge go above it.


10) Stitch the elastic and fabric together, stretching as you go.


11) Hem the bottom and that's it!  So easy, right?!?


I need to find/make a better top to go with it, but I really like how it turned out.

I was actually going to make this skirt from Morning by Morning Productions  but got sidetracked when I pulled the plaid fabric out of my stash.

                                                      Source: morningbymorningproductions.blogspot.ca via Etcetorize on Pinterest


I'll still make the lace one someday~

Is it winter where you are or do you still get to wear only one layer of pretty things?  Leave a comment~

This project was featured here:


Wednesday, August 15, 2012

Adult Prairie Skirt

Last week I showed you how to make a cute skirt for back to school.


I was even lucky enough to have it featured on CraftGossip.  Anne Weaver picks out what sewing 'gossip' to share with their readers and here's what she wrote about my little project:

Tamara from Etcetorize shows how to make a girl’s prairie skirt for back-to-school. The long ruffle sewn on to a yoke creates a full skirt without making it too bulky through the hips and waist. She gives the dimensions she used to make one for her 5 year old niece, but you can easily adjust them to make a skirt larger or smaller. This would be cute for the tween set, or even in an adult size. 

What she didn't know at the time was that I had already made a larger version for myself!


Don't ask me what measurements I used, because I just eyeballed the whole thing and used the same concept that I did with the girl's skirt.

I don't ever wear this silhouette but it's not bad.  I think it's good for people trying to add curves (like me) or hide curves (like Reese Witherspoon or Jennifer Love Hewitt-they both rely heavily on this style).  The border print cotton fabric gives it a very folksy feel.  Hopefully, I don't like like I'm about to go to a hoe down.

This is the first time you're seeing my new bangs too!  I asked for your opinion on my new haircut here, and as soon as I read the comment from the lovely Ana from Portugal you couldn't hold me back..." I think with bangs you look like younger :)! ".  Yup, she said the magic word~

Friday, August 10, 2012

Back to School Skirt

My niece celebrated her fifth birthday recently.  Well, we celebrated, she opened lots of presents.  I always like to give something handmade along with her 'big' gift in the hopes that I'm secretly brainwashing her and turning her into a future crafter/sewer.  I think it's working!

how to make a skirt, easy to make skirt, kids skirt, beginner sewing project

Her little add in gift this year was a cute skirt I threw together.  If you have little ones heading off to school this year, this is a great piece to add to their back to school wardrobe.

This is another project where I just took a couple of rectangles and made them into something cute.  So, to start, make a pattern out of two rectangles like this:
Remember, the skirt I made is for a 5 year old.  If your child is bigger/smaller, taller/shorter, whatever, just make some adjustments to your rectangles.  Mostly, it'll be in the skirt length that you'll adjust to make it longer or shorter (the larger rectangle).

Here's what you need to make your skirt:

Materials:
-lightweight cotton
-3/4"-1" wide waistband elastic
-scissors, pins, thread, ruler
-sewing machine

With your fabric wrong sides together, place your pattern pieces on your fabric and cut out.  You should have two of each rectangle.

Steps:
1) Pick up your two smaller rectangles.  With right sides together, sew a seam along each of the short ends, creating a large tube.  Do the same with your large rectangles while you're at it.

2) Finish your seams by serger or zigzag and press open.


3) With a long basting stitch, sew all the way around the edge of your large rectangle piece.  I like to stop and start again at the side seams.  This reduces the risk of breaking thread when you pull it to gather in the next step.


4)  Before you pull your threads to gather, mark off quarter sections of the skirt.  To do this, simply fold your piece so that the side seams are matching.  Now, on either end mark with a pin.  Now you know where each quarter is.  You can continue to mark off so that it's in eighths if you want to be more precise in your gathers.


5)  OK, now you can go ahead and begin to pull your basting thread to gather up your skirt.

6) Mark off quarters (or eighths) on your smaller rectangle piece.  This piece is the yoke of your skirt.  Once you've marked it, match to the pins on the gathered skirt piece (right sides together).  Start by matching your side seams and then go from there.  Move your gathers around so that they're even in each section.  Once you're sure everything's even, go ahead and sew the two pieces together.


7) Pull out your basting threads and finish the seam.  Press the seam allowance towards the yoke.


8) On the yoke, turn over 1/4" along the top edge and press. 

9) To determine the length of the elastic, just measure around your child's waist and cut a piece that is comfortable for them but will stay up on it's own.  This is usually the waist measurement minus 1" or so.  Don't forget to add in about a half inch to secure the elastic to itself.

10)  Next, measure the width of your elastic. Multiply that by two and add another 1/4". Turn that amount over and press again. Nothing fancy here, we're just making a casing for your elastic to go into.

11) Sew along the inside edge, making sure to leave about 2" open to insert your elastic.  I like to put a safety pin on each end of my elastic to guide it through the casing.  The second pin makes sure the end doesn't go flying into the casing, causing me to have to start all over again~


12) Once your elastic is in, overlap about 1/2" and secure to itself.  Make sure your elastic hasn't twisted!  Ease the elastic into the casing and close the casing.
13) Oh!  I almost forgot...hem the bottom of your skirt!  You can fold it over and secure or do a rolled hem.  Add some pretty lace if you want.  Anything goes~

That's it!  You're done.  So easy peasy.  I added a cute little tie to the front of mine but you could use buttons or other embellishments to make it pretty.

Can you believe summer is almost over and a whole new school year will be starting again?  Isn't it funny how even as an adult it feels like everything starts in September?

Same skirt with shorter yoke and skirt.
Obviously she just wants to go ride her bike.
Enough with the pictures already Auntie!
As usual, it seems like a lot of steps when it's all written out like this, but trust me, it comes together super quick.  There are so many ways you can jazz this up and make it your own.  Have fun and happy sewing everyone!

**UPDATE**
To see how this looks in an adult size click HERE.

This project was featured here:

Friday, July 27, 2012

Summer Two Piece: The Tutorial

Okie Dokie, here we go...due to overwhelming interest (4 people, I think) here is the requested tutorial so that you can make your very own Summer Two Piece ensemble!


When I whipped it up it was really a very simple project, and it still is in step by step form, it just seems like a bit much when it's all broken down.  But stick with me and by the end you'll have a few outfits from these two simple little pieces.

Before we begin I have to clarify two very important things:

#1- I do not know anything about pattern drafting.  This is just a series of some rectangles slightly adjusted, it's not couture, so please don't get your undies in a knot if I'm not doing something the way "it's supposed to be done"
#2-The measurements I'm using are to fit my body.  As I've mentioned before, I'm very small busted (about a 36 A or B).  I think most grown women are little more well endowed than I am (can you use that phrase for women?) so make adjustments to suit your body.  If you're more 'bossomy' then make your pieces a little wider, if you're longer in the torso, make your pieces longer.  It's not rocket science, just experiment.  Think of mine as an extra-small and make your pattern bigger as needed.  Just think about how store bought patterns look, they just expand by about 1/4" - 1/2" for each size up.
#3- I'm going to break this down into two parts, the pattern and then the sewing.  It's going to seem long, but trust me, the whole process can be done in about an hour.
#4- I'm writing this as if I'm writing for beginner sewers.  If it seems too simplistic, consider yourself an intermediate sewer.  Congratulations!

Here we go....

To make your pattern, here's what you need:

Supplies:
- Craft or tissue paper
- Ruler or measuring tape
- Pencil and paper scissors

Steps:
1) Start by drawing a basic rectangle.  This should be the length of your top plus about 3" for seam allowance and bottom casing.  The width should be a couple of inches wider than your widest part of your torso for a loose fit.


2) In the upper right  LEFT hand corner (that should say LEFT below, sorry about that) measure and mark as below.  We'll use these measurements to soften up the edges a bit.


3) Extend your measurements to the corners as shown.  These new lines will be your side and top edges.

4) Round out your top edge by just free hand drawing a slight arc in the line.


5) Do the same for the bottom edge.

6) That was your front piece.  Now we need to make the back.  It's almost the same but shorter because it sits lower on your back.


7)  It's difficult to see, but basically it's the same idea, measure in around 3" from the RIGHT top corner, connect to bottom to create angled side seamand slightly curve up the top edge.


8) As a little extra something I added a lining or "shelf bra" inside.  Tube tops are always better with this added feature and it's super easy to add.


9) Don't forget to make the back of your lining (which I almost did!).  I actually didn't even make a separate piece.  I just used the back that we already made and drew a broken line about 5.5" down from top.  Once I've cut out my back I'll just fold this up and use it to cut my lining.


OK, that's your pattern pieces.


PART TWO: Sewing your top

Here's what you need for this section

Materials:
- Your pattern pieces
- Scissors and pins
- Narrow and Wide Elastic (if you have lingerie elastic for the narrow elastic it's best to use that)
- Stretch fabric and matching thread
- Sewing Machine

Steps:
1) Cut out your pattern pieces on your fabric.  CUT ALL PIECES ON A FOLD.
(Sorry, I'm showing you this on ivory fabric which may make it hard to see the stitches, but as I said a couple of weeks ago, I'm using up my stash and this is what I had on hand.  No trips to the fabric store until I use up what I have!)

I almost missed the back of my bralet, but  it's there
at the top of your back piece.
Don't forget to cut it out too!
 2) We're going to make your 'bra-let' first.  With right sides together, sew your side seams and finish with a zigzag or serge, whatever you usually do.


4) Measure about 2-3" from each side and pin.  Measure another 4" or so from your first pins.  Baste long stitches in between your pins and gather slightly.


5) Measure a piece of the narrow elastic around your torso, under your bust line.  Cut a piece that is a comfortable length and sew together by overlapping the ends.  You should end up with a loop of elastic (that isn't twisted).


6) Divide your loop of elastic in quarters.  The easiet way to do this is the pull the sewn piece to one end and mark the other end with a pin.  Now, bring the two pins together and pin the other ends.  Now you have marked off quarters.  Do the same with the bottom of your bralet.  Now, match up your pins and pin your elastic to the bralet, having edges even.  Make sure you elastic is on the right side of your fabric.


7) Using a narrow seam allowance, sew your elastic down, pulling as you go making sure it's somewhat even.  You can use a zigzag and stitch over the inside edge.


8) Now we're going to make the body of your top.  Start the same was as the bralet by sewing the front and back together along the side seams.


9) All right, it's coming together!  We're almost there.  Now, slip the bralet inside of the bodice, WRONG sides together.  Pin the upper edge so it's even all the way around.  You can baste this edge if you want now.


10) Using your 1" waist band/wide elastic, cut a piece that fits comfortably around the top of your chest area. 

Follow the same steps to adhere this to the top of your bodice as we did to the bottom of the bralet.

11) Once you have your elastic sewn onto the top edge you just fold it under and press.  This is what give you the seamless look rather than a casing and it's what makes this top special!


12) If you want a blousy look for your top, just sew a small casing along the bottom edge, insert elastic, and close. Measure the elastic to fit loosely around your hips. Don't make the loop like we did before. Just use a safety pin and feed it into the casing, stitch the ends together, and then close the casing.


And that is it!


I know what you're saying. "Uh Tamara...that's only one piece!  Where's the bottom?!?!"  Guess what...you already know how to do it.   Just click your heels three times and say there's no place like home.  Oh wait, sorry, that's something else.

Seriously though, you now have the skill, the tools, and the knowlege to make the skirt.  Just make a rectangle about an inch wider than your hips and angle it out, curve up the bottom edge just slightly, add your elastic to the waistband just like we did for the top of the top, and hem it.  There you go!  You've created your own skirt.  Look at you, you'll be an intermediate sewer in no time~


Now, the four of you who requested this tutorial better get sewing because I want to see your creations!  Have fun and just go for it.  If you want a more casual look, sew a tie on the front.  if you want a dressier look, lengthen the skirt and add a slit.  Make it your own.  I can't wait to see what you come up with~

Happy sewing!

Linkwithin

Related Posts Plugin for WordPress, Blogger...