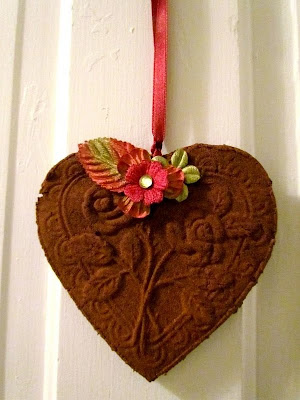
We're going to use lots of cinnamon. Cinnamon is a scent that I can sometimes find overpowering but, I enjoy it in the fall. It's warm and inviting. I love these pomanders that we're going to make because they can literally last for years and years, and still give off a nice subtle aroma.
Here's what you need:
 |
| That's apple sauce and cinnamon. Don't worry about the brand, you're not going to eat it~ |
Steps:
1) Measure 1 cup of cinnamon and pour into a mixing bowl.
2) Add about 1/2 cup of apple sauce.
Your dough should be dry and crumbly.
3) Slowly spoon in a bit more apple sauce until your dough is like clay. Make sure to not let it get too wet and sticky.
4) Dust your mold with a bit of cinnamon.
5) Scoop out a large egg sized shape of dough and gently knead into your mold.
6) Level off the back with a sharp knife.
7) Gently tap your mold until the dough comes out and place on a cookie sheet.
8) Before you put into the oven to bake, don't forget to make a little hole at the top of your shape so that you have something to hang your pomander by when you're all done.
9) Now you can put into the oven for one hour at 150 degrees.
After one hour, take the pomanders off your baking sheet and place right on the rack in the oven for another hour, still at 150 degrees. This will allow the dough to thoroughly dry out.
Let them cool off, and now comes the fun part. Decorate your pomanders with ribbon, flowers, buttons, anything you want!
Hang in your kitchen or a hallway and every time you pass by you'll get a lovely poof of cinnamon air.
If, after awhile you can't smell it anymore, just rub the back of your pomander down a bit. It will freshen it up and the cinnamon scent will come alive again.
What do you think? What's your favourite fall smell? As I was making this I was wondering if I could try different spices for different smells and colours. I'm thinking about recycling this craft and making some nice tree ornaments for Christmas. Use your imagination and see what you come up with!
I'll be linking up all week but don't forget to come back here on Monday for the Make it Great Linky Party!
Have a crafty week!


14 comments:
Thanks! Might give this a try, also lovely to give as a small Fall gift ♥
I'm pinning this as well. Love the idea that you can just scrape the back a bit and refresh the scent.
This little DIY is FABULOUS! I LOVE IT and thanks so much for sharing!!! hugs...
Very clever, I must say. Thanks for the "pin" button for Pinterest too- yuppers, I pinned :)
Visiting from Funky Junk Interiors Linky Party tonight,
~Suzanne in NW Illinois
Good looks and good smells!
Thanks for the tutorial. I've seen these before and wondered how to make them. I bet you could put some fragrance oil in the mixture, too...or maybe that might be too oily. Can't wait to experiment. :)
Pinning on pinterest.
Cheers,
Tracy Screaming Sardine
Can't wait to try this!
Hello, creative! Welcome to my blog party )!
I used this recipe for my Fall wedding favors 6 years ago and they still smell wonderful!! I used a cross cookie cutter and then used a really small heart cookie cutter. I used a straw to make the hole for the ribbon.
Just popped in from Sugar Bee Crafts' Link up. I love this craft! My kids would enjoy it as well. We've done Christmas ornaments like this, but I've never thought to use a paper mold for it. Thanks for sharing!
Jaymie@ http://dancesdishesanddreams.blogspot.com
Love this! It would even make a great car air freshener! I would be honored if you would link this up to my Commercial Break Thursday!
suzy
This is perfect as a co-worker gift or a "thiking of you" gift. I've saved it to my favorites! Love your blog!
My crafty friend makes these every year and told me her secret for keeping them from crumbling after they are dry is to use a combination of Elmer's glue and apple sauce. She mixes it in a 1 to 1 ratio and adds it to the cinnamon. I had great luck using it that way.
One may add a dash of cloves, allspice or nutmeg to the cinnamon for added fragrance. I use unsweetened applesauce. I make the dough a little more moist that what this looks like in the photo. You can come up with great ornaments or favors for all occasions with the right cutters (check ebay and thrift shops)I air dry mine, but can tend to curl up if not turned frequently. I might try to bake a batch this winter per these instructions. this is a lovely mold.
Post a Comment