Showing posts with label Fall. Show all posts

Monday, October 1, 2012

Pinspired Fall

Do you know how many pins I have on my "Things to Make" board on pinterest????  Over 200!!!!  How did that happen?  I guess I better get making stuff!

Now, I'm not usually too crazy about banners, wreaths, signs, etc.  But I've come across a few that I just had to make.  Here's the first one:


I've hung it on my front door.

Some close-ups:


And here's the inspiration:


The funny thing is, I was about halfway through choosing my papers when I realized I had the same stack as the original!  I couldn't punch through the coasters I used as the bases so I just glued some gold shimmery ribbon on the back instead.

How many pins do you have on your 'to make' board?  Do you actually make any of them?  I've also started a board where I move pins over that I've actually made.   It makes me feel like I'm crossing things off the list.

Friday, September 28, 2012

Autumn Candle

Although the temperature has been unseasonably warm (in the afternoons), Autumn is definitely here.  I know because I just spent the last hour mowing up leaves in the yard.  (There's just waaaaaay too much to rake them up, the lawn mower is the only way to go.)

Still, even though the nights are cool and the sun is going down earlier and earlier, the changing leaves make it very beautiful outside.

While I was outside I decided I needed to use some of those pretty leaves and make something with them.  So, I came up with this very simple and very quick project for today.

DIY Candle, Fall crafts, Decorate your own candle

Before I even gathered my supplies, I took my candle outside to see which leaves would be the perfect leaves to use.
Soooo many colours to choose from!
Once you've found the leaves you want, here's what else you need:


Materials:
-iron
-candle
-wax paper
-leaves

Steps:
1) Turn on your iron and while you're waiting for it to heat up remove any wrapping on the candle.  Then lay a small sheet of wax paper down on a flat surface and place your candle on top.  You can start to decide the placement of your leaves.


2) Wrap the wax paper around the candle, covering the leaves, and then gently use your iron to heat up the wax and melt the leaves into the candle.


**Note: test your wax paper first to see if there's a right and wrong side so that you don't leave wax residue on the bottom of your iron.


You don't have to leave your iron on the paper for very long.  You'll see the wax melting.  Just gently rub the iron around.  Lift the wax paper up and place some more leaves down.  Repeat the process until your candle is filled and you're happy with how it looks.

Tah dah!  That's it.  Another project done in less than 5 minutes~


I really love how this adds a little bit of character to an otherwise plain Jane candle (no offense to any Jane's out there).

Do you say Autumn or Fall?  What's the difference?  I think Autumn sounds a little more swanky and sophisticated.  Truth be told, I usually say Fall.  Guess I'm not very swanky~

This project was featured here:


Friday, October 21, 2011

Fall Door

I have been a crafting maniac lately.  Seriously.  Just look at the mess in my studio...


But it's all worth it because here's the end result. 


Aren't they pretty?!?!!  I have a friend who sells my bags in her shop here.  Almost everything in her shop is made in Saskatchewan.  She has everything from garlic and mustard to candles and bags and pottery.  It's really beautiful.  I'm going to see if she's interested in the little beauties above too!  Crossing my fingers~

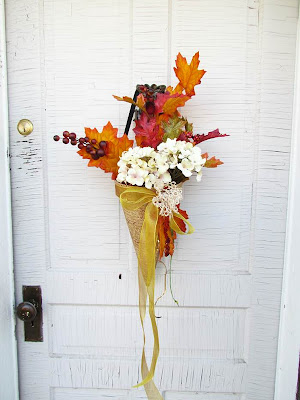
Anyway, I managed to tear myself away from all of that to make this week's craft....a fall wreath.  Well, not really a wreath.  The only time I stick a wreath on my door is Christmas, so it's a Fall Cone instead.

I shot loads of pics because I was really making this whole thing up as I went along, but really, it's dead easy.

Here's what you need:

Basically just grab anything odds and ends that are
decorative and fit in with your colour scheme~

Steps:
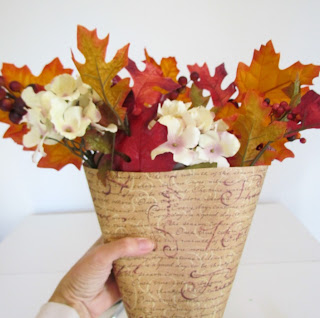
1) Create a cone shape with your scrapbooking paper and glue together.


The back will be open like this.


I was actually just going to leave mine like that but I realized it would be sturdier with something holding it together back there so I just glued on some plain paper.  The clips are on only until the glue dries.


2) I added odds and ends of fake flowers and leaves to see how it would look.  The whole thing probably would've gone together easier if I had taken them out after this but for some reason I stubbornly left them in there for the rest of the project~


3) Add some pretty ribbon to the top of the cone by gluing to the back.


Bring round to the front and tie a nice bow.


4) Now you just start throwing bits and bods on of any left overs you have.  Left over sequins from the Butterfly Cushion Project ?  Sure throw them on! 

5) Got a doily?  Go ahead!  Throw it on there!  (I gathered it in the back and secured it with thread and then just pinned it to the ribbon)


6)  When you're done adding things, punch a hole in either side and insert some ribbon to act as a hanger.


Make sure you knot your ribbon on the inside enough times that it doesn't slip through the hole.


7) And that is it!  Voila!  A pretty fall door~

Fall Wreath, Fall Door, Fall Decorating, DIY Fall Door, Autumn Decor, Easy DIY Fall Craft

 I know, I know...My door needs to be painted.  But it's 100 years old and I think the cracked paint gives it character so I just can't bear to do it.

Fall Wreath, Fall Door, Fall Decorating, DIY Fall Door, Autumn Decor, Easy DIY Fall Craft

 That's about the extent of my seasonal decorating until Christmas so I hope you like it.  Leave a comment below and let me know what you think.  And don't forget to come back here on Monday for the Make it Great Linky party!

Have a great weekend everyone~

Thursday, October 13, 2011

Inspiration Shot: Fall Leaves

Fall is definitely here, and I am definitely obsessed with all of the beautiful colours in the leaves....


Fall, Autumn, Canadian Fall, Leaves, Changing Leaves, Nature, Fall leaves, Fall trees, Canadian Trees


I love anything variegated so these ones are really special~


Even at night they're beautiful~


My plum tree looks like it's on fire!


Just click your heels three times~


Happy Fall everyone~

Wednesday, October 12, 2011

New Fall Coat

I may have mentioned once or twice that I'm a little excited to be attending the Creativ Festival in Toronto this year (please don't go on strike Air Canada!!!!).  First of all, it's been ages since I've had a holiday, and secondly I can't believe that I'm going to be surrounded by people like me who are just as obsessed interested in crafting and sewing as I am!!!

But I don't want to look like a little prairie chic walking around downtown Toronto, so I made a new fall coat especially for this trip (well, that's the excuse I'm using, but truthfully I just love making coats).


I used this pattern with a lot of alterations.

Vintage New Look 6538
Out of Print
I haven't bought a New Look pattern for a very long time (except at the second hand shop) so I'm not sure if they've improved their sizing at all but they used to only go as low as size 10 in most of their patterns.  This drives me crazy because I'm nowhere near a size 10.

So, I took it in several inches on the sides, added darts in the front and back, narrowed the sleeves and hemmed them instead of fringing them, and narrowed the shoulders slightly.  It's still a little big but I figure that will be nice when I pull out my heavy sweaters.

I love the colour of this fabric.  And you wouldn't believe how super soft it is.


The pattern didn't call for a lining but I wanted something to shield the wind so I lined the back and the sleeves, and then I ran out of fabric.


The fringing is really what makes this coat stand out.  I love it.  It took about ten times longer to do it than I thought it would but it was sooooo worth it.


So?  Will I fit in with all the city slickers in Toronto?  I don't know if my coat is downtown chic or ranch hand trendy.  What do you think?

DIY Fall Coat, New Look 6538, Handmade Coat

PS....I also cut off half of my hair!!!

Linkwithin

Related Posts Plugin for WordPress, Blogger...