Wednesday, October 9, 2013

Boys Napsack

Last week I gave you a tutorial on how to make the Easiest Napsack Ever that I made for my niece.

And you know if I make a girls version, I have to make a boys version for my nephew too~

DIY Napsack, DIY Backpack

This kids size bag is perfect for sleep over or a place to throw runners for after school activities.


You can find this great old world map print in the Others section over at Wholeport.

*This post is sponsored by Wholeport.com however I have received no compensation other than the fabric shown and all opinions are my own.

Monday, October 7, 2013

Movie Monday-Quick and Easy Halloween Treat Packs

Have you started getting ready for Halloween yet?  


Did you know that there's more to it than just making a great costume?  Now you have to make great packages for all your treats!  I had no idea.

I love this project because it's so quick and easy but you can still add personal touches.


Head on over to Scrapdaworld and leave Tamika a nice comment if you like her project.

More fun Halloween projects to come~

Friday, October 4, 2013

Easiest Napsack Ever

Last month I got some great waterproof fabric from Wholeport.  With school and all kinds of kids activities starting up, I knew right away what I wanted to make with it.

easy sewing project, how to make a backpack, how to make a napsack, DIY Bag

Here's what you need to make your own bag in no time flat.


Materials
-.5 metre of fabric ( doesn't need to be waterproof)
-2 metres of 1" wide webbing
-4 D rings
-ruler, fabric pen, scissors, thread etc.

Steps:
1) Cut two pieces of fabric 11" x 14.5". (This is kids size, if you're making this for an adult, increase the size to fit.)


2) Use your fabric pen to make a mark on the side 2.5" up from the bottom.

3) Cut two pieces of webbing 3" long each.  Seal the ends with fray check or melt them so that they won't fray.


4) Loop your webbing through 2 of the D-rings and attach to the outside of your bag at the markings you just made.  Have the  length of the webbing towards the inside, raw edges should be even.  Sew with a 3/8" seam.


5) Repeat step 4 on the other side.

6) From the top edge, measure down 1 1/4" mark and measure again another inch down.  Lay both pieces of fabric right sides together and stitch the sides, skipping the inch between your two marks.


7) Stitch across the bottom and snip the corners so that they'll lay flat once you turn everything right side out.


8) Turn right side out and turn top edge down 1 1/4" and stitch.  You should end up with a hole on the outside of the upper casing on each side seam.


9) Cut the remainder of your webbing in half.  Don't forget to seal your ends.  Attach a large safety pin and guide one piece of webbing through a side hole ending at the opposite side seam.


10) Stitch down the webbing on the opposite through the hole to secure it.


11) Repeat on the opposite side.

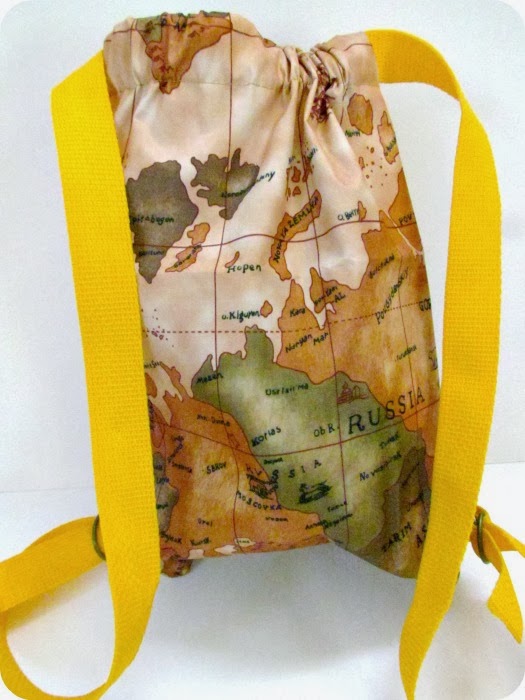
12) Weave the ends of your webbing through the D-rings to act as adjustable should straps.


That's it!  You've created the Easiest Napsack Ever!!


I was a little nervous that this fabric would be difficult to sew with a regular presser foot but I had no major glitches or slips.  Check out all the other great waterproof fabric you can choose from over at Wholeport.

*This is a sponsored post however I have not received any compensation other than the product shown and all opinions are my own.

Thursday, October 3, 2013

Etcetorize on Instagram

Have you checked out Etcetorize on Instagram yet?  What are you waiting for?  Here's a look at what you're missing....


I post pics of family, nature, projects, and other things going on in my life besides crafting.  Come on over and feel free to hit the follow button~

Wednesday, October 2, 2013

Personalized Headphones

Doesn't get much easier than this...

DIY Headphones, Mod Podge

A tiny bit of Sparkle Mod Podge, and even tinier paper shape and you've got your own one-of-a-kind headphones!


Tuesday, October 1, 2013

Pixel Scrapper

There are so many great sites out there that offer digital freebies but I just have to let you know about another one I came across a couple of weeks ago thanks to Karen over at Free Pretty Things For You.

Pixel Scrapper

 You don't have to be a digital scrapbooker to find uses for all the great things you'll find here.

It's a really neat site where you 'purchase' items with "DC points".  You get points by doing things like logging in every day, signing up for mailouts, etc.  So, in effect, you can get loads of things for free.

I got this whole entire package for FREE because I got a bunch of points just for becoming a member.


It's basically three kits in one.  I got all the background papers, as well as all the text pieces, glitters, images, and other ephemera.  Neato, right?  Do you recognize any of the items???  (hint hint, take a look at my new header)

So far, I've found that I can use these images in my Silhouette software too!  Bonus.

They've also got loads of tutorials if you use Photoshop, great layout ideas for scrapbookers, and a fun blog with even more great tips and ideas.


I stumbled onto their Pinterest page and ended up following.  I love all of the trending and inspiration boards and easily got caught up on the Ephemera Love board for far too long.

Check it out, see what you find.  I'd love to hear about what kind of projects all of these fun little images inspire.

*This is not a sponsored post.  I just fell in love with this website and wanted to share it with you~

Linkwithin

Related Posts Plugin for WordPress, Blogger...