Friday, July 6, 2012

Summer Scarf Halter II

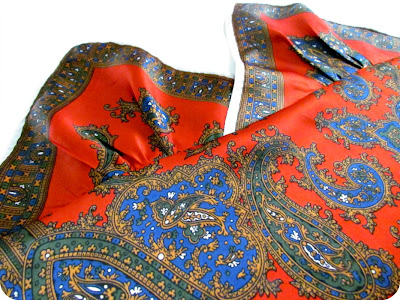
Apparently the dance of veils is not over...I still have two scarves left to make something with.  So, today, let's make a new version of the Scarf Halter top for summer.
scarf refashion, how to turn a scarf into a top, Scarf halter, Scarf top
Here's what you'll need:

Materials:
-Large scarf (mine is about 26" (66cm) square)
-thread, scissors, pins
-sewing machine and measuring tape (not pictured)

Steps:
1) Fold your scarf in half and cut along folded edge.
Now you have two pieces.


2) Take one piece and cut a 2-3" strip off the cut edge. (This step is optional if you need larger halter pieces and will make straps out of an alternate material.)


3) Cut your strip down the middle so that you'll have two long strips 1-1.5" wide.


4) With the remaining piece from step 2, fold over corners to create triangles on either end.  Cut the bottom layer of the scarf along the inside edges.


These are all of the pieces you should have.

2 long skinny pieces, 1 large rectangle (half of scarf), two small squares. Plus you'll have one small squarish piece that you don't need right now but hang onto it.

5) Fold the small squares to make a triangle.  Press the folded edge.  Zig zag or serge the unfinished edges and stitch along the inside of the finished edge.  This creates lined halter pieces.


6) Measure in approximately 3" in from each corner.  Stitch long basting stitches in between your marks to gather.


7) Find your large rectangle and mark the centre of the cut edge.  Place your halter pieces on either side.  You can overlap yours like I did to ensure good coverage, or if you're a little more daring and you're lucky enough to have cleavage that you like to show off, you can have the triangles meet at the centre. In either case, pin your pieces right sides down, raw edges even, and stitch in place.

8) Make sure you're happy with the fit and finish the raw edge with a zig zag or serger.  Pull out your basting threads and press the seam allowance down towards the bodice all along the entire edge.


9) I was originally going to use the long skinny pieces to create a band in between the bodice and the cups but changed my mind and decided to use them as straps instead (straps are pretty important in this project).  So, fold your skinny long pieces in half lengthwise with right sides together and stitch.  If you want wider straps use a smaller seam allowance.  I ended up using a 3/8 seam allowance for spaghetti type straps.


Trim your seam allowance and turn your strap so that it's right side out.  You can use a turning tool like I have or just use a small safety pin to guide the strap inside itself.

10) Attach one strap to each triangle bra top corner.


11) My scarf won't reach all the way around my back to overlap and secure closed.  So, remember that little square piece we had left over from all the cutting?  Well, just use it to make a couple of short straps just like we did in the steps above.  Attach them right into the seam allowance of the upper bodice edge.


Because of this back closure you won't really be able to wear a proper bra with this top.  You could try the whole stick on cutlet thing, which I find come in very handy in times like this, or use a much larger scarf that you know you'll be able to overlap in the back better.  The last option I can think of is to sew in bra cups either to the inside of the bra pieces or between the lining and the outer fabric.  Otherwise, I'm afraid you'll have to just be brave and go for it.

And now you're ready to go to the folk festival, picnik, or just go out and enjoy the hot summer day!

scarf refashion, how to turn a scarf into a top, Scarf halter, Scarf top
I bought these jeans at the second hand store to make cut-offs.
They're full of shreded holes.  So funny~
For something different you could mix things up by using different scarves for all of the pieces, or using a super duper big scarf for the bodice and make it into a tunic or dress!  Have fun with it and see what you come up with.

Remember, a scarf is just a square piece of fabric with finished edges.  If you can't find a scarf you like, use a square piece of fabric.

I hope you're enjoying these scarf transformations because I'm having a lot of fun coming up with ideas on how to make them. 

scarf refashion, how to turn a scarf into a top, Scarf halter, Scarf top

You can find all of these projects, plus lots of other ideas, on the Tutorials tab up top~

Have a crafty week everyone!

This project was featured here:

http://salttree.net/  It's a Blog Party   Seven Alive


Thursday, July 5, 2012

Button Swap

Are you looking for a way to get more people to visit your blog but you don't have the funding to purchase advertising?

ME TOO!!


Let's team up!  If you have a similar sized, family friendly blog, and you'd like to swap buttons/ads I have space in my side bar.

Just contact me directly via email and we can work out a monthly agreement for small sized ads (150 X 150). 

You get to place your button on my blog and I get to place my button on yours!


I'm getting loads of new visitors right now so this is a great time to partner.

Contact me at etcetorize{at} yahoo {dot} ca if you're intrested~

(Similar sized blog refers to the number of followers or visitors you have)

Wednesday, July 4, 2012

Save a Yoke

Sometimes I even surprise myself.  I am so beyond happy with today's restyle, I can barely believe I'm the who came up with it!
I started with this very pretty blouse from my closet.


It's gorgeous right?  But it always did look better on a mannequin than it did on me.


I couldn't bare to throw it away though.  Just look at all the lovely stitching on the yoke.

Soooooooo, I turned it into the cutest little dress for my niece!


I took all the pieces of the blouse apart (I still have plans for the sleeves and the bodice) and inserted some small shirred pieces into the side.  Then I just made a gathered skirt and attached some ties.

It was super easy to do and probably took me less than a couple of hours to put together.
restyled blouse, save a yoke, blouse to dress, recycle a blouse
She's such an awesome model!
Look at your wardrobe with new eyes before you throw something in the giveaway pile.  You never know what kind of magic you can make!

Tuesday, July 3, 2012

Motivated Monthly:Handmade Jewellery

It's the beginning of the month and you know what that means....time to start a new monthly theme for Motivated Monthly!  If you're new here, you can link up all things creative every Monday at the weekly Make it Great Monday party, but the Motivated Monthly party stays open all month long and has a different theme every month (last month was Garden Party, this month is Handmade Jewellery).

Before we begin, let's take a look at some of your fun garden projects from last month.

1. Sew Sweet Cottage got the whole family involved in making a handprint planter/birdbath.
2. The DIY Dreamer showed you how to add a personal message to your plant pots.
3. SaltTree gave you a tour of her garden, including this cute birdcage turned planter.
4.AtsyVaVa gave a broken old chair a new life by recycling it into a new planter.

If you were featured, please feel free to grab a featured button from below~

Etcetorize

And now for this months' theme!

Handmade Jewellery
What does that mean?
It means jewellery made by YOU.
Bracelets, necklaces, rings, etc.
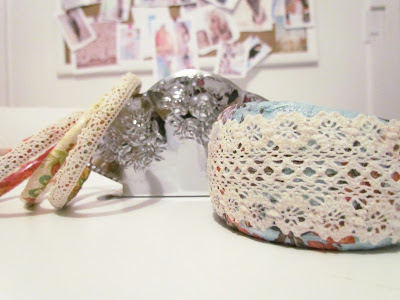
Here's an example:
Shabby Chic Bracelet, DIY Bangles, Lace Bangles, DIY Jewellery, mod podge jewellery, mod podge bracelets, mod podge bangles, decoupage, decopuage jewellery

Please READ the guidelines BEFORE you link:
Please:
1) Link directly to your family friendly project, not your blog main page
2) Limit of 4 links/blog please, no one likes a linky hog
3) Link only creative projects that you've created yourself (no round-ups, giveaways, shops, or commercial sites please)
4) For this month please link up HANDMADE JEWELLERY ONLY~

Please feel free to hit one of those follow buttons in the sidebar.
 It's not mandatory but you'd sure make my day if you did!
This party will also be posted each week, so you'll get even more clicks throughout the month!
I do ask though that you please post the party button someplace on your blog where everyone will see it. The more people that join the party, the more fun and exposure it will be for all of you.

Etcetorize
   
Here's what's coming up next month...
August: Oh Baby!

Let's see what you've been working on! Gen will no longer be cohosting but, if you link up you are giving me permission to tell the world how great you are and possibly post a picture or a link to your awesome project either here, on Facebook, or on Pinterest. Make sure you're OK with this before you link up.)


Did you read the guidelines?  Did you link up a handmade jewellery project?


Sunday, July 1, 2012

Make it Great Monday

Today is Canada Day and the weather is gorgeous, so I'm just going to get right to business so that I can get back outside to celebrate a wonderful day~
Make sure to visit your fellow bloggers to find awesome projects like these ones:
1. Learn how to make this Breezy Tunic with a great tutorial from Elegance & Elephants.
2. My good friend Khadija from Creative Mind shows you how to make your own lovely necklaces, just like the ones at Anthropologie.
3.Erin over at Taking Time to Create always has the loveliest cards.  Check out her blog for loads of creative cardmaking ideas.
4. Here's another fun anthro knock-off.  Jana from Transformations from the Heart saved herself $976 by making her own super cool coat rack.   Stop by her blog to find out how to make your own.

If you were featured you can grab a special button from the sidebar~

Please only link:
1) To your Family Friendly Project Post that you've made yourself, not your main blog page
2) Maximum of 3 projects that you haven't link up before
3) Please, no shops, giveaways, or round ups
4) Feel free to hit one of those Follow buttons on the sidebar ;)
And, not really a rule, but something you won't regret if you do....go visit some of the other links and leave a comment, we all love comments right~

If you link up, please post my button somewhere on your blog so more people can come join the fun:

Etcetorize

With her due date getting nearer and nearer, Gen has decided not to co-host the linky parties for now.  So, it's just you and me guys, but I can tell you that the parties are getting more views and clicks than ever.  Last month, Make it Great Monday was seen close to 1500 every times week and Motivated Monthly had over 4000 hits.  I hope you'll continue to link up and share all of your great ideas with everyone out there~

Let's see what you've been working on! If you link up you are giving me permission to tell the world how great you are and possibly post a picture or a link to your awesome project either here, on Facebook, or on Pinterest. Make sure you're OK with this before you link up.)


It's Canada Day!

It's Canada Day today!


The sun is shining, the birds are singing, and it is going to H-O-T today! 
Have a great day...I know I'm going to~

Linkwithin

Related Posts Plugin for WordPress, Blogger...