Showing posts with label jewellery. Show all posts

Friday, August 29, 2014

Washi Acetate Earrings

I've had some very important little visitors (check out my Instagram) here this week so I only had time for a super quick, but very pretty, project~

DIY Earrings, DIY Jewellery, Washi Tape

I have 1 roll of Washi tape that I've barely used so I wanted to try to come up with something interesting to show it off, plus I wanted some new earrings.  Voila!  The Washi Acetate earrings were born~

Here's what you need if you want to make your own:


Materials:
-Washi Tape
-Acetate Sheet
-Scalloped scissors
-Earrings findings (shepard's hooks + 4 jump rings)
-pliers, small hole punch (not shown)
-ink pad

Steps:
1) In order to stabilize your washi tape so that you can cut it, take a piece approximately 6" long and stick it down onto your acetate sheet.

Depending on how long you want your earrings
to hang, this should make 1 pair.
2) Using your scalloped edged scissors, cut two long rectangles.  You may have to play with this a bit.  I'm not sure if it was just my scissors but I found it made it difference which side was down and which direction I was cutting in.  Just play with it and find which way works best for you.


3) Punch a small hole in the center near the top of each rectangle.


4) My washi tape is pretty subtle so I inked the edges to bring out the scallop a bit more.


5) Add 2 jump rings (so it will hang the right way) and attach to your earring finding.


That's it!  I added a couple of little crystals to the bottoms of mine to add a bit of sparkle but that's basically it.

This entire project took me less than 10 minutes to do.  Try different decorative scissors with different washi tapes.  If you don't have a piece of acetate laying around you could just use some scrapbooking paper or cardstock.  I just like the glassy resin look I get with acetate.

Do you have a washi tape collection?  It's a trend I sort of passed on, probably because I knew if I started buying it I wouldn't stop.  What do you do with it all?  Leave a comment below~

Friday, July 25, 2014

Moon and Star Bracelet

Got some scrap fabric and a bracelet you never wear? Then today's refashion project is just the thing for you!


Here's what you need to cover your own bracelet:


 Materials:
-Bracelet or bangle
-remnant of cotton
-scissors

Steps:
1) Cut a strip of fabric 1/2".  I didn't have the full width of my fabric left over so I just tied some strips together.  If you have the full 45" width one strip should be enough.


 2) Place your bracelet in front of it at the halfway point of your strip of fabric and tie.  Then follow the instructions below~


 Pull tightly.  After a few knots you'll begin to notice that you'll be getting a lovely spiral rib forming.


At the end just knot your fabric twice and snip any ends.


That's it!  I like it much better now and can see myself wearing it with my hippie dippy weekend outfits easily.  This is a very basic macramé knot but in a new medium other than hemp it has a new life.  Have you ever tried macramé knots with other materials?  Leave a comment.

You can check out some of my other macramé pieces HERE.

Friday, March 28, 2014

Easy Spring Necklace

The sun is shining, the snow is melting, and I can finally go outside without my earmuffs on!!  Spring is well on its way!!

DIY Necklace, Beaded Necklace, DIY Jewellery, Fabric Covered Beads

I got these pretty fabric covered beads from Wholeport ages ago but didn't know what to do with them until today~

This necklace is pretty simple to make but is so pretty I know it will have big impact when it's on.


Just string your beads onto some clear fishing line, cap the ends, add some jump rings so that you can attach a chain, and then add your closure.  See?  Super easy!

Is it springtime where you live?  After our deep freeze winters up here Spring is a pretty big deal.  It'll be a couple of months before we can start thinking about planting but the sunshine brings us hope.  Tell us all about spring where you live, leave a comment below~


*This post is sponsored by Wholeport however no compensation was received other than the products shown and all opinions are my own.

Friday, August 16, 2013

Framed Owl Earrings

Are you on the owl bandwagon?  Not yet, but you want to be?  Well, keep reading for a super easy way to get started.

owls,

I got this little pack of owls from Wholeport this month.  I completely forgot that I had ordered them so it was a nice surprise when they fell out of the packet.

10 in a pack for less than $3!

Here's what else you need to make your own Framed Owl Earrings:


-Owls, cabochons, shephard's hook earring findings, long headpin with loop at end
-pretty scrapbook paper, mod podge, sponge brush
-jewellery pliers, craft knife
-optional: wire cutters (pliers usually have a cutter built in)

Steps:
1) Cut out two ovals from your scrapbook paper that fit will fit inside the oval of your cabochons.  I placed my paper on top of my cabochon and gently pressed along the edge of the frame to emboss the paper lightly and then just cut along the embossed line.  You'll still have to trim a bit and it might not be perfect but that's OK.  The paper will be covered by your owl and just peek through a bit.


2) Adhere your paper to the cabochon.  I used Mod Podge because I know it will work with metal but you can use whatever your favourite adhesive is.


3) I decided at the last minute to fill the cabochons with Mod Podge Dimensional to add a resin look.  You can just use regular Mod Podge if you want.  In fact, if you use the regular formula you'll probably only need to wait about an hour to move onto the next step.  If you use Dimensional you'll have to let it sit overnight to completely dry.

Refill with more Dimensional Mod Podge
about a half hour after the first pour.  It settles a bit
and the second pour will make sure you get right to the edges.
4) While you're waiting for your Mod Podge to dry you can make the rest of your earring.  I used a long head pin because it's what I had on hand that sort of matched but you can use a length of wire and manually add a loop if you want.

Just string on a few beads and create another loop at the top.


5) Attach to the shephard's hook finding.


6) Once your paper is dry just layer it onto the bottom loop with your owl.


That's it!  Now you can rock your trendy look~


My aunt used to collect owls.  It didn't take long before she had a house full of them.  Eventually she had to tell everyone to stop buying her ceramic owls, owl salt and pepper shakers, owl earrings, and owl anything else.

What do you collect?  Do you know anyone who has a house full of rooster, cats, or pigs (of the ceramic variety)? Leave a comment below and tell us all about it!

*This is a sponsored post however I did not receive any remuneration other than the products shown and all opinions are my own~

Friday, July 26, 2013

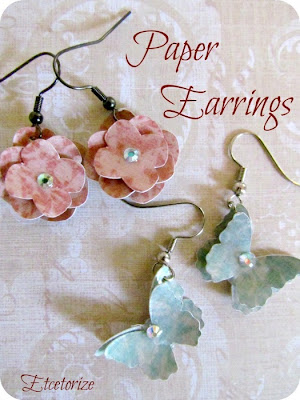
Paper Earrings

It's been awhile since I've worn earrings.  I figure it's because I'm not crazy about my little collection that I have so I decided that it's time to add some....at no cost!


DIY paper jewellry, paper jewellery, Silhouette earrings, DIY earrings, paper earrings

Here's what you need to make your own pretty paper earrings with things you might already  have in your craft closet:


Materials:
-pretty medium to heavy weight scrapbooking paper
-Dimensional Mod Podge
-Glue gun or other adhesive
-small hole punch and needle nose pliers
-shepard hook earrings tops
-small rhinestones or other embellishments

Steps:
1) I let my Silhouette cut out my hydrangea shapes with the biggest of the 3 shapes only 3/4" wide.


If you don't have a Silhouette you can still do this project.  As you can see it's a very simple shape that just gets progressively smaller.

2) Coat all of your petal pieces with a nice thick layer of Dimensional Mod Podge.


I love this stuff because it dries clear and looks and acts a lot like resin without all the mixing.  You can get as close to the edge as you want and it shouldn't fall off.

3) Before you walk away to let everything dry overnight stick a little rhinestone (or better yet a Swarovski crystal) right in the middle of the smallest shapes.


Let the Mod Podge dry overnight making sure to shift your pieces a little about an hour or two into it to ensure that none of them are stuck to your table below.

4) Now you can do what I did and skip right to the next step but I don't recommend it.  You can see in the photo where I had to unglue my pieces to get the paper to fit the hole punch.  So just punch your holes now and save yourself the aggravation.


5) Now add the smallest dab of hot glue onto the middle of the largest shape and start stacking the other shapes on top, rotating as you go to make sure we can see all of the petals.


6) Using your needle nose pliers attach the shepard hooks.  You can add jump rings if you want to in between, I just didn't have any the right colour so I went straight to the hook. (I'm determined to use up my massive stash of jewellery making supplies without adding to it)


Tah Dah!  You've got yourself the prettiest pair of earrings on the block!

DIY paper jewellry, paper jewellery, Silhouette earrings, DIY earrings, paper earrings

I like them so much I made another pair in a different shape....butterflies, of course!

DIY paper jewellry, paper jewellery, Silhouette earrings, DIY earrings, paper earrings

I wish you could see how glossy they are.  They look just like resin covered ceramic but they're just paper!

DIY paper jewellry, paper jewellery, Silhouette earrings, DIY earrings, paper earrings

This is really just a twist on my original paper jewellery that I made ages ago.  You can also see the necklace I made from paper here.

What do you think?  Are you a diamonds only kind of gal or could you see yourself sporting a pair of paper earrings?  Leave a comment below~

Friday, May 10, 2013

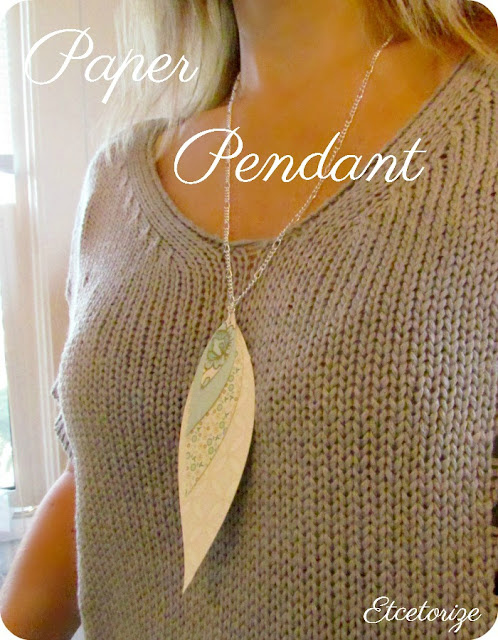
Paper Pendant

I'm not sure if you've noticed, but my blogging schedule has sort of been blown to pieces lately.  For someone like me who likes routine, and has been in this particular routine for the past two and half years, you can imagine how this sits with me.

My real life job, yeah the one that pays the bills around here, is getting in the way so I hope you'll bear with me while I figure out how to fit it all in.

In the meantime...I hope you enjoy this week's fun and super easy project!

DIY jewellery, DIY jewelry, paper pendant, paper necklace, paper accessories, easy paper crafts


 You only need a few supplies to make your own pretty accessory:


Supplies:
-Pretty medium/heavy weight paper
-optional template
-craft knife and cutting mat
-standard jewellery making kit: pliers, jump rings, chain, closure
-small hole punch
(In the picure you also see a glue runner, but I decided not to use it so just pretend it's not there)

Before we get started I have to tell you about my template.  I picked it up at the dollar store and got 4 different templates for a whopping $1.25!


I was originally drawn to the mailing/gift tags but this project uses the leaf pattern:


 So, you don't have to use a template for this project but it will sure simplify things for you if you have one.

Steps:
1) Choose 4 different papers and decide how you want to layer them.  It's important to use heavier weight paper so that your pendant doesn't bend or fly around while you're wearing it.

It's hard to see but some of these
have sparkle!


 2) Starting with your bottom paper, cut out your largest shape.


 3) Now just move through your papers cutting smaller and smaller (but same) shapes until you get a pretty stack.  Line them up with all the points matching to see how it will look.


4) Using a very small hole punch, punch a hole through the top tip of the shape, getting as close as you can to the edge without tearing the paper.


 5) Line your papers up and once again, starting with the bottom piece thread them onto a jump ring.


6) Now just add your pendant to a chain and add a closure and you're done!


So easy!  You can use any type of shape.  This is a great paper buster for all those little bits of scraps you keep from past projects too!  If you want to add more body to your shapes add a layer of Dimensional Mod Podge before you put it all together.

I'll try to have more to share next week.  Until then...don't be afraid to leave a comment~

Check out my other (very popular) paper jewellery project HERE!

Linkwithin

Related Posts Plugin for WordPress, Blogger...