Friday, March 8, 2013

Hair Accessories

My whole blogging schedule is off this week because I was on the road travelling for my real job.  So, to make up for being late...you get a 5 for 1 deal!

DIY Hair Accessories, DIY Headband, Ribbon Crafts

This month's Wholeport package came with ALL of this!  If you buy it from their website it's less than $20!  ALL of it!  All the ribbon and all of the hair accessories.


I was a little overwhelmed at first, but after a few failed attempts at a simple bow I came up with these fun projects:


First up is the pleated headband (#1).

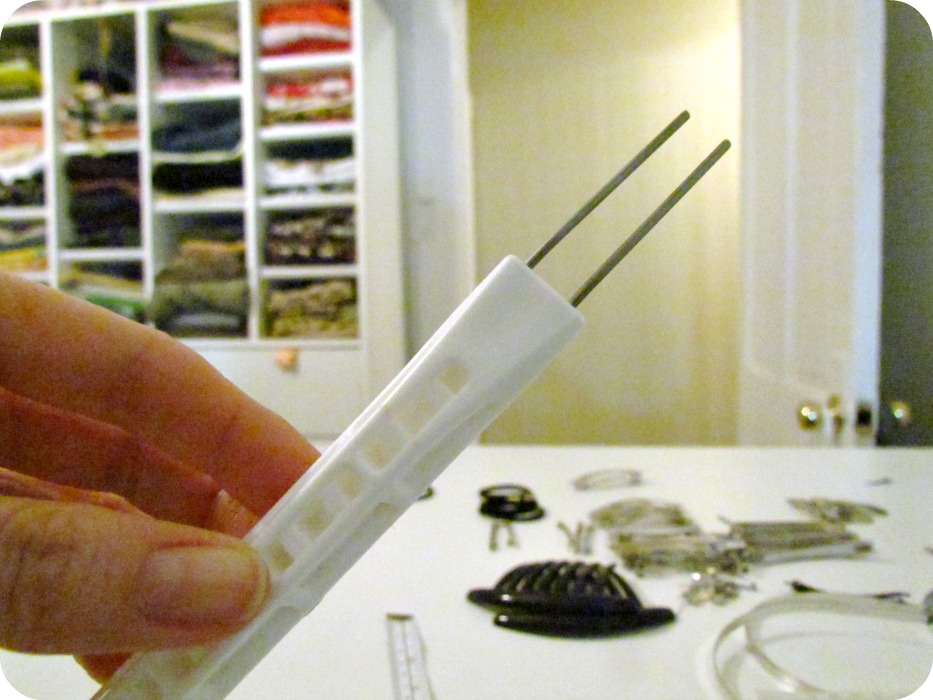
I used my pleating tool on some wide ribbon and ironed it flat as I tucked and folded.


Next, run a straight stitch right down the centre to hold everything in place.  Run a thin bead of hot glue along your stitching line and add a thinner ribbon on top.


Glue everything onto the headband foundation, making sure to fold in your raw edges and voila!  You're done!


#2 is just a cute little rosette glued onto a nice bobby pin clip.

Cut a piece of wide ribbon about 9" long and run a basting stitch close to one edge.


Pull the basting stitch and secure the ends together.


To cover the hole in the middle I glued on a little polymer clay cameo I made with last month's Wholeport Craft gift.


#3 is a fun party bow!  Most people use a piece of dowling to get the ribbon to twirl but I didn't have any on hand so I used an embroidery hoop.

Wrap thin pieces of ribbon around the hoop, securing the ends with a pin or clothes pin.


Place in an oven at 275 degrees for about 25 minutes.

Let everything cool down completely and remove from the hoop.  Your ribbon should be set into fun little twirls.

Then I just cut them into different lengths and tacked them onto a ribbon covered barrette.


We're not done yet!  #4 and #5 were so easy I didn't even take any photos.  To make #4, just fold your ribbon into a loop and tie it around the middle to secure with another piece of ribbon.  Glue the whole thing onto a clip or barrette.

#5 was easiest of all, but I think it might be my favourite.  I just wrapped some washi tape (not from the kit) around a headband foundation, and tah dah, it's done!

These will all be going to my niece with a pair of navy blue leggings.

Wholeport has this kit in other colours and sizes.  Check out their website for all kinds of fun products.

Do you know someone special who likes fun hair accessories?  Which one will you make?!?!


*The materials for this project were provided for free from Wholeport, however I did not receive any compensation and all opinions stated are my own.


Get Free Crafting Supplies now from WholePort.com

Thursday, March 7, 2013

Simplicity Spring Patterns

The parade of new patterns continues with the new Simplicity catalogue:


As much as I dislike Project Runway patterns I do like a classic shift dress:


I'm resisting that darn high/low trend but this skirt is beginning to win me over:

This is my favourite of all the new patterns.  I'd love to make view A in a pretty floral silk:


They've included loads of new patterns for little girls and toddlers, including this super cutey dress:


There are almost 30 new patterns in total.  You can check them all out HERE.

Wednesday, March 6, 2013

Just a note...

It was my sister's birthday recently.  Along with the leggings and locket I've already shown you I also made her a card.


I love the pretty little 3 D butterflies.


The card was a bit last minute so I didn't take as much time with it as I probably should've.  I wish I had roughed up the edges on the inside but will have to remember that for the next one.


Here's the inspiration card that I used (I didn't make this, I found it through Pinterest):
                                                   Source: splitcoaststampers.com via Etcetorize on Pinterest


Tuesday, March 5, 2013

Vintage Patterns Wiki: 1920's

With Downton Abbey done for the season I've had to get my fix of 1920's fabulous fashions elsewhere.


Last week I showed you some of my favourite swimwear finds on Vintage Patterns Wiki and this week we'll take a look at some treasures from the 1920's.

As soon as I saw this I thought of Lady Edith.

Even without pretty colour drawings I can see how pretty this dress would be.
It's very Lady Mary~

And of course, it wouldn't be a party without
a showstopping dress for cousin Rose!
I LOVE view A and would wear it in a heartbeat.
There are so many things that should make 1920's fashions so wrong, but somehow they end up looking totally gorgeous.  I think it must have something to do with envisioning them all in fabulous flowing silks.

Patterns from the 1920's are not easy to come by and can sometimes go for over $100.  Do you think you could shell out that much just for a pattern? (I think I might for the right pattern)

How old is the oldest pattern in your collection?  Could you part with it or does it have sentimental value?  Leave a comment below~

Monday, March 4, 2013

Solid Perfumed Locket

When my grandmother passed away a few years ago I was lucky enough to receive much of her jewellery.  It isn't worth anything in terms of money, but it means a lot to me because it was hers.

My sister lives in another city so she wasn't around when we were going through the pieces, so she didn't get anything.  For her birthday, I decided to give her a locket I had from my Grandma's jewellery box and fill it was some soothing lavender scented solid perfume.


Here's what you need to make your own solid perfume:


Materials:
-pure beeswax
-essential oil
-carrier oil (I used olive oil)
-container
-craft knife and something to melt your ingredients in (not shown)

Steps:
1) Melt enough wax to fill your container.  I used my melter from a a soapmaking kit I have but you could use a double boiler or crockpot too.


2) Once your wax is melted add some carrier oil.  It will look kind of funny and squiggly but just stir and it will melt into the wax.  There are no set amounts.  Just follow your instincts and add enough so that your not just making scented wax.

3) Add some lovely smelling essential oils.  Again, just follow your instincts.

4) Pour it into your container.  I made a bit of a mess but the nice thing with this is that it cleans up pretty easily if you wipe it down while its cooling, or you can warm up your craft knife and simply cut off any excess.

Tah dah!  That's it!

solid perfume, DIY perfume locket

My sister's life is a little stressful so I'm hoping the lavender will help to calm and soothe~

I found the original inspiration for this project here:

                                                       Source: crunchybetty.com via Etcetorize on Pinterest

I've been thinking about making this project for ages.  I have no idea why I put it off.  It was super easy and took hardly any time at all.  Go to Crunchy Betty for more information on mixing essential oils and other fun natural craft projects.

What scent will you make yours with?  Leave a comment below~

Friday, March 1, 2013

Suavemente Scarf

Have you seen all those fun bleach pen projects on Pinterest?  I've had all kinds of designs run through my head that I've wanted to try, but guess what...no one sells Bleach Pens around here.  Believe me, I've looked everywhere.

So, how did I make this?


I made my own Bleach 'Pen'!

Now, I'll be the first to admit that this project looked quite different in my head, but in the end I let go and just let it be whatever it was going to be.  (This is probably not a good project for any perfectionists out there.)

I found the Bleach Pen recipe here:

                                                                Source: onegoodthingbyjillee.com via Etcetorize on Pinterest

Apprently I need some practice in the kitchen because my mixture ended up pretty gloopy.  In the end, I heard the voice of Tim Gunn in my ear and just "Made it work!", sort of.

So, aside from what you need to make the bleach pen, which I'll send you to OnegoodthingbyJillee to learn how to make, you'll also need:

Materials:
-cotton scarf
-pattern weights (anything heavy)
-paper to line your surface so the bleach doesn't stain your table
-lyrics to your favourite song or poem, etc.
-bleach pen
-optional: scissors and tape to make the end of your bleach pen pointier

Steps:
1) Lay down some paper to protect your table from the bleach.


2) Lay your scarf on top.  Stretch it as best you can and lay pattern weights (or all your bottles of Mod Podge) on top to keep it from moving.


 3) Prepare your bleach pen for writing.  I used some tape to try to make the nozzle a little smaller.


4) Write out your favourite poem or the lyrics from your favourite song onto your scarf using your bleach concoction.


Now, like I said, my bleach pen ended up pretty gloopy so this is quite a mess.  I was disappointed at first and then decided I didn't care.  The point isn't for anyone to be able to read it because it will be all scrunched up and wrapped around my neck anyway.  The point is that I know the 'secret' message on my scarf and it will hopefully put a little smile on my face when I think of it.


I tried to write out the lyrics to Suavemente by Elvis Crespo which is an old song but I love it.  It's basically a  dance song that's all about all the ways the singer wants to be kissed.

5) Let the bleach sit overnight and then rinse out or wash and hang to dry.


That's it!  You're done!

What will you put on your scarf?  For me it was a toss up between Suavemente, a Ricki Martin song, and my favourite Shakespeare sonnet.  I figured Suavemente would be the easiest to write out...and it makes me want to merengue! Leave a comment below~


Linkwithin

Related Posts Plugin for WordPress, Blogger...