Friday, August 24, 2012

Ruffled Onesie

One Wednesday I showed you all of the cute little things I made for my friend Gen who just had a brand new baby girl.  One of those things was a cute embellished onesie.  It's super easy and the perfect project for any new moms out there who are new to sewing.

easy sewing, #ruffled onesie, #baby, DIY baby

 
Here's what you need:
Materials:
-onesie
-cotton fabric
-thread, scissors, pins, measuring tape
-optional: wooly nylon thread and serger

Steps:
1) Measure across the bum part of the onesie and double that measurement.  Mine was 8", so I'm going to cut my cotton fabric strips 16".

2) Cut 1" wide strips from your cotton whatever length you calculated above.  Make as many as you want, I went with 3 but you could go for more if you like.


3) Finish all edges of your strips, including the short sides.  I did a rolled hem on my serger.  If you don't have a serger, you can either zigzag or do a very narrow regular hem.  (If you choose the narrow hem method you may want to add another 1/2" to the width of your strips as your hem will take more away than the rolled hem will.)


4) Sew a long basting stitch right down the centre of each of your strips.

5) Gently pull the bobbin thread to gather or ruffle your strip of fabric.  Gather only to fit across your onesie (on mine, 8").  If you pull too much, just pull the fabric back along the thread to make it fit.  Try to make sure your gathers are somewhat even.


6) For easy placement I started with the bottom ruffle, matching it up with the edge of the leg hole.  Pin in place down the centre of your ruffle.  Add the next two layers above, simply laying each ruffle edge to edge with the one below it.


7) Go back to a regular sewing stitch and stitch right down the centre, on top of your basting threads.  Try to keep the edges of your ruffle out of the way.

8) When you're all done and happy with it you can pull out your basting threads.  Make sure not to leave anything hanging, stray threads can be very dangerous for a baby as they can wrap around their tiny fingers and cut off circulation.  Always make super duper sure you've cut everything down.

And that is it!  I had some extra ruffle left so I made it into a little flower and handstitched it onto the front just so that not all the action is in the back.
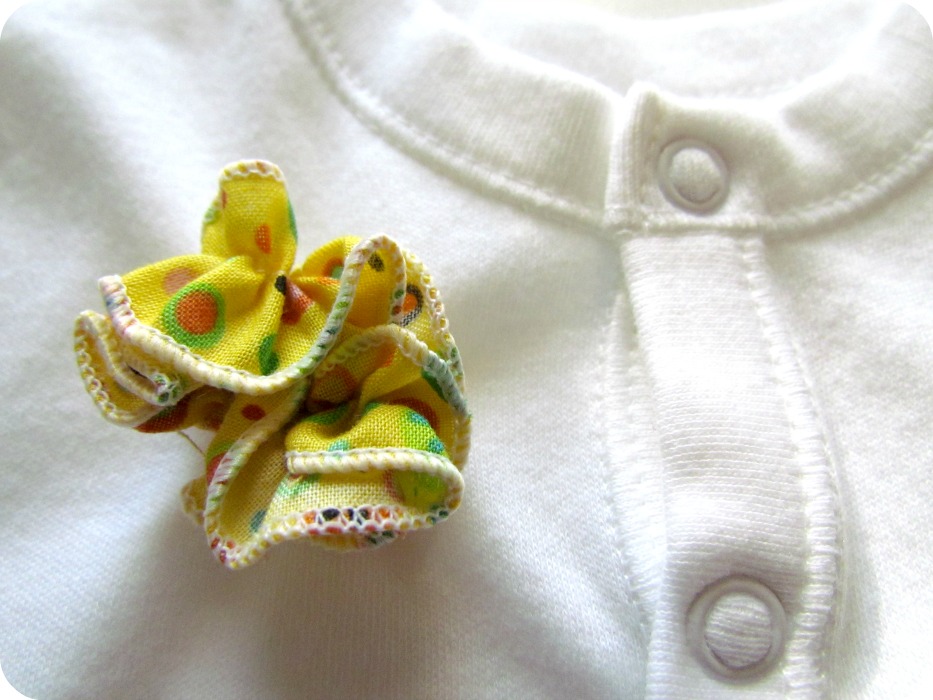

I made this as an extra 'add-in' gift but it seemed to steal the show actually.

If you missed it and want to see what else was in the handmade gift pack just go here to check it all out!

This project was featured here:
five days five ways | because every day is different

Thursday, August 23, 2012

Tell a Tale: The Hunger Games


In honour of this week's DVD release
of The Hunger Games I thought we should take a look at the book
 that started this latest pop culture phenomenon.


“District 12: Where you can starve to death in safety.”
― Suzanne Collins, The Hunger Games

Summary (from Goodreads):
Could you survive on your own, in the wild, with everyone out to make sure you don't live to see the morning? In the ruins of a place once known as North America lies the nation of Panem, a shining Capitol surrounded by twelve outlying districts. The Capitol is harsh and cruel and keeps the districts in line by forcing them all to send one boy and one girl between the ages of twelve and eighteen to participate in the annual Hunger Games, a fight to the death on live TV. Sixteen-year-old Katniss Everdeen, who lives alone with her mother and younger sister, regards it as a death sentence when she steps forward to take her sister’s place in the Games. But Katniss has been close to dead before—and survival, for her, is second nature. Without really meaning to, she becomes a contender. But if she is to win, she will have to start making choices that will weigh survival against humanity and life against love.

Review:
I had put off reading the Hunger Games for many reasons (mainly the hype) but in the end I'm glad I read it. I think this is the kind of book that stays with you, in your head, for quite some time. When you least expect it, you're thinking about it again. The scariest thing is that it's only a slight exaggeration of North American society today. It's not difficult to envision a crazy 'reality' show just like this showing up on our TVs in the very near future. 

I enjoyed the writing, it was very visual without being overly descriptive, somehow Young Adult fiction books always seem to do this exceptionally well. The fact that I finished it within two days tells you that, first of all, it's an easy read, and secondly, it's a fast moving story that you don't want to put down.

Don't let all the hype or the Young Adult label deter you.  Even for someone like me who doesn't normally read this genre I really enjoyed it and I'm looking forward to watching the movie and reading the next two books.


(For a snapshot on how completely out of touch parts of our society have become, check out this article from the New York Times, critiquing the costumes from the film.  I'm not sure these people even get that they're the ones who are being made fun of the most in the film.)


Don't forget to enter the HAPPY BITHDAY giveaway
 going until the end of August! 
 May the odds be ever in your favour!

Wednesday, August 22, 2012

Baby Gifts

Some of you who also follow my friend Gen over at Cabin Fevered Gem, may have noticed that she's sort of taken the summer off from blogging.  That's because she's been busy...growing a baby! 

Which she just had a week or so ago.  (You'll have to go to her blog to see if she's posting pics)

Of course, I couldn't pass up this chance to make a whole plethora of handmade baby gifts for her.
baby gifts, DIY baby, DIY onesie, baby shower

Check out the video if you want to see the inside of my very first paperbag scrapbook album!  I'm very excited about this project.  It took forever to make, but was so much fun to put together.


I'll be posting the tutorial for the onesie on Friday so  make sure to come back to learn how to embellish your own~

Don't forget to enter the HAPPY BIRTHDAY giveaway going on until the end of August!

Tuesday, August 21, 2012

Happy Birthday Etcetorize!!! (+Giveaway)

Wow!  2 years old today!  I can hardly believe it.  I had no idea I would stick with blogging this long and that I would enjoy it so much!

                             Happy Birthday Comments Pictures

There were times when I wondered what the heck I was doing this all for, but in the end, it's just plain fun to share your creations and get wonderful feedback from such an amazing and supportive community.  You guys rock!

I know I probably don't have as many followers as I should have, and I don't follow all of the trends very closely, and sometimes I don't even know what I'm doing (i.e. Facebook), but I have fun learning and meeting new people every day.

I remember when I hit 12 followers. I had a minor heart attack and wondered how earth I was going to keep this up to make all 12 people happy.  Now I'm up to over 700 followers, over 450 posts, and over 580,000 page views!  I try not to get caught up in the stats, but I have to say...those numbers make me pretty happy~

So to celebrate, first I'm going to share some of my all time favourite projects and posts and then I'm going to give you a chance to win an AWESOME birthday present from Plaid!

Fav Tutorials:
Oh boy, this is hard!  I love them all.  Here's a few you should check out though:
1. The project that started a craze...how to make a Spool Knitter.
2.  You know how much I love butterflies and Mod Podge...these Butterfly Coasters put them both together.
3.  These gorgeous Butterfly Bookmarks add a little something special to your reading experience.
4. It still boggles my mind, but my Paper Jewellery project is still going strong on Pinterest.
5. I love refashioning scarves, and this pretty Scarf Purse was one of my favourite.

Fav Show & Tells
I usually share a project mid-week without a tutorial, just showing you what else I'm up to.
1. One of my first Show and Tells were these Pretty Beaded Rings I made while living in Japan.
2. This Crazy Quilt Box was the envelope for my Mother's Day Card, it was that big!
3. I even surprised myself with how cute this Refashioned Yoke dress turned out for my niece.
4. I love and use this Recycle Coffee Table Bench every day.

Fav Inspiration Shots:
I used to post a photo from my trips around the world but people didn't seem very interested so I've stopped doing it, I do love these shots though~
1. My 2 month camping trip across Eastern and Southern Africa was the trip of lifetime and one of my favourites.  This amazing creature was photographed while on safari in the Masai.
2. I love to visit aquariums while I'm travelling, and the one in Okinawa, Japan is still
 one of the best that I've seen.
3. I used to live in the Caribbean too, and this shot from St. John brings it all back instantly.
4.  And this is where I live (North Central Saskatchewan)!  Sometimes I forget
 just how beautiful my own backyard is!

Ahhh, always nice to walk down memory lane.  To see more great projects and photos just visit the tabs up top.

And now, what I know you've really been waiting for...
the Giveaway from Plaid!
Take a look at these AWESOME prizes.
One lucky Etcetorizer will win ALL OF THESE ITEMS!!!


I'm going to give you lots of ways to enter and lots of time to do it.  Have your rafflecopter entry(s) in by the end of the month and I'll announce a winner at the beginning of September.  Good luck you lovely Etcetorizers!!

Thanks for making the past two years
such a fun, exciting, and creative journey!

a Rafflecopter giveaway

(Sorry guys, I don't why I have so much trouble with Facebook, I just don't get it.  I can't get Rafflecopter to find me on Facebook, but if you do a search over there for Etcetorize (maybe Et Cetorize???) I think I come up.  You can friend me or like me or subscribe or whatever the heck your supposed to do.  Ahhh, someday it will all make sense I'm sure.  If anyone knows where I can find an easy to follow beginners guide to FB, please tell me where, I'll be eternally grateful~)

Sunday, August 19, 2012

Make it Great Monday

I can't tell you how thrilled I am that the Make it Great Monday party is still growing!  We're almost up to 100 projects every week.  I try my hardest to get to all of them and to leave a comment but please forgive me if I don't make it to yours or if I only leave a comment on one of your projects instead of all of them.  With so many people having comment verification on it's becoming more and more time consuming.  I still love visiting all of your blogs though, so keep on linking!
Here are some highlights from last week's party.
1. Upcycled Design Lab shared an awesome tutorial and show'd you how she made a top that she had already remade!
2. All of Me showed you how to melt hama beads and make them into something special.
3. Erin from Time to Create shared a super easy and super fun idea to keep your kids busy.
4. and Ana from Ana Love Craft is being featured, not because she told me I looked young & beautiful in my new hairdo (although it certainly didn't hurt) but, because I fell in love with her gorgeous set of atlas bags!

Thank you to everyone for linking up!
I love having sooooo many creative ideas all in one place.
If you were featured, please feel free
to grab a featured button from the sidebar.
Now, onto this week's Make it Great party!
Please only link:
1) To your Family Friendly Project Post that you've made yourself, not your main blog page
2) Maximum of 3 projects/party that you haven't link up before
3) Please, no shops, giveaways, round ups, or commercial sites
4) Feel free to hit one of those Follow buttons on the sidebar ;)
And, not really a rule, but something you won't regret if you do....go visit some of the other links and leave a comment, we all love comments right? And you never know what kind of goodies you'll find!


If you link up, please post my button somewhere on your blog so more people can come join the fun.
Etcetorize

Let's see what you've been working on! (If you link up you are giving me permission to tell the world how great you are and possibly post a picture or a link to your awesome project either here, on Facebook, or on Pinterest. Make sure you're OK with this before you link up.)
Make it Great Monday:
(All of your creative projects)

Etcetorize
Motivated Monthly:
(BABY Projects ONLY)

Did you read the whole post above?  Avoid having your project deleted by making sure to link up to the right party please~

Friday, August 17, 2012

Pretty Dominoes

I was one of those kids who always kept things in their original packaging.  I was also one of those kids who rarely threw anything away.  So, when I came across my childhood domino set in it's original box in pristine condition I threw caution to the wind and gave them a total overhaul.

#mod podge, dominoes, decoupage, vintage games

 
If you want to make a pretty set of your own, here's what you need:


Materials
-Set of wooden dominoes
-Mod Podge gloss and Mod Podge Dimensional Magic
-Spray paint or acrylic paint
-paint brush
-pretty papers

Steps:

1) If you're super serious about crafting you will want to sand and prime your dominoes.  I am not that serious, so I just lined them all up and gave them several coats of spray paint.


I went back and forth on the idea of sanding down the edges to give them a shabby chic look but in the end decided that wasn't a good idea.  All of the tiles should look the same when they're turned over and they shouldn't have any distinguishing marks on them.  So... I just left them as is.

2) While you're waiting for your tiles to dry, pick out your pretty papers.  You need a different paper for every number you have (six).  You can cover the blanks too but this could be a little confusing when you're playing.  It's best to just leave them blank.

3) You're probably still waiting for your paint to dry so now's a good time to cut out your tiny little squares of paper to cover each of the numbers.  I used my Silhouette but you could do this by hand.  My squares are 18millimetres square.  Make sure to pre-measure your tiles to see if it's the same before you start cutting.

I was originally going to cover the blanks,
that's why there's seven tiles,
but I changed my mind~
4) Once your paint has finally dried, start adhering your papers.  The easiest way to do it is one number at a time.  Gather all of the one's and paste down the same paper on top of each of them, then all of the two's and so on.


I found it easier to brush the glue onto the backs of the paper squares instead of directly onto the tiles.

5) Next add a nice thick layer of Dimensional Magic to the entire top of your dominoes.


This gives them a super glossy, resin look.


It goes on a bit milky but dries super clear.  Just watch for air bubbles.  I put mine on so thick I had to let them dry overnight.


I couldn't put these lovely tiles back into their old box so I even made them a new holder!


Gorgeous!  Now I just need to find someone to play with~

Have a crafty week everyone!

Linkwithin

Related Posts Plugin for WordPress, Blogger...