Showing posts with label handmade jewellery. Show all posts

Friday, August 29, 2014

Washi Acetate Earrings

I've had some very important little visitors (check out my Instagram) here this week so I only had time for a super quick, but very pretty, project~

DIY Earrings, DIY Jewellery, Washi Tape

I have 1 roll of Washi tape that I've barely used so I wanted to try to come up with something interesting to show it off, plus I wanted some new earrings.  Voila!  The Washi Acetate earrings were born~

Here's what you need if you want to make your own:


Materials:
-Washi Tape
-Acetate Sheet
-Scalloped scissors
-Earrings findings (shepard's hooks + 4 jump rings)
-pliers, small hole punch (not shown)
-ink pad

Steps:
1) In order to stabilize your washi tape so that you can cut it, take a piece approximately 6" long and stick it down onto your acetate sheet.

Depending on how long you want your earrings
to hang, this should make 1 pair.
2) Using your scalloped edged scissors, cut two long rectangles.  You may have to play with this a bit.  I'm not sure if it was just my scissors but I found it made it difference which side was down and which direction I was cutting in.  Just play with it and find which way works best for you.


3) Punch a small hole in the center near the top of each rectangle.


4) My washi tape is pretty subtle so I inked the edges to bring out the scallop a bit more.


5) Add 2 jump rings (so it will hang the right way) and attach to your earring finding.


That's it!  I added a couple of little crystals to the bottoms of mine to add a bit of sparkle but that's basically it.

This entire project took me less than 10 minutes to do.  Try different decorative scissors with different washi tapes.  If you don't have a piece of acetate laying around you could just use some scrapbooking paper or cardstock.  I just like the glassy resin look I get with acetate.

Do you have a washi tape collection?  It's a trend I sort of passed on, probably because I knew if I started buying it I wouldn't stop.  What do you do with it all?  Leave a comment below~

Friday, August 22, 2014

Beautiful Boho Earrings

I've been in a very hippie boho chic state of mind lately, so I made some jewellery to go with my current vibe.

Boho, Bohemian, Festival style, DIY earrings


I haven't worn large gold hoops for awhile so I decided to wrap them up and make them pretty!  Here's what you need to make your own:


Materials:
-hoops earrings (or a bangle-shown at the end of the post)
-light gauge wire
-wire cutters, scissors
-embroidery thread
-beads
-optional: flat head pliers

Steps:
1) Depending on the size of your earrings, cut a piece of embroidery thread 1.5 - 2 metres long.  You'll be using all six threads as one so try not to separate them.  Simply tie a regular double knot at one end of your thread onto the end of your earring.


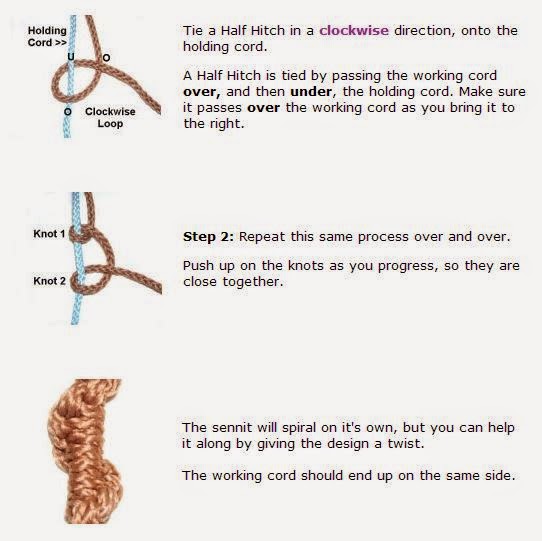
2) You'll be doing what's known as a half hitch spiral knot.  But don't think about the technical stuff, because this is one of the easiest knots ever.

Source

Your 'holding cord' is your earring.


Pull tightly as you complete each knot.  You'll notice after just a few stitches that you're creating a pretty spiral effect.


3) Just keep knotting over and over again until you go all the way around your entire earring and you're at the other side.  Now just tie another regular knot.  If you have some jewellery glue on hand you can add a dot, but it should be fine without.


4) Now cut a piece of light gauge wire (I have no clue what gauge I used as I was just stash busting and nothing has any labels.  Just make sure it's easily pliable and can wrap easily.) about 1 metre long.  About 3/4 of the way down from the front or back end of your earring, wrap your wire catching the end inside.

Cris cross a couple of times to keep everything in place.
5) Wrap the wire in wide sections, about every third time around add a bead onto your wire and try to get it to sit on the outside of your earring.


6) Stop wrapping the wire about the 3/4 mark on the other side of the earring.  Just wrap and cris cross to end it.  If you have some flat head jewellery pliers you can give it a little squeeze to keep it all in place.


I loved how these turned out so much that I used the same techniques to make a bangle too!


This is an awesome stashbuster if you're like me and you have loads of beads and old jewellery just taking up space.  I really want to try it using some variegated thread, but then I'd have to buy some, and that would sort of defeat the entire purpose of a stashbuster.

Do you have some supplies you need to use up?  What sort of stashbusters do you like to make?  Leave a comment below~

Friday, July 25, 2014

Moon and Star Bracelet

Got some scrap fabric and a bracelet you never wear? Then today's refashion project is just the thing for you!


Here's what you need to cover your own bracelet:


 Materials:
-Bracelet or bangle
-remnant of cotton
-scissors

Steps:
1) Cut a strip of fabric 1/2".  I didn't have the full width of my fabric left over so I just tied some strips together.  If you have the full 45" width one strip should be enough.


 2) Place your bracelet in front of it at the halfway point of your strip of fabric and tie.  Then follow the instructions below~


 Pull tightly.  After a few knots you'll begin to notice that you'll be getting a lovely spiral rib forming.


At the end just knot your fabric twice and snip any ends.


That's it!  I like it much better now and can see myself wearing it with my hippie dippy weekend outfits easily.  This is a very basic macramé knot but in a new medium other than hemp it has a new life.  Have you ever tried macramé knots with other materials?  Leave a comment.

You can check out some of my other macramé pieces HERE.

Friday, June 13, 2014

Shell Earrings

I've been on the road most of this week for work so it's time to pull out the jewellery making supplies for a quickie craft!


Aren't the painted shells gorgeous?  I completely forgot that I ordered them, so was very happily surprised when they fell out of my latest Wholeport package.

Here's what you need to throw together your own perfect summer earrings.


Supplies:
-pliers
-2 shepherd hooks
-4 medium size jump rings
-2 medium/long eye pins
-2 large round cabochon shells
-4 natural beads (I think mine are coconut)

Steps:
1) Slide 2 small natural beads onto your eye pin.  Then cut it down and make another eye on the other end.


2) Using a jump ring, attach one end of your eye pin to the shell piece.


3) Attach another jump ring onto the other end and through the end of the shepherd hook finding.


That's it!  Couldn't be easier.  Just make another one and you've got a pair.  Watch the direction of your jump rings to make sure the shells don't swing the wrong way, but other than that...easy peasy!

I tend to go a little boho chic in the summer so my jewellery changes as well and gets much more casual.  How about you?  Do the change in seasons signal a change in style for you?  Leave a comment below~


*This post is sponsored by Wholeport.com however no compensation was received other than the product shown and all opinions are my own.

Friday, March 28, 2014

Easy Spring Necklace

The sun is shining, the snow is melting, and I can finally go outside without my earmuffs on!!  Spring is well on its way!!

DIY Necklace, Beaded Necklace, DIY Jewellery, Fabric Covered Beads

I got these pretty fabric covered beads from Wholeport ages ago but didn't know what to do with them until today~

This necklace is pretty simple to make but is so pretty I know it will have big impact when it's on.


Just string your beads onto some clear fishing line, cap the ends, add some jump rings so that you can attach a chain, and then add your closure.  See?  Super easy!

Is it springtime where you live?  After our deep freeze winters up here Spring is a pretty big deal.  It'll be a couple of months before we can start thinking about planting but the sunshine brings us hope.  Tell us all about spring where you live, leave a comment below~


*This post is sponsored by Wholeport however no compensation was received other than the products shown and all opinions are my own.

Saturday, December 7, 2013

Ribbon and Chain Necklace

Disclaimer: I've been sick in bed since Tuesday night and today is my first day out of my pj's and housecoat. Hence, the snazy project name, super easy project,  and slightly dazed look in my eyes~


I realized this week that I have waaaaaaaay too much crafting, jewellery making, paper, decoupaging, card making, sewing, and fabric stuff.  So, I'm on a supplies diet and am only allowed to use things I already have, make things I've been meaning to make, and finish projects I started and haven't completed.  I'm not sure how long this will last, but I had these chains just sitting in a jewellery box doing nothing so I decided to make them into something wearable.

Here's what you need for this super easy project:


Materials:
-Ribbon
-Large chain
-Wire cutters, scissors
-Fray check, thread, sewing machine

Steps:
1) Cut your chains to the size you want, taking off any extra hooks or clasps that you don't need.


2) Apply some fray check to the end of your ribbon.  When it's dry, thread it into the last link in each of your chains and fold behind.


3) Simply stitch it down and repeat on the other side.


Cut your ribbon to a length that will sit nicely and allow enough in the back to tie.  You can adjust the necklace so that the ribbon closure is on the side for something a little more precious and whimsical.

Trying to look thoughtful, but really
my energy is just fading fast~

I'm not sure if I like how long it is, to be honest with you.  I might cut the chains in half so that there are four shorter ones instead of just the two.  But I think I'll wait until I'm more myself before I decide.

Have you ever put yourself on a supply diet?  How successful were you?  Leave a comment below, I need all the inspiration and self-control I can get....especially with Boxing Day sales coming up soon!

This project was featured here:

Friday, November 22, 2013

Faux Silver Pendant

Today's project is great either for yourself or as a quick and easy stocking stuffer.

polymer clay silver pendant, DIY silver pendant, DIY jewellery, DIY clay jewellery, silver leaf


Here's what you need to make your own~


Materials:
-Polymer clay
-Silver leaf
-craft knife
-optional:
   -pasta machine for flattening clay
   -soft brush
   -straight edge

Steps:
1) Condition your clay by warming it up in your hands and rolling it into a soft egg shape.


2) Run it through your pasta machine (used for clay only, not for food) on the thickest setting.  If you don't have a pasta machine for crafting just roll out your clay until it's about 1/8" thick or so.


3) Lay your flattened clay piece down on a cutting surface (I like to use a ceramic tile but anything will do), and cut it into a long skinny rectangle.

I may need a new 'straight edge'.

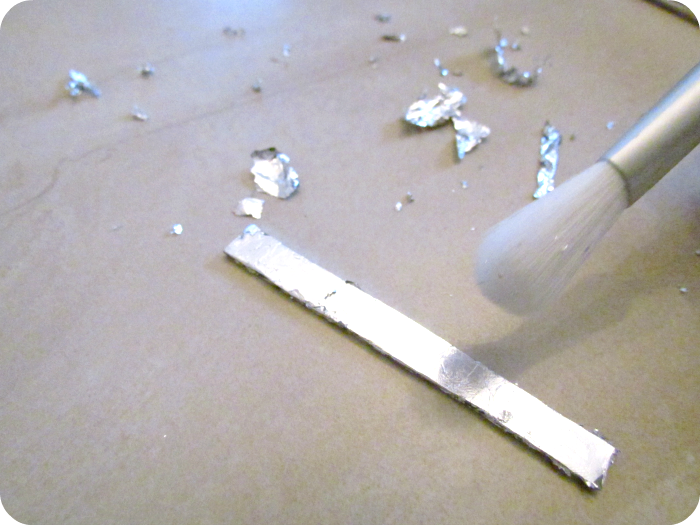
4) Tear off a piece of silver leaf and gently lay it on top of your clay rectangle.  Using a very soft clean brush gently brush it into the clay.


5) Use your knife to cut off the edges and then turn it over to do the back.


If your leaf splits or breaks don't worry about it.  Just lay another piece down and keep brushing until it blends into the other pieces.  It doesn't have to be perfect, that's part of the beauty of the piece.

6) Now, very very gently roll one end around a pencil or other smallish object to create a loop on one end.


The silver leaf will start to crack.  Don't freak out.  You can either just leave it or add more silver leaf on top and continue to brush it in.

7)  If you just want a nice plain bar, bake your clay piece in the oven following the directions on the clay packet.  If you want to add an extra special touch and you have a stamp that has lettering, you can personalize your piece to make it look like it's hammered.

"Love" & "Mom"

Once your piece is baked the silver is baked right onto the clay.  It shouldn't come off.  If it does though, you can seal your piece with some Mod Podge or Double Coat.  Either one will dry clear.


Don't worry if your loop at the top doesn't fully close.  As long as you aren't jumping on a trampoline or surfing, gravity should take care of holding things in place for you.

What would you print on your pendant?  Leave a comment below~

This project was featured here:

Adorned From Above  WP button250x250

Linkwithin

Related Posts Plugin for WordPress, Blogger...