Showing posts with label beads. Show all posts

Friday, April 4, 2014

Beaded Bowls

Are you always looking for a place to throw hair pins or keys or other trinkets?  Try making these pretty little bowls and you'll never lose your bits and bobs again!

beaded bowls, polymer clay bowl

I was actually hoping that I'd be able to peel the clay off the bowl once it was baked, but no such luck.  It's a happy mistake though because I like them like this just as much as the picture that was in my head~

Here's what you need to make your own beaded bowls:


Materials:
-polymer clay
-seed beads (you could try glitter or small buttons - just nothing flammable)
-small glass bowl
-plastic clay knife
-pasta maker for clay.  If you don't have this you can just roll the clay out, just don't ever use your rolling pin for food afterwards.

Steps:
1) Break out some clay.  Warm it up in your hands and roll it around to condition it.


2) Once it's nice a soft, shape it into a sort of oval rock shape.  Gently glide it into your pasta maker at a wide setting.  Keep putting it through at smaller settings until you get it nice and thin.  Make sure to rotate the clay or you'll just get on long skinny piece that keeps getting longer each time you put it through.


3) Drape your flattened clay over the outside of your little bowl, gently stretching it to cover as much as you can.


4) Cut the edge with a plastic clay knife or other tool and then roll the sides of your bowl around in some beads.


5) Gently push the beads down to make sure that they're embedded right into the clay.


6) Bake your clay as per the directions on the package.  I like to double bake my clay pieces.  I'm not 100% sure but I think it makes the clay just a little bit more sturdy once it cools down.

beaded bowls, polymer clay bowl

You can ruffle the clay a bit like a did on the grey one above.  If you're really talented you could even scallop the edge.  This is a nice little craft buster if you have some extra beads or clay that you want to use up too!

What would you put in your little bowls?  Leave a comment below~

Friday, February 28, 2014

Flashback Friday: Book Jewellery

I hope you're having as much fun as I am looking back at some of my old projects.

I originally shared this next project with you back in 2011.  I had only been blogging for a few months but it's still one of my favourite things I've made, probably because I love books so much.  (I should have loads of great book reviews for you when I get back from travelling!)
------------------------------------------------------

Have you ever had one of those weeks where time seems to drag on and on, but you still haven't found the time to do all of the things you meant to do?  That's what this week was like for me, so today's tutorial is something easy peasy that you can do in a snap when you just need a few minutes to feel creative.  At the end, I'll give you some ideas for how to take it to the next level, just in case you're more organized than I am and actually did do everything on your to-do list already.

Here are the materials I used:
 
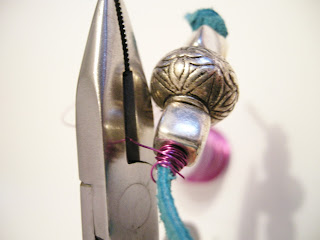
All I had handy were these wire wrapping pliers,
but you really just need ordinary or round nose pliers.

Steps:
1) Cut your strip of leather at least 15 1/2 " (39.5cm) long and tie a knot in one end.


2) String on some bulky beads.


Make sure you choose beads with a large enough hole to fit the leather.  I originally wanted to use these cute ladybug beads, but clearly, it was not going to happen:


 3) Tie another knot or wrap some wire at the end of your beads.  If you go the wire route, make it bulky, to stop the beads from falling over it.


4) Cut the wire and smoosh down a bit with your pliers to get rid of any sharp edges

5) Measure approximately 9" (23 cm) down and either tie another knot or wrap another piece of wire.


6) Add some more beads. This time if you're using the wrapped wire version, fold the end up. If you're using the knot method, tie another knot and you're done!


7) Wrap wire around the two layers of leather to secure.


8) Now for some extra blingity bling, thread some pretty beads onto an extra long head pin.  Make sure the holes in these beads aren't so big that the pin goes right through them.  You can also add a smaller bead at the bottom to make sure your beads are secure.


If you don't have any head pins you can just create your own version like this one:


9) Using your pliers, gently bend the tail of the head pin so that it will wrap through the leather loop.  Twist it to secure.


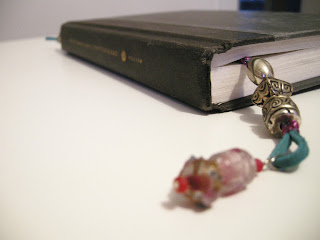
 Tah dah!  Now your books will look as pretty as you!


Book Jewellery, DIY Book Jewellery, DIY Bookmark, Beaded Bookmark, Bookmark Craft, easy to make bookmark, how to make a book mark
See the black on top?
I just used the knot method and it took me
less than 5 minutes to make it~

And when they're on the shelf they look just like jewellery~


What do you think?  If you want to take it a level higher, try using ribbon instead of leather.  Or, braid/macrame some embroidery floss.  Use tassels instead of beads.  As usual, you're only limited by your imagination.
--------------------------------------------------

I love projects that more than just pretty, they're useful...and they use up supplies that I already have on hand.  So this one really hits the mark.

When I first posted this project I had less than 100 followers, so if you remember it from the first time around you're a star and one of my very favourite people because you've stuck around for so long!  If this is your first time seeing it, I like you too!  It's very inspiring to have other people interested in what you're doing so I appreciate every visitor that stops by.

So....what do you use to keep your place in your books?  I have been known to use receipts and even other books!  Leave a comment below.  And if you want to catch up on my book reviews you find them all over on Goodreads.com.  Just search for me as Etcetorize~

Friday, November 16, 2012

Beaded Headbands

Party season is coming up soon and today's project is the perfect way to add just a bit of sparkle and pizzazz to your outfit without blinding your dance partner.

DIY Beaded Headband, Make your own headband, DIY Hair accessories
Here's what you need to make your own:


Materials:
-headband
-small gauge wire (make sure your beads will fit onto it)
-beads
Optional: Round nose pliers

Steps:
1) Cut a piece of wire at least 1 metre (39") long.


2) Using your pliers wrap one end of the wire to make a small ball.  If your wire is soft enough you can probably  just bend it with your fingers.  There is no technique to this, you just want something that will stop the beads from sliding right off the end.


3) Start loading up your wire with various beads.  Use different sizes, some matte some sparkly, etc.  This will give it more variation and create more interest.


4) Once you've filled up your entire metre of wire with beads create another 'knot' at the end, again this is just so that the beads won't fall off.


5) Wrap your beaded wire around your headband.


6) You should have enough wire to circle back to create a criss-cross pattern.


7) Tuck the end in and bend it so that it's secure and that's it!  You're ready for the party!


I had another headband that I never wear so I created another bead mix out of these beads:


and made this one!


I added a little beaded bouquet of flowers to this one too.

As you can see, I don't really wear my headbands the traditional way with hair pushed back.  I wear them more like little crowns or tiara's.  They feel more special that way~

DIY Beaded Headband, Make your own headband, DIY Hair accessories

I know someone will ask, so I'll just say now, that they don't hurt when you put them on, at least not any more than any other headband does.

What do you think?  Are headbands just for little girls or would your wear something pretty like this yourself?  Leave a comment~

This project was featured here:

Beyond The Picket Fence

Friday, February 17, 2012

Pretty Beaded Pins

Here's a little weekend project for that night when someone else does all of your lovely household chores for you.  Letting you put your feet and your hair up so that you can head out enjoy a night on the town~

Today's project is super easy but hopefully will give you that little extra sparkle to make your evening out special.

Here's what you need:

Steps:
1) Using your wire cutters, cut a piece of wire around 8"-9" (20-23 cm).  This isn't exact because it depends on the length of your bobby pin and the size of beads that you're using.  A good estimate to use is about 3 times the length of your pin.


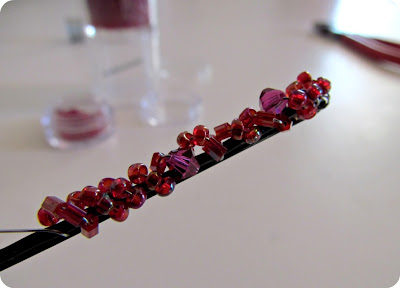
2) Wrap the end around the rounded end of the bobby pin a few times and squeeze it down with your straight nose pliers.  Make sure the wire isn't sticking towards the inside of the pin or it will catch on your hair.

3) Start adding your beads.  As you add beads wrap the wire around the pin, leaving the underside free of beads. 

Just keep adding and wrapping until you get to the bottom of your pin.


4) At the end just wrap the wire around itself 3 to 4 times and once again squeezing the end down with your fingers or straight nose pliers.

And that, my friends, is that!  So easy...but so pretty!


So easy, in fact, that I made another pair in one of my fav colour combo's...gold and pink!


And now I need to hear from you....my friend Gen has bet me that all my life I've been wearing my bobby pins upside down.  Which way to you wear your bobby pins?  Squiggly side up or down?  Leave a comment and let me know, I've got a box of bobby pins riding on this~

Linkwithin

Related Posts Plugin for WordPress, Blogger...