If that doesn't make you smile, I don't know what will~
Showing posts with label 1970's. Show all posts
Thursday, May 3, 2012
Thursday, December 22, 2011
Wednesday, May 11, 2011
"Celebrating" my birthday~
I'm a bit disappointed, I didn't get to any linky parties on Wednesday night. But you know what? I have a good excuse.... because instead of partying down with the rest of you crafters, I was here:
What do you mean you can't tell where I was????
OK, does this help??
Still not sure? How about this??
My mom and I "celebrated" a couple of milestone birthdays this year (mine was a couple of months ago and I was not a happy camper at the time) and my sister gave us each the very generous gift of a concert ticket to see Elton John. The three of us went on Wednesday night, and even though my sister was super sick, we had a great time.
After a few minor on stage tantrums (which is to be expected, it's Elton John after all) the rest of the show fell into place. He played a nice mix of the old classics and a few new ones from his latest album, which he said would be his last. Can you imagine playing the same songs over and over again for almost 40 years? If I didn't love those songs so much I'd almost feel sorry for the poor famous rock stars out there.
Sir Elton played his piano and sang songs for well over two hours straight and the crowd ate it up. As for his attire, he was pretty subdued considering his fashion history:

What really caught my eye were his back up singers. First off they sounded amazing. But more importantly, they looked like they were having a blast up there.
What do you mean you can't tell where I was????
OK, does this help??
Still not sure? How about this??
My mom and I "celebrated" a couple of milestone birthdays this year (mine was a couple of months ago and I was not a happy camper at the time) and my sister gave us each the very generous gift of a concert ticket to see Elton John. The three of us went on Wednesday night, and even though my sister was super sick, we had a great time.
<< I had some video to insert here but am having trouble loading. I'll keep trying >>
After a few minor on stage tantrums (which is to be expected, it's Elton John after all) the rest of the show fell into place. He played a nice mix of the old classics and a few new ones from his latest album, which he said would be his last. Can you imagine playing the same songs over and over again for almost 40 years? If I didn't love those songs so much I'd almost feel sorry for the poor famous rock stars out there.
Sir Elton played his piano and sang songs for well over two hours straight and the crowd ate it up. As for his attire, he was pretty subdued considering his fashion history:

| I think he was basically the Lady Gaga of the 70's. |
| Source |
| There was a woman in the audience wearing a similar pair of boots in black~ |
I'd love to be a back up singer! You get to be all fun and sparkly and dance your butt off in front of everyone. I suppose it would help if I could carry a tune.
Anyway, it was a fun night out with my two favourite ladies. Thanks for the birthday gift Jen! See the rest of you at the rest of the linky parties this week. Leave a comment and let me know which oldie but goodie concert you'd love to go to or have seen!
And don't forget to enter my Thank you Giveaway before midnight on Saturday, May 14th. If you're a follower you just have to follow the link and leave a comment telling me what your favourite Etcetorize project has been so far and you could win a pretty Etcetorize blouse with matching bracelet.
Saturday, April 30, 2011
Easiest DIY Caftan Top Ever
Caftans have sort of gotten a bad rap since the 70's.
But I still love them, and I think they can be sexy, saucy, and stylish all at once if you go about it in the right way.
Today I'm going to show you how you can make your own super easy caftan top that will be perfect for any occasion.
Supplies:
2 large scarves (mine are 42"X 42"or 106.5 cm square)
thread
pins
measuring tape
sewing machine (or needle if you'd prefer to do this by hand...which you can, it's that easy!)
Steps
1) Cut off any tags from your scarves
2) Measure from the centre of your neckline towards your shoulder and decide how wide you want your neckline to be.
3) Fold your scarf in half along one side to determine the centre and mark it with a pin.
4) Next, you need to decide how long you want your top to be. Because my scarves were extra big I was able to fold them almost in half. This way I got the length I wanted and they were then lined so I wouldn't have to wear a tank top underneath. I could've left them long and made a dress instead. You decide what works best for your body.
For this seam you can leave wrong sides together and stitch on the outside.
And guess what....that's it!
![]() |
| Source |
But I still love them, and I think they can be sexy, saucy, and stylish all at once if you go about it in the right way.
| Victoria's Secret |
![]() |
| Colin Heaney |
Today I'm going to show you how you can make your own super easy caftan top that will be perfect for any occasion.
Supplies:
2 large scarves (mine are 42"X 42"or 106.5 cm square)
thread
pins
measuring tape
sewing machine (or needle if you'd prefer to do this by hand...which you can, it's that easy!)
Steps
1) Cut off any tags from your scarves
3) Fold your scarf in half along one side to determine the centre and mark it with a pin.
4) Next, you need to decide how long you want your top to be. Because my scarves were extra big I was able to fold them almost in half. This way I got the length I wanted and they were then lined so I wouldn't have to wear a tank top underneath. I could've left them long and made a dress instead. You decide what works best for your body.
![]() |
| You can see here that it's folded. This is just the front so far. |
5) Remember earlier we decided how wide the neckline would be? Now you can mark that along the top edge of your scarf with two pins. Do the same with the scarf for the back and pin the two scarves together at your neckline markings.
Leave your sides unattached and open for now.
6) Here's a spot where you can add a personal touch. Because I said this was the easiest caftan ever, I'm making mine with just a few stitches at the neckline and leaving the tops of my sleeves open (to flutter). If you want a closed sleeve you can stitch along the top of your scarves up to your neckline mark. Just make sure to put right sides together and use a narrow stitch.
7) I'm going the easy route and just stitching about a half inch on either side of mark with a 1/4"seam.
Don't forget to stitch it with right sides together. Once it's stitched just flip it back to right sides out and give it a quick press along the top seam.
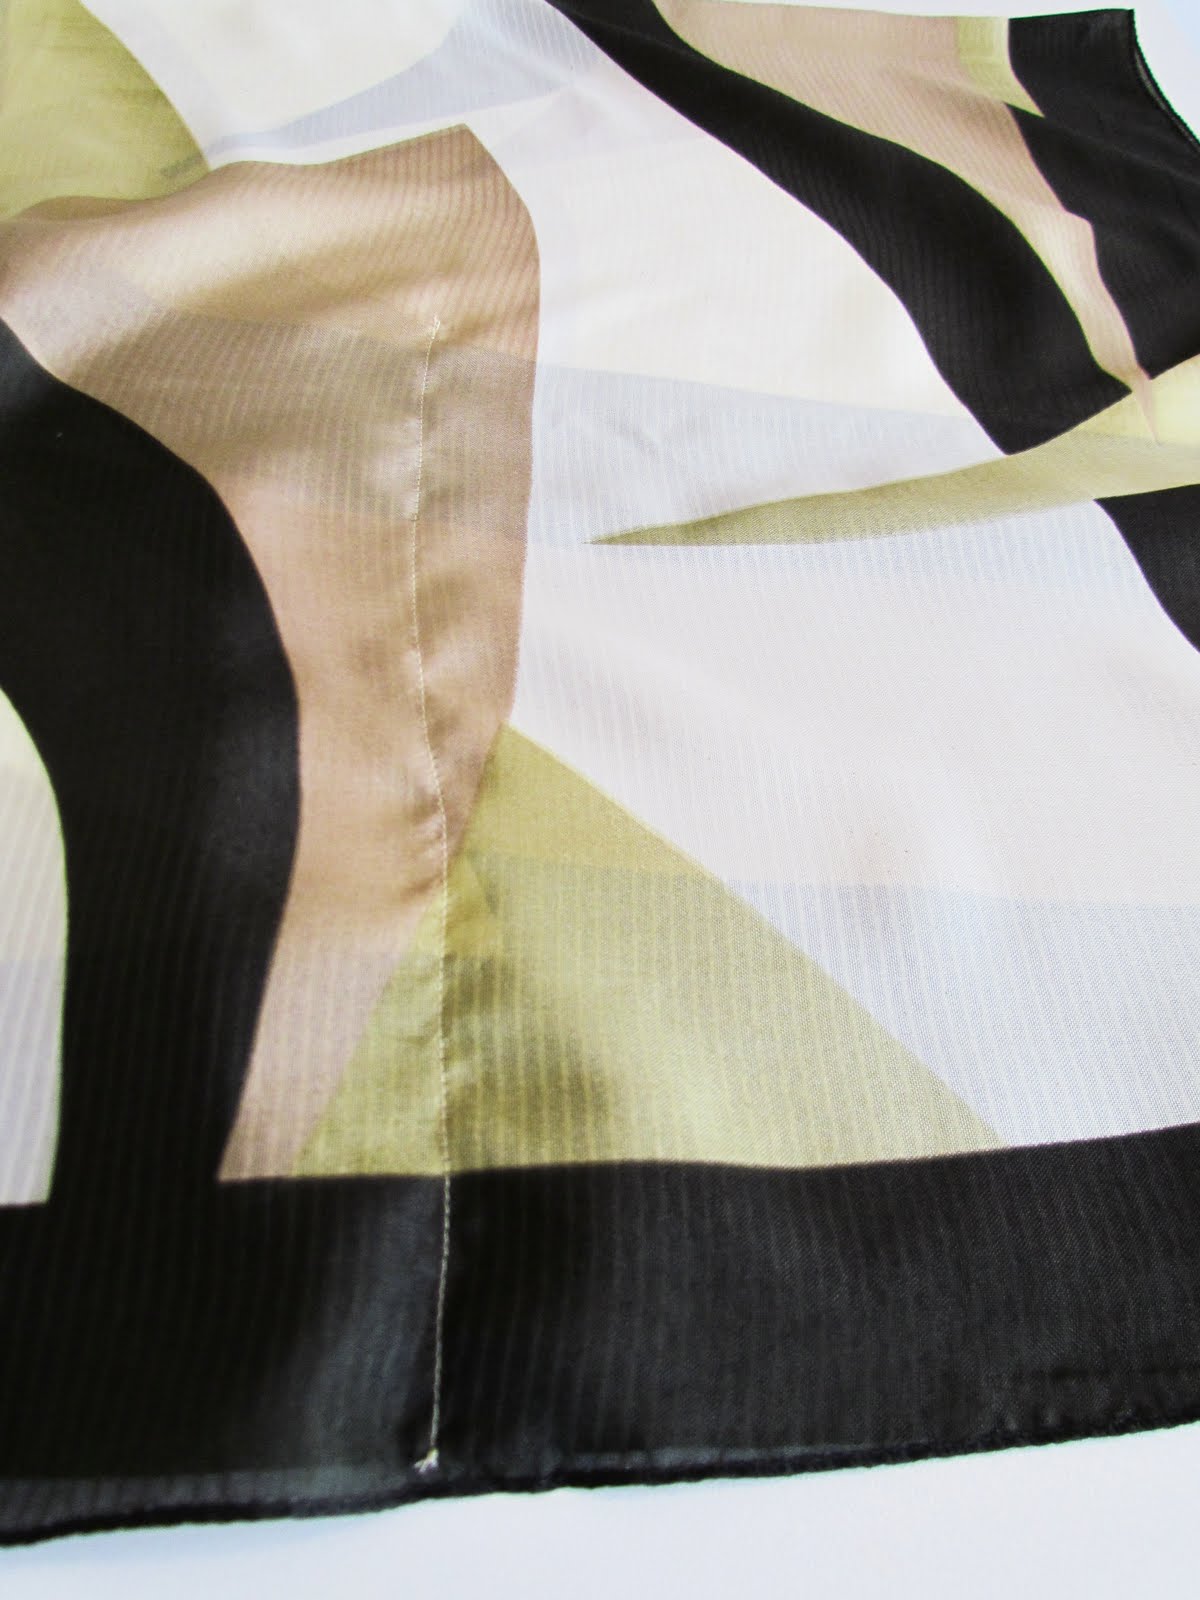
8) Now you just need to make a side seam so that people can't see right through your top. The best way to determine this is to measure across the front of your hips and add a few inches. That way you know it will lie nicely along the bottom edge. I measured 12 inches (30.5cm) in from each side and sewed a line straight up from the bottom, 12 inches long.
For this seam you can leave wrong sides together and stitch on the outside.
![]() |
| My stitching is really much straighter than it looks here. The scarf is just not laying straight...really! |
![]() |
| Wear it off the shoulder for evening |
![]() |
| Wear it centered for something a little more conservative |
This project took me about 30 minutes to complete. And I think the only reason it even took that long was because I had to stop and take photos of each step.
I bought my scarves at the dollar store, and even though they're polyester and of very questionable quality, I think they were still a pretty good deal. If you use a proper silk scarf or even just cut some fabric into the right size square and then hem the sides this would hang much more beautifully. Check out your local 2nd hand shop for great deals on scarves!
If you want to make this your own, just try playing with your seams or add a beaded embellishment or fringe along the bottom. Or how about some cute buttons at the top neckline corners. The caftan silhouette has to be the most simplest out there, so all you need to do is dress it up with the right accessories and away you go. Style and comfort, all in one!
Hope you give it a try. Comment land has been very quiet lately but I'd sure love to hear your thoughts.
Have a great week everyone!
Wednesday, November 24, 2010
Show and Tell: Burdastyle Competition
I'm sure any of you who are sewers are familiar with the burdastyle site. It's an amazing place to get sewing tips, free (and/or inexpensive) patterns, advice, and showcase your own projects.
Right now they are holding a contest...and I entered! It's sponsored by Bernina and the grand prize is, of course, a sewing machine. It's called "Party Through the Decades" and each submission has to choose their favourite decade and submit an inspiration board as well as a photo of their project.

If you've read my "About Me" blurb on the sidebar you can easily guess what decade I chose...the 1970's of course! And I was completely inspired by Halston, one of my favourite designers of the decade.
My inspiration board is a mix of classic Halston along with the newer Heritage line:
And here's my creation:

"I love everything about the 70’s. It was a decade when glitz and glam were the everyday norm. I’m especially drawn to Halston and the beauty in the simplicity of the shape and movement of the fabric that he was able to capture.
This piece appears simple but to attain such simplicity one must achieve perfection in each and every stitch, otherwise it shows. The beautiful olive green colour adds to the elegance and sophistication as does the authentic era belt.
All the “it” girls of the era wore Halston. They, and their clothes, epitomized the jet set lifestyle. I hope that you can see the Halston influence in my creation and I can’t wait to wear it!"
You can check out the other submissions by going here . And you can check out my projects page here . I don't know if number of views and number of time favourited matters in the decision making...but it probably wouldn't hurt.
Once you see all of the amazing submissions you'll probably agree that I don't really have a very good chance of getting too far in the competition, but it was still fun, and it was a good incentive to get me to make something special to wear for the holidays! Now I'm ready to party all Christmas season long~
Wish me luck!
Right now they are holding a contest...and I entered! It's sponsored by Bernina and the grand prize is, of course, a sewing machine. It's called "Party Through the Decades" and each submission has to choose their favourite decade and submit an inspiration board as well as a photo of their project.
If you've read my "About Me" blurb on the sidebar you can easily guess what decade I chose...the 1970's of course! And I was completely inspired by Halston, one of my favourite designers of the decade.
My inspiration board is a mix of classic Halston along with the newer Heritage line:
And here's my creation:

Part of the submission is to give a short blurb on why you chose the era that you did. Here's what I wrote:
This piece appears simple but to attain such simplicity one must achieve perfection in each and every stitch, otherwise it shows. The beautiful olive green colour adds to the elegance and sophistication as does the authentic era belt.
All the “it” girls of the era wore Halston. They, and their clothes, epitomized the jet set lifestyle. I hope that you can see the Halston influence in my creation and I can’t wait to wear it!"
You can check out the other submissions by going here . And you can check out my projects page here . I don't know if number of views and number of time favourited matters in the decision making...but it probably wouldn't hurt.
Once you see all of the amazing submissions you'll probably agree that I don't really have a very good chance of getting too far in the competition, but it was still fun, and it was a good incentive to get me to make something special to wear for the holidays! Now I'm ready to party all Christmas season long~
Wish me luck!
Subscribe to:
Posts (Atom)