Wednesday, August 14, 2013

The Snugg

As you know, I've decided to join everyone else in this century and recently purchased an iPad....and am loving it.  When the lovely folks over at The Snugg found out, they sent me this very pretty, and very useful iPad cover!


I've been using my iPad without a cover and it was a real pain.  It felt very vulnerable and I knew it was just a matter of time before something happened to it.

But with my new Snugg iPad 4 Case it's easy to carry it around, watch movies, and way steadier when taking photos.


I'm not normally drawn to blue but this pretty baby blue leather reminded me so much of a pretty Tiffany's box that I couldn't resist.


This is the executive case which has the added feature of some great pockets on the inside.


Here's a shot of the back and how it stays standing up so easily.


It has a little slot up top to hold your stylus.  I don't have one so I just use it for a pretty Mod Podged pencil in case I come across something I want to make a note on.


And at the end of the day, when I finally tear myself away from this little addictive piece of machinery, it sits nice and compact, just waiting for me to open it up the next day to continue getting a higher score in Bejewelled Blitz or watch another old movie or TV show.  (Yes, my days are slightly less productive lately)


As you can tell, I'm over the moon about mine.  Hard to believe considering it's just a case, but without it things were getting a little awkward.  In fact, I would only admit this to you guys, but I actually carried my beautiful new iPad in a tea towel one day because it was the fastest thing I could find that would provide a bit of protection.

Check out the other great colours and styles here.  And leave me a comment letting me know what your favourite app is.  I get a little lost in the App store and love hearing about what others are using.


*This is a sponsored post however I received no compensation other than the product shown and all opinions are my own.

Monday, August 12, 2013

Bike Basket

Talk about a quickie project....I think this one took me less than 5 minutes (if you subtract the year it took me to find the supplies)!

You've seen my bike before.  I call it my "Old Lady Bike" and I mean that with lots of love for the "old ladies" out there.


I love cruising around town on it.  I made a little Bike Bag for it last summer, but I always knew that what I really wanted was an actual basket.

So, I finally found the perfect basket at the second hand shop, weaved some ribbon through the side, and tied it on.  That's it!  So simple.  What's even better is that it works on the front or the back and it only takes a minute or two to switch it.

I love the vintagey feel of the whole bike now.  I suppose I could've dry brushed some paint onto it, mod podged it, or poured glitter all over it, but why mess around with it when I've got bike riding to do?


Friday, August 9, 2013

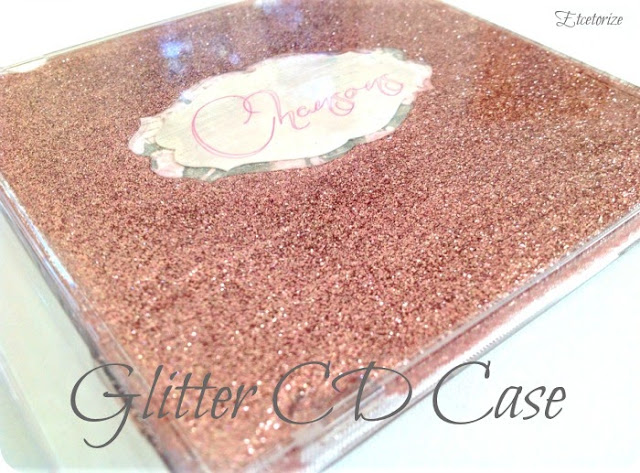
Glitter CD Case

I think I might be one of the last people on the planet, but I have to admit, I do still listen to CD's.  I travel a lot on the highway for my job so I have to have something to entertain me on those long trips.  And singing as loud as I can to a cd full of my favourite songs helps me stay awake.

And you know how much I love pretty glittery things so today I give you....

glitter CD, CD Case repurpose


Even if you don't listen to CD's I bet you have loads of these things laying around.  Why not make them pretty and use them for something else.

Here's what you need to make your own:


Materials:
-Mod Podge and sponge brush
-pretty scrapbooking paper
-Glitter!!!!

Steps:
1) I made a little label for my CD with my Silhouette.  You can get as simple or as ornate as you want with this.

I listen to a lot of old French music
so I used the French word for songs. 

2) Lay down your first layer of Mod Podge and stick your label face down.


Make sure to add some Mod Podge on top and around the edges to seal it all in.

3) Mod Podge dries pretty quickly so you might need to lay another layer of it down, nice and thick this time and then throw some glitter on top.


You may need to do this two or three times to get a nice even layer of glitter.  Don't worry about it coming off inbetween coats.  Just don't press down too hard when you put a new layer of Mod Podge on top.

4) Once you have as much glitter down as you like put one last layer of Mod Podge on top to seal all that glitter in.


Remember, Mod Podge dries clear so you can go as thick as you need to.  Don't forget to get into the nooks and crannies.

That's pretty much it!  Mod Podging doesn't get much simpler than this.


I love how it sparkles in the sunshine.

CD cases can be used to hold photos, calendars, recipes, etc.  You name it, if it's flat enough you can throw it in there and have a super cute case to put it in.  Have more ideas?  Leave a comment below and let us all know.

Avoir une bonne semaine!  (I think that means have a good week en francais)

Wednesday, August 7, 2013

Pillowcase Top

There were a few more cloudy periods yesterday so I was able to take some time out of my busy reading in the hammock all day time to whip up a little pillowcase top for the final month of summer.

Did you notice...
It took 3 tries to get it right
but I changed my hair colour!
I just wanted something super easy, lightweight, and flowy, for those hot summer days when you don't feel like letting everyone see everything.  This top hit it right on the mark.

You don't really need to use a patter to make a pillowcase top.  They're super easy.  But I knew I had this cute vintage pattern just sitting in my drawer so that's what I used.


This pattern is from 1976.  I am a big sucker for McCall's patterns from this time period because I love the illustrations so much.  Unfortunately for me, size small was still a large fitting 10-12, so I had to take about 2" out of the width of both the front and the back.  But now I love the casual fit of it.  And I really love that all the edges are finished with proper facings to give it a more polished finish.

I thought about adding a cute iron-on from my Wholeport stash but in the end I opted for simplicity.

I think I was inspired by this top I pinned not too long ago, which is not a pillowcase top at all:
I'm going to be very sad when all this beautiful hot weather ends but I guess that means I'll be able to start planning a wonderful hot weather getaway soon.  Any suggestions?  I don't usually do that 1 week all-inclusive type thing.  I like to throw on my backpack and take off for a month not really knowing where the road is going to take me.

My last trip was to Thailand and I loved it.  Where have you been that you think I could go (and wear my new pillowcase top!) ?  Leave a comment below~

Monday, August 5, 2013

Playing Around

Sorry but I have no fun crafty projects to share with you today.

I finally took the plunge and bought an iPad!!!!  So, I've been very busy getting caught up on Mad Men via Netflix, playing Candy Crush, and taking photos around the yard.


I think just about anyone can take beautiful photos with this thing!  But it's not just anyone who can model like Katya.  Look at those eyes!


Besides...it's a long weekend and the weather is beautiful!  So, I'm taking the day off~

Have a wonderful August long weekend everyone!

Friday, August 2, 2013

Endless Options Scarf Top

Did you really think I'd let the whole summer go by without at least one thrift store scarf transformation?

DIY Scarf Top, Scarf Refashion, DIY Halter

This top couldn't be any easier.  Here's what you need to make your own:

Materials
-large scarf (mine is 38" square)
-2 metres of wide ribbon
-standard sewing kit (thread, scissors, sewing machine)

Steps
1) To start, simply decide which part of your scarf is the top and which is the bottom.  The design might be the same all around so it might not make a difference but if yours has a one way pattern take a few minutes to figure this out.

2) Cut your ribbon in half so that you have 2 one metre pieces.  Dab a bit of Fray check on each of the ends to stop your ribbon from fraying in the wash.  Then measure about 10" up the sides from the bottom of each corner and attach each piece of your ribbon.  If you attach it to the front like the photo below then you won't see the stitching when you wear your top.


Guess what?!?!?!  That's it!!  That's all you have to do.

Now I'll show you how you can wear it:

Steps:
1) Drape the scarf across your body covering one side and bringing the two top corners up to the opposite shoulder.


2) Tie the ends of the top corners together at your shoulder.


3) Scrunch up your scarf so that the length sits somewhere close to your waist/hips or whatever is comfortable.

4) Wrap the scarf around your body, overlapping to ensure there's no big gaping hole under your arm.


5) Pull tightly and tie the ribbon together at the opposite side.


There are lots of other variations.  Just play with it and see what you come up with!

DIY Scarf Top, Scarf Refashion, DIY Halter, how to wear a scarf as a top

I have lots of other scarf refashions below:

scarf refashion, how to turn a scarf into a top, Scarf halter, Scarf top
Tutorial HERE
scarf repurpose, scarf refashion, how to make a top from a scarf, scarf to top, scarf halter top, make a summer top
Tutorial HERE


embroidery hoops, make your own purse handles, how to make a bag, DIY purse, scarf to bag, scarf recycle, scarf refashion, easy sewing project, easiest bag ever
Tutorial HERE
DIY Vest, Easy Sewing Project, Scarf to vest, Scarf project, Easy Sewing, Deconstructed
Tutorial HERE
 Believe it or not, I do sometimes just wear a scarf as a scarf. How about you?  Are you a scarf kind of gal or do you think they're just a silly accessory?  Leave a comment below~

This project was featured here:


Linkwithin

Related Posts Plugin for WordPress, Blogger...