Showing posts with label DIY jewellery. Show all posts

Friday, August 29, 2014

Washi Acetate Earrings

I've had some very important little visitors (check out my Instagram) here this week so I only had time for a super quick, but very pretty, project~

DIY Earrings, DIY Jewellery, Washi Tape

I have 1 roll of Washi tape that I've barely used so I wanted to try to come up with something interesting to show it off, plus I wanted some new earrings.  Voila!  The Washi Acetate earrings were born~

Here's what you need if you want to make your own:


Materials:
-Washi Tape
-Acetate Sheet
-Scalloped scissors
-Earrings findings (shepard's hooks + 4 jump rings)
-pliers, small hole punch (not shown)
-ink pad

Steps:
1) In order to stabilize your washi tape so that you can cut it, take a piece approximately 6" long and stick it down onto your acetate sheet.

Depending on how long you want your earrings
to hang, this should make 1 pair.
2) Using your scalloped edged scissors, cut two long rectangles.  You may have to play with this a bit.  I'm not sure if it was just my scissors but I found it made it difference which side was down and which direction I was cutting in.  Just play with it and find which way works best for you.


3) Punch a small hole in the center near the top of each rectangle.


4) My washi tape is pretty subtle so I inked the edges to bring out the scallop a bit more.


5) Add 2 jump rings (so it will hang the right way) and attach to your earring finding.


That's it!  I added a couple of little crystals to the bottoms of mine to add a bit of sparkle but that's basically it.

This entire project took me less than 10 minutes to do.  Try different decorative scissors with different washi tapes.  If you don't have a piece of acetate laying around you could just use some scrapbooking paper or cardstock.  I just like the glassy resin look I get with acetate.

Do you have a washi tape collection?  It's a trend I sort of passed on, probably because I knew if I started buying it I wouldn't stop.  What do you do with it all?  Leave a comment below~

Friday, August 22, 2014

Beautiful Boho Earrings

I've been in a very hippie boho chic state of mind lately, so I made some jewellery to go with my current vibe.

Boho, Bohemian, Festival style, DIY earrings


I haven't worn large gold hoops for awhile so I decided to wrap them up and make them pretty!  Here's what you need to make your own:


Materials:
-hoops earrings (or a bangle-shown at the end of the post)
-light gauge wire
-wire cutters, scissors
-embroidery thread
-beads
-optional: flat head pliers

Steps:
1) Depending on the size of your earrings, cut a piece of embroidery thread 1.5 - 2 metres long.  You'll be using all six threads as one so try not to separate them.  Simply tie a regular double knot at one end of your thread onto the end of your earring.


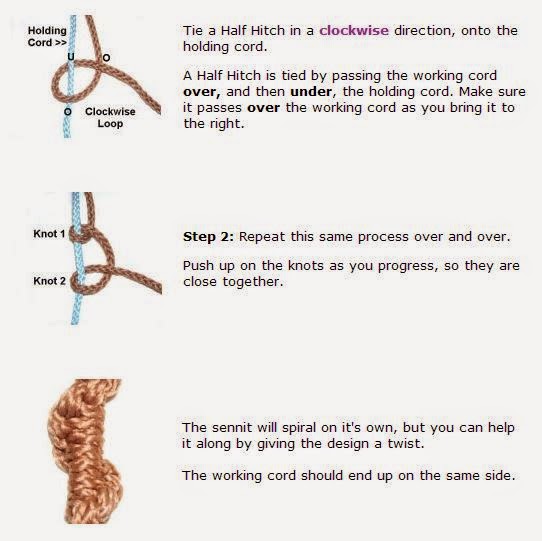
2) You'll be doing what's known as a half hitch spiral knot.  But don't think about the technical stuff, because this is one of the easiest knots ever.

Source

Your 'holding cord' is your earring.


Pull tightly as you complete each knot.  You'll notice after just a few stitches that you're creating a pretty spiral effect.


3) Just keep knotting over and over again until you go all the way around your entire earring and you're at the other side.  Now just tie another regular knot.  If you have some jewellery glue on hand you can add a dot, but it should be fine without.


4) Now cut a piece of light gauge wire (I have no clue what gauge I used as I was just stash busting and nothing has any labels.  Just make sure it's easily pliable and can wrap easily.) about 1 metre long.  About 3/4 of the way down from the front or back end of your earring, wrap your wire catching the end inside.

Cris cross a couple of times to keep everything in place.
5) Wrap the wire in wide sections, about every third time around add a bead onto your wire and try to get it to sit on the outside of your earring.


6) Stop wrapping the wire about the 3/4 mark on the other side of the earring.  Just wrap and cris cross to end it.  If you have some flat head jewellery pliers you can give it a little squeeze to keep it all in place.


I loved how these turned out so much that I used the same techniques to make a bangle too!


This is an awesome stashbuster if you're like me and you have loads of beads and old jewellery just taking up space.  I really want to try it using some variegated thread, but then I'd have to buy some, and that would sort of defeat the entire purpose of a stashbuster.

Do you have some supplies you need to use up?  What sort of stashbusters do you like to make?  Leave a comment below~

Friday, March 28, 2014

Easy Spring Necklace

The sun is shining, the snow is melting, and I can finally go outside without my earmuffs on!!  Spring is well on its way!!

DIY Necklace, Beaded Necklace, DIY Jewellery, Fabric Covered Beads

I got these pretty fabric covered beads from Wholeport ages ago but didn't know what to do with them until today~

This necklace is pretty simple to make but is so pretty I know it will have big impact when it's on.


Just string your beads onto some clear fishing line, cap the ends, add some jump rings so that you can attach a chain, and then add your closure.  See?  Super easy!

Is it springtime where you live?  After our deep freeze winters up here Spring is a pretty big deal.  It'll be a couple of months before we can start thinking about planting but the sunshine brings us hope.  Tell us all about spring where you live, leave a comment below~


*This post is sponsored by Wholeport however no compensation was received other than the products shown and all opinions are my own.

Wednesday, March 12, 2014

Crafty Day

Last weekend my sister and her kids came to town for a quick visit, which also meant a super fun crafty afternoon with my niece.

First she taught me how to use a rainbow loom.


According to Micheals, this is the crafting toy of the year.

Such a good teacher...very patient and kind~

Look what we made!!
That's her fake smile because
Auntie took too long to take the photo~

After we finished making our bracelets then we refashioned a little sweater of mine.


We cut the sleeves off to make leg warmers and then cut the body off and sewed it into a tube to make a neck warmer.


Such a fun crafty day!

When is the last time that you let a kid teach you something?  Leave a comment below~

Saturday, December 7, 2013

Ribbon and Chain Necklace

Disclaimer: I've been sick in bed since Tuesday night and today is my first day out of my pj's and housecoat. Hence, the snazy project name, super easy project,  and slightly dazed look in my eyes~


I realized this week that I have waaaaaaaay too much crafting, jewellery making, paper, decoupaging, card making, sewing, and fabric stuff.  So, I'm on a supplies diet and am only allowed to use things I already have, make things I've been meaning to make, and finish projects I started and haven't completed.  I'm not sure how long this will last, but I had these chains just sitting in a jewellery box doing nothing so I decided to make them into something wearable.

Here's what you need for this super easy project:


Materials:
-Ribbon
-Large chain
-Wire cutters, scissors
-Fray check, thread, sewing machine

Steps:
1) Cut your chains to the size you want, taking off any extra hooks or clasps that you don't need.


2) Apply some fray check to the end of your ribbon.  When it's dry, thread it into the last link in each of your chains and fold behind.


3) Simply stitch it down and repeat on the other side.


Cut your ribbon to a length that will sit nicely and allow enough in the back to tie.  You can adjust the necklace so that the ribbon closure is on the side for something a little more precious and whimsical.

Trying to look thoughtful, but really
my energy is just fading fast~

I'm not sure if I like how long it is, to be honest with you.  I might cut the chains in half so that there are four shorter ones instead of just the two.  But I think I'll wait until I'm more myself before I decide.

Have you ever put yourself on a supply diet?  How successful were you?  Leave a comment below, I need all the inspiration and self-control I can get....especially with Boxing Day sales coming up soon!

This project was featured here:

Friday, November 8, 2013

Glitter Bangles

I've already got my Christmas sweater picked out and ready to go (I got it at an end of season sale last year).  It's red, it's sparkly....it's perfect for Christmas.  Only one more thing could make it even better....more GLITTER!

Glitter Bangles, DIY Glitter Bracelet, How to make bracelets with glitter, Christmas jewellery

This project is a little messy, but it's worth it~

Here's what you need to make your own Glitter Bangles.

Supplies:
-old set of bangles from the thrift store (I picked mine up at a garage sale for next to nothing)
-Mod podge
-paint brush
-piece of scrap paper
-GLITTER!

Steps:
1) Pour a generously thick line of glitter onto your paper.


2) Paint Mod Podge onto your bangle, leaving about an inch or so bare so that you can hold it and set it down to dry.  You can go back later and touch up this spot.

Sorry for the fuzzy pic.
3) Gently roll your bangle into your glitter.


4) If any glue and glitter squashed over the edges just wipe it off to create a nice clean edge and then let bangles sit for a few hours to dry.

I use this piece of styrofoam as a drying rack
but an even better solution would be to hang them.

5) If you had to leave a spot bare make sure you go back and add glue and glitter before you move onto the next step.

6) Once everything is fully covered and dry just go back over top of everything with another layer of Mod Podge to seal it all in.  If you miss this step, I guarantee you will be leaving a trail of glitter behind you everywhere you go.


7) Leave your bangles to dry overnight and voila!  The Mod Podge will dry clear and you will have some lovely (and glittery) new jewellery for the holidays~

Glitter Bangles, DIY Glitter Bracelet, How to make bracelets with glitter, Christmas jewellery

Do you usually have a special Christmas outfit or does your family stay casual for the festivities?  Leave a comment below~

Friday, August 16, 2013

Framed Owl Earrings

Are you on the owl bandwagon?  Not yet, but you want to be?  Well, keep reading for a super easy way to get started.

owls,

I got this little pack of owls from Wholeport this month.  I completely forgot that I had ordered them so it was a nice surprise when they fell out of the packet.

10 in a pack for less than $3!

Here's what else you need to make your own Framed Owl Earrings:


-Owls, cabochons, shephard's hook earring findings, long headpin with loop at end
-pretty scrapbook paper, mod podge, sponge brush
-jewellery pliers, craft knife
-optional: wire cutters (pliers usually have a cutter built in)

Steps:
1) Cut out two ovals from your scrapbook paper that fit will fit inside the oval of your cabochons.  I placed my paper on top of my cabochon and gently pressed along the edge of the frame to emboss the paper lightly and then just cut along the embossed line.  You'll still have to trim a bit and it might not be perfect but that's OK.  The paper will be covered by your owl and just peek through a bit.


2) Adhere your paper to the cabochon.  I used Mod Podge because I know it will work with metal but you can use whatever your favourite adhesive is.


3) I decided at the last minute to fill the cabochons with Mod Podge Dimensional to add a resin look.  You can just use regular Mod Podge if you want.  In fact, if you use the regular formula you'll probably only need to wait about an hour to move onto the next step.  If you use Dimensional you'll have to let it sit overnight to completely dry.

Refill with more Dimensional Mod Podge
about a half hour after the first pour.  It settles a bit
and the second pour will make sure you get right to the edges.
4) While you're waiting for your Mod Podge to dry you can make the rest of your earring.  I used a long head pin because it's what I had on hand that sort of matched but you can use a length of wire and manually add a loop if you want.

Just string on a few beads and create another loop at the top.


5) Attach to the shephard's hook finding.


6) Once your paper is dry just layer it onto the bottom loop with your owl.


That's it!  Now you can rock your trendy look~


My aunt used to collect owls.  It didn't take long before she had a house full of them.  Eventually she had to tell everyone to stop buying her ceramic owls, owl salt and pepper shakers, owl earrings, and owl anything else.

What do you collect?  Do you know anyone who has a house full of rooster, cats, or pigs (of the ceramic variety)? Leave a comment below and tell us all about it!

*This is a sponsored post however I did not receive any remuneration other than the products shown and all opinions are my own~

Linkwithin

Related Posts Plugin for WordPress, Blogger...