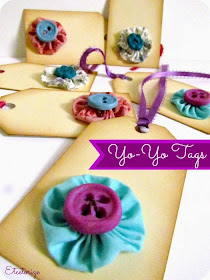
First up I cut up some tag shapes with my Silhouette. I used some lightweight card as backing and some adhesive backed paper from Silhouette for the fronts.
I stuck the pieces together and then inked the sides.
OK, cards done....next up, yo-yo's!
I'm not going to give a step by step on how to do yo-yo's because there are lots of great tutorials already out there, like THIS one that I used from Positively Splendid~
 |
| So cute! |
 |
| Buttons & Ribbons Seashells |
I baked my buttons and then sewed them onto the yo-yo's.
All that was left was to glue the yo-yo's onto the tags and add some ribbons.
Now the next time I have a gift to give, I have tags ready to use!
I like the old fashioned very homemade aspect of yo-yo's. Have you ever made and used them in a project?They're an awesome stash buster. Leave a comment~
*This post is sponsored by Wholeport.com however no compensation was received other than the products shown and all opinions are my own.


Wow, not only did you make your own yoyos, you made your own buttons....and your tags turned out wonderfully!
ReplyDelete