Although Summer is almost half over for most of North America, it seems to be just beginning where I live. So I figured I better get prepared in case we actually get some nice super hot scorching weather and make a nice cool set of pj's.
I made this top with a remnant I had from this awesome vintage 1974 pattern.
This was one of the very first vintage patterns I ever bought. I made View C and just cut it off short.
Then I just happened to have some undies that I had already made, so now I have a cute little set!
So bring it on Summer! I'm ready for you!
Pages
▼
Wednesday, July 30, 2014
Tuesday, July 29, 2014
Olsen Twins Wedding Dress
Have you see the wedding gown that Mary-Kate and Ashley Olsen designed for their friend Molly Fishkin?
The internet was all atwitter about it last week because these ladies are all such arbiters of amazing style (I've never heard of Molly Fishkin before but I think she's a Hollywood stylist).
This gown though seems rather plain and medieval looking to me.
What would you do if your friend insisted on designing your wedding gown? Could you say no? What if you don't like it?
Would you ever say no to the Olsen Twins style advice? What would you do? Leave a comment below~
The internet was all atwitter about it last week because these ladies are all such arbiters of amazing style (I've never heard of Molly Fishkin before but I think she's a Hollywood stylist).
Now, every bride is of course beautiful, but I have to say, I was expecting something...more. I mean, just look at Mary-Kate (I think that's which one it is. They aren't identical twins but I still have a hard time telling them apart.). She looks absolutely stunning.
This gown though seems rather plain and medieval looking to me.
What would you do if your friend insisted on designing your wedding gown? Could you say no? What if you don't like it?
Would you ever say no to the Olsen Twins style advice? What would you do? Leave a comment below~
Monday, July 28, 2014
Movie Monday - a Chanel Fitting
Seriously! How does this man consistently come up with so many incredible designs every season?!?!?
Did you know that he designs 7-8 shows a year just for Chanel (plus all the accessories). Then he also designs for other labels too! Plus he comes up with the advertising concepts and often is the photographer.
On top of that he still manages to find time to do other little things like paint masterpieces, guest edit magazine articles, publish books, and create installation art pieces. You can find a breakdown of some of his work HERE.
Whew, I'm exhausted just thinking about it all!
Sunday, July 27, 2014
Friday, July 25, 2014
Moon and Star Bracelet
Got some scrap fabric and a bracelet you never wear? Then today's refashion project is just the thing for you!
Here's what you need to cover your own bracelet:
Materials:
-Bracelet or bangle
-remnant of cotton
-scissors
Steps:
1) Cut a strip of fabric 1/2". I didn't have the full width of my fabric left over so I just tied some strips together. If you have the full 45" width one strip should be enough.
2) Place your bracelet in front of it at the halfway point of your strip of fabric and tie. Then follow the instructions below~
Pull tightly. After a few knots you'll begin to notice that you'll be getting a lovely spiral rib forming.
At the end just knot your fabric twice and snip any ends.
That's it! I like it much better now and can see myself wearing it with my hippie dippy weekend outfits easily. This is a very basic macramé knot but in a new medium other than hemp it has a new life. Have you ever tried macramé knots with other materials? Leave a comment.
You can check out some of my other macramé pieces HERE.
Here's what you need to cover your own bracelet:
-Bracelet or bangle
-remnant of cotton
-scissors
Steps:
1) Cut a strip of fabric 1/2". I didn't have the full width of my fabric left over so I just tied some strips together. If you have the full 45" width one strip should be enough.
That's it! I like it much better now and can see myself wearing it with my hippie dippy weekend outfits easily. This is a very basic macramé knot but in a new medium other than hemp it has a new life. Have you ever tried macramé knots with other materials? Leave a comment.
You can check out some of my other macramé pieces HERE.
Thursday, July 24, 2014
Tell a Tale - Austenland
I read a few dud books lately so instead of telling you about how bad they are I thought I'd tell you about a cute movie I saw recently, that's based on a book (that I haven't read).
Synopsis (from RottenTomatoes.com): For as long as she can remember, Jane Hayes (Keri Russel) has treasured the writings of the author behind such literary classics as Emma and Pride & Prejudice. For years, Jane has been stashing away funds in the hopes that someday she would be able to afford a trip to Austenland - a place where the die-hard fan can be completely immersed in the elegant world of the beloved author. When Jane finally manages to save up enough, she excitedly packs her bags and books a room.
Upon arriving, Jane quickly discovers that Austenland is everything she had ever imagined. Every detail is exquisite, save for one small exception: Jane's limited funds mean that she can't enjoy the same luxury experience as other, wealthier bachelorettes who currently populate Austenland, but she decides to make the most of her trip regardless. Later, when Jane falls into a romance with a dashing young servant, a lifetime of dreams suddenly begin to come true.
Review: This is a very cute movie. I don't think there's any other word for it. Keri Russel is very sweet and charming and you can't help but root for this poor sheltered bird. Of course, with Jennifer Coolidge as her sidekick you know there will be at least a few laugh out loud moments.
This is a great girls night movie, you have period costumes, a love triangle, beautiful countryside, Jane Austen references galore, and more than a few handsome men~
I haven't read the book, I imagine it must be from the "Chic Lit" genre which I steered away from a few years ago, but as a movie I can handle it.
Have you read this book or seen the movie? What did you think? Did you know that there are actually Jane Austen tours that you can take? Would you ever immerse yourself in Austenland? Leave a comment below~
Wednesday, July 23, 2014
Strip of DIY Earrings
My niece got her ears pierced this year so I wanted to give her some new earrings for her birthday this month.
Using my smallest molds I made a whole pile of them.
I had all sort of ideas for making a holder for them all but in the end decided to just put them on a simple strip of glitter foam.
I cut a little 2" strip and stuck it onto some cardstock and trimmed away the excess cardstock.
On the back, I measured an equal distance and drew 2 lines.
With my extra small hole punch I punched a series of holes down each line for the earrings to fit into.
Voila!
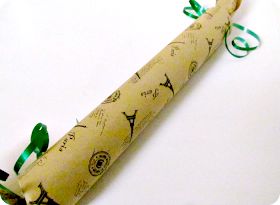
But now, how to wrap them?!?! I used an empty paper towel roll!
And then just wrapped it up like a giant firecracker~
I used to love getting earrings for a gift when I was young. Now I rarely remember to put them on. How about you? Do wear earrings everyday? Leave a comment below~
Using my smallest molds I made a whole pile of them.
Some of them even glow in the dark! |
I had all sort of ideas for making a holder for them all but in the end decided to just put them on a simple strip of glitter foam.
On the back, I measured an equal distance and drew 2 lines.
And then just wrapped it up like a giant firecracker~
I used to love getting earrings for a gift when I was young. Now I rarely remember to put them on. How about you? Do wear earrings everyday? Leave a comment below~
Tuesday, July 22, 2014
Giveaway WINNER!
Monday, July 21, 2014
Movie Monday - Relaxing Ambient Noise (TNG)
You may need to be a bit of a Trekker to get this video but I think that it's beyond brilliant, which gives you a bit of insight into what makes me tick.
I seriously play this all day long in my earphones
at work and it helps me stay cool, calm, and collected.
There are also videos of ambient sounds from other ships from the sci-fi universe as well as from 10-Forward and the crew cabins! Perfect for sewing by...take me away TNG!
Sunday, July 20, 2014
Friday, July 18, 2014
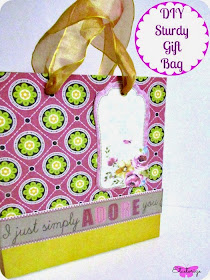
DIY Sturdy Gift Bag
Today feels like a good day to pull out the Mod Podge and do some recycling!
I showed you how to make a gift bag from gift wrap paper before, but even I have to admit, those bags are really only useful for lightweight items. This bag is heavy duty and should be able to hold almost any kind of gift you have to give.
The secret? It's really a box!
Yes, I'll do almost anything for you guys...even eat a box of 12 fudgesicles. (Not all in one sitting!)
Here's what you need to make your own Sturdy Gift Bag.
Materials:
-empty box
-Mod Podge and sponge brush
-Pretty papers and embellishments
-Ribbon
-Cutting mat, scissors or craft knife (or a cutting board)
-ruler
-hole punch (not shown)
-optional: glue runner
Steps:
1) Measure the sides of your box and add at least 1/4" to the width. I found that the edges of my box wasn't super crisp and even. The extra 1/4" will give you some wiggle room to make sure your paper will cover everything.
2) Once you've got your measurements, cut your paper to fit. I'm doing a patterned paper for top 3/4 of the bag and a solid at the bottom, that's why I have extra pieces. At minimum, you should have 2 large pieces for your front and back, and 2 small narrow pieces for your sides.
3) Use your favourite adhesive to glue down the opening (the top of your bag) to the inside of the box.
By gluing it down instead of cutting it off you'll create more strength for the handles later on.
4) Glop on some Mod Podge and set your papers in place.
You can see here where I overlapped my paper on the side. If I had cut my paper the exact width of the box you probably would've been able to see it peek through.
Here's what my bag looks like with the paper on it. I could stop here and just add handles but it still looks a little blah to me.
5) So now is the fun part! You get to embellish your bag! I used this matching sheet from the same paper pack as my other two sheets and added a cute (and glittery) little belt around where the papers meet.
6) At the top opening of your bag, measure in at least 2" from each side and about 5/8" down from the top. Punch 2 holes on each side and thread some ribbon through and knot it on the ends.
If you don't have ribbon you can use rope, twine, or you could even braid some strips of fabric together! I added a pretty pre-made tag to mine.
That's it! Easy Peasy!
Now I have a gift bag ready to go for any occasion, I have one less thing in the recycle bin, and I got to eat 12 fudgesicles! What could be better?
This is a great project to get rid of any papers that have been sitting in your closet for too long. I bought this pack ages ago because it was cheap, but I rarely use it because it just doesn't sing to me. I like that I'm finally using it, and I think it actually looks quite pretty now~
What will you put in your gift bag? Leave a comment below~
I showed you how to make a gift bag from gift wrap paper before, but even I have to admit, those bags are really only useful for lightweight items. This bag is heavy duty and should be able to hold almost any kind of gift you have to give.
The secret? It's really a box!
Yes, I'll do almost anything for you guys...even eat a box of 12 fudgesicles. (Not all in one sitting!)
Here's what you need to make your own Sturdy Gift Bag.
-empty box
-Mod Podge and sponge brush
-Pretty papers and embellishments
-Ribbon
-Cutting mat, scissors or craft knife (or a cutting board)
-ruler
-hole punch (not shown)
-optional: glue runner
Steps:
1) Measure the sides of your box and add at least 1/4" to the width. I found that the edges of my box wasn't super crisp and even. The extra 1/4" will give you some wiggle room to make sure your paper will cover everything.
2) Once you've got your measurements, cut your paper to fit. I'm doing a patterned paper for top 3/4 of the bag and a solid at the bottom, that's why I have extra pieces. At minimum, you should have 2 large pieces for your front and back, and 2 small narrow pieces for your sides.
3) Use your favourite adhesive to glue down the opening (the top of your bag) to the inside of the box.
By gluing it down instead of cutting it off you'll create more strength for the handles later on.
4) Glop on some Mod Podge and set your papers in place.
You can see here where I overlapped my paper on the side. If I had cut my paper the exact width of the box you probably would've been able to see it peek through.
Here's what my bag looks like with the paper on it. I could stop here and just add handles but it still looks a little blah to me.
5) So now is the fun part! You get to embellish your bag! I used this matching sheet from the same paper pack as my other two sheets and added a cute (and glittery) little belt around where the papers meet.
6) At the top opening of your bag, measure in at least 2" from each side and about 5/8" down from the top. Punch 2 holes on each side and thread some ribbon through and knot it on the ends.
If you don't have ribbon you can use rope, twine, or you could even braid some strips of fabric together! I added a pretty pre-made tag to mine.
That's it! Easy Peasy!
Now I have a gift bag ready to go for any occasion, I have one less thing in the recycle bin, and I got to eat 12 fudgesicles! What could be better?
This is a great project to get rid of any papers that have been sitting in your closet for too long. I bought this pack ages ago because it was cheap, but I rarely use it because it just doesn't sing to me. I like that I'm finally using it, and I think it actually looks quite pretty now~
What will you put in your gift bag? Leave a comment below~