It will be a fun look back at some of the projects I've posted over the years that you may have missed if you haven't been hanging out here all that time.
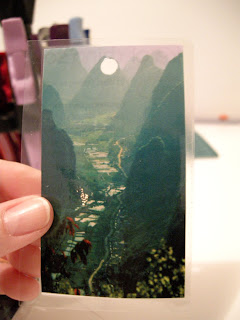
First up are the DIY Luggage tags that I shared with you back in 2011~
-------------------------------------------------------
Everyone knows the saying that one person's trash is another's treasure. Well, I feel like I've hit the jackpot! Last summer my local library sent out an email to community organizations to tell them that they were purging their backdated magazines. Everything had to go. They listed all of their titles and said that if you wanted what they had you had to take it all. So, you couldn't just say you wanted the 2008 Vogues, you had to take everything from 2002 to 2010 if that's what they had.
I responded with a short list of titles that I would be willing to take once they had fulfilled any requests from community groups. I didn't hear anything for ages so I figured my request had just been binned or something. Then, in about November, I got an email asking me to come pick up the 8 boxes of magazines that they had for me!!!!
 |
| There's a load of Elle Decor in there somewhere too! |
If you've been following me for awhile you will know that I love to create Inspiration boards and books. My initial plan was to use the magazines for that kind of thing, along with using the valuable info inside of them. Obviously, I have far more than I know what to do with so now I'm thinking of all kinds of other fun crafts I can use this huge resource for.
I sort of made this up as I went along so I don't have the usual supplies photo for you. But basically here's what you need:
- inspirational images
- travel quotes
- regular paper
- glue (optional)
- access to a computer
- access to a laminator and laminating sleeves
- hole punch
- ribbon or plastic ties
1) Use Google to find some fun travel quotes.
2) Gather some travel images from magazines or travel brochures. ( You could also just use wallpaper samples or scrap booking paper, anything you like)
3) On your computer use a word processing program to create business card size labels. You don't have to use label paper, regular printer paper will do. Each label should have enough info to identify your luggage as yours but not enough to give a stranger the inside track to your life.
Mine have my first initial, last name, originating city, and phone number, with my quote at the bottom.
If you're really not comfortable having any personal information on your bag, that's OK. Just put the quote. Having anything on your bag that's unique and identifiable will distinguish it from the rest, and that's the whole point here.
4) Cut out your images to the same size as your labels. Put a little dab of glue on the back and affix to one of your labels just to stabilize the two together.
5) Now make a sandwich inside your laminating sleeve (laminating paper/picture face down/label face up/laminating paper). Make sure to leave at least 1/4 inch space all the way around each piece to ensure the plastic will seal itself. Run it through the laminator. (If you don't have access to a laminator try using sticky back mack tack paper and just stick everything together.)
6) Cut all the way around each tag staying at least 1/4 inch from all of the edges.
7) Punch a hole in one end and add a strong ribbon or plastic twist tie.
 |
Happy Travels~
------------------------------------------------------------
Update: I still have these tags on my bags, they've never fallen off, and I've never picked up the wrong black bag at the airport.
How do you identify your bag from all the rest when you travel? Leave a comment below~


Great idea! And I think this is so much smarter than buying mass-produced luggage tags which are supposed to help your luggage stand out from all the rest (Huh?? when they all look alike??) So this is a perfect idea. Thanks!
ReplyDelete