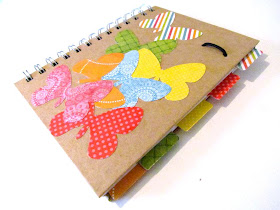
Whenever I go on vacation it's usually for a fairly lengthy time, usually far too long for me to be able to keep track of everything that happens inside my little head. So, I always take a travel journal with me, a new one for each trip.
Instead of purchasing something though, I decided to embellish something I already had laying around. It seems the latest and greatest "gift" to give employees at my workplace are small recycled plain notebooks. I suppose the idea is that we're supposed to use them for work, seeing as the logo is plastered right on the front, but you know, I like to be a little different~
Here's what you'll need to make your own journal:
 |
| I also used my Silhouette SD, add a pair of scissors or punches if you don't have an electronic cutter |
Steps:
1) At first I was going to cut out some flowers to put on the front of my book but I just couldn't find anything that caught my eye in my Silhouette library. Then I remembered...I'm a butterfly girl! So, I cut out some cute little butterflies in several bright papers.
2) I used Mod Podge to adhere them to the front of my book. I decided not to do another layer of Mod Podge on top just to go along with the whole recycled earthy look the cover already has.
 |
| I forgot to take a shot with them all glued down but you'll see that in a bit~ |
I "designed" this little shape above to make some tabs so I could section off my book. It's really just a series of rounded corner rectangles welded together, so if you don't have an electronic cutter you could probably just do something similar on your own with a ruler~
4) Just cut a bunch of tab shapes in the same pretty papers, score the centre lines and get ready to glue.
6) Turn the page over and press down the other side. So super easy!
7) Section off your book and add your tabs throughout. In my travel journals I like to have these sections:
-journal
-blog notes
-photo log
-purchases
-miscellaneous
Tah dah!
So pretty right?
But wait...there's more! While I had my Mod Podge out I figured I better cover the logo on my pen too.
So, there it is all together and ready to go. I can't wait to use it!
If you want to keep up with my travels just click here.


I love this idea! I'm a traveler too and I also keep a travel journal, but I usually just include it in my regular journal. I have 2 big trips coming up in the next couple of months and I am definitely going to steal your tab idea! Thanks for the inspiration!
ReplyDeleteThis is a great idea! I have to add it to my (very long) to-do list :P Thanks for sharing it! Oh, and have a fun trip!
ReplyDeleteWhat a good idea. I aleays think that I'll remember everything when I get home, but as I'm putting togheter my scrapbook I realise that a lot of things have sliped my mind, so I might steal your ide the next time i go flying.
ReplyDeleteWish you a great weekend!
you are so organized! Nice job. Record everything and bring back lots of good stories to share!
ReplyDeleteI love your file dividers :) I just blogged about my travel journal on Monday too!
ReplyDeleteEnjoy your trip - I'm off to go stalk your travel blog!
Such a cute little notebook and pen Tamara! great job! - happy travelling!
ReplyDeleteThanks for linking to a Round Tuit!
Hope you have a fabulous week!
Jill @ Creating my way to Success
http://www.jembellish.blogspot.com/
Sweet & simple - love it!
ReplyDeleteLove it and what a great idea !
ReplyDeleteGREAT idea!!!
ReplyDeleteI just love the tabs! Those are brilliant! There are so many times that I wish notebooks and things came with tabs. I am totally pinning this so I can make them!
ReplyDeleteOooh, I love those tabs too. I can't wait to give this a try. I love the idea that you have an individual book for each trip - that's brilliant.
ReplyDeleteThis is great! I am making something similar for my husband for his birthday so he can catalogue our travels soon. Thanks for sharing.
ReplyDeleteIt's great!
ReplyDeleteI love the butterflies!
Hi Tammy,
ReplyDeleteThis is so beautiful. I am featuring this on my blog. Have a look here :
http://creativekhadija.com/2016/08/back-to-school-creative-organizing-ideas/
Thank You.
Khadija
www.creativekhadija.com