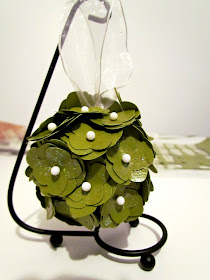
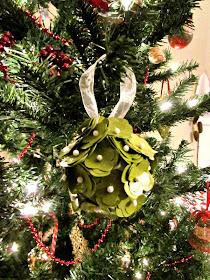
So let's get on with Day 3!
Here's what you'll need:
Steps:
1) I wasn't crazy about the paper I had for this project. I just felt like it was missing a little pizazz...sparkle that is. So, instead of using loose glitter and covering me and everything else in my studio in sparkly bits I took the easy road and got out my Sparkle Mod Podge. Yay! I love Sparkle Mod Podge.
Just lightly brush it on your paper. It dries fairly fast but your paper may curl up a bit on the sides. Just flatten it out and it'll be fine...and sparkly!
2) While you're waiting for your new Mod Podged paper to dry, cut a piece of ribbon about 8" long to use as a hanger. You can glue or use a pin to secure it to the top of your Styrofoam ball (or egg).
3) I used my Silhouette to cut out a couple pages of these shapes:
When you stack them they make a tiny little hydrangea flower, so cute!
3) Gently curl the edges of the shapes and stick a pin through the centre of each little stack.
4) Starting from the bottom of the ball just stick your flowers in and try to cover as much of the Styrofoam as possible. If you find you have a lot of gaps either re-insert your flowers, stacking them slightly, or you could even give your ball a quick coat of paint before you add your flowers.
I really wanted to use red pins in the centres of the flowers to look more like holly but I didn't have enough.
If you need more bling add more sparkle or pearls or other embellishments all over to make it shine and stand out on your tree.
And that's it! Another super easy and oh so simple tree ornament that hardly takes any time and helps you use up those bits of pretty paper you were saving for who knows what.
Make sure to head over to Cabin Fevered Gem to see what she came up with for today.
If you're participating in our fun challenge make sure to link up your beautiful creations on the Make it Great Monday linky party. It's open all week!
Don't forget to enter the surprise giveaway Here! Only a few days left to enter~


so smart! it can be more colorful too with different colored flowers..
ReplyDeleteSuper cute! I love the look, my daughter would love to make these. I don't have a Silhouette yet, I see myself cutting out a hundred little flower shapes!! lol Found you on Sugar Bee Crafts and am following you now!
ReplyDeleteThat ornament looks so cute! The colour combination makes me think of mistletoe--very seasonal! :D
ReplyDeleteI have some polystyrene balls ferreted away in my stash, might have to try this!
Super pretty! Love it! ...so excited about tomorrow's!!!
ReplyDeleteWhat a fun idea! I totally need to make one of these for our entrance.
ReplyDeletevery sweet! and I agree with a previous poster... it also reminds me of mistletoe! Lovely :)
ReplyDeleteSo very creative and very elegant. I am visiting from Blue Cricket Design. Nice job!
ReplyDeleteThat took some patients but it looks great!
ReplyDeleteSo cute and eye catching! Great job!
ReplyDeleteNow that is cute!
ReplyDeletethis is so cute I'd love you to add it to what we wore and made party over at http://raegunwear.blogspot.com
ReplyDeleteGreat idea! I've always hated how plastic-y the store bought ones look.
ReplyDeleteHow pretty! That silhouette comes in really handy for projects like this!
ReplyDeleteThis is so unique and beyond cute!! I love it!! Would love for you to please share it via my Pin'Inspirational Thursday linky party please...LOVE it :)) http://theartsygirlconnection.blogspot.com/2011/12/pininspirational-thursday-11-linky.html?m=1 thanks so much :)) Wishing you a happy Thursday..~Marilyn
ReplyDeleteThis is fantastic! I love the pop of the white against the green!
ReplyDeleteI'm your newest follower and would love for you to stop by for a visit!
~Abbie (www.fivedaysfiveways.com)
Oops! Wasn't logged in! I still like it, though! : )
ReplyDelete~Abbie (www.fivedaysfiveways.com)
Those are super cute!
ReplyDeleteThis comment has been removed by the author.
ReplyDeleteSo cute! This would be fun to take to the holiday party for the hostess to hang :)
ReplyDelete-Jill
So cute!! Love it!
ReplyDeleteI just love your flower ball! It looks like pearls nestled with some greens. Thanks for the tutorial!
ReplyDeleteI'm your newest follower! Stop on by sometime! If have a weekly linky party called Terrific Under Ten Tuesdays. It's for projects made fr $10 or less. I would love to have you sometime!
Oh my goodness this is adorable!!!! I am hosting a 25 Days of Handmade Christmas series on my blog and I would absolutely love it if you would share this tutorial with my readers!! Info is here: http://embracingmessy.blogspot.com/2011/12/25-days-of-homemade-christmas-day-1.html or you can email me at embracingmessy@gmail.com
ReplyDeletethis looks fabulous! I love the green color.
ReplyDeletemegan
craftycpa.blogspot.com
Another great ornament - love the shade of green!
ReplyDeleteThanks for linking to a Round Tuit!
Hope you have a great week!
Jill @ Creating my way to Success
http://www.jembellish.blogspot.com/
Love this idea1 so cute and festive! I'd love for you to link up to my Christmas carnival
ReplyDeletehttp://blissfulanddomestic.blogspot.com/2011/11/homemade-in-december-link-carnival.html
Hey Tamara-
ReplyDeleteI featured this misteltoe ball at Creative Juice today. Glad to see you hit 400 and then some!
Hope you are having a great holiday,
xoxo
Nicolette
This is so pretty! Beautifully done. Thanks for joining the party. I pinned and tweeted this.
ReplyDeleteThis is so cute! Very creative...I really want to make this for next year. I would love if you would share this at our {Home for the Holidays} party going on now at The Corson Cottage ~ Carrie
ReplyDeleteBravo! C'est magnifique!(From your friendly neighbourhood French teacher down the hall)
ReplyDelete