I have many. Some of them have beautiful photos of travel destinations, some have pics of pretty flowers, some mean absolutely nothing to me at all , but I still can't throw them out. I always think, someday I'm going to use those calendar shots for something.
So, that's exactly what we're going to do today.
Here's what you need:
I picked up this set of six glass coasters at the second hand shop for $3.00. Everything else I already had on hand.
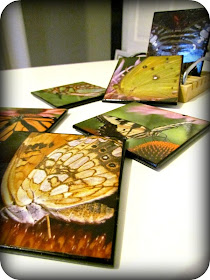
And this is the calendar that I'm using, it's a mini with cool super close-up pics of butterflies.
Steps:
1) First you should take apart your calendar and decide which photos you're going to use.
Normally this step would stop me in my tracks and I'd be paralyzed with indecision for weeks. But I decided to throw caution to the wind and just picked six pretty shots of butterflies~
2) Next, wipe down your coasters so that they're nice and clean. Then place your coaster on top of your calendar photo face down to decide how your going to crop your shot. Using a sharp blade, cut around your coaster.
You'll probably need to do a bit more trimming to make sure it fits the way you want on the front of your coaster.
2) You could just leave your pics as is, or you can take a stamp pad and gently ink the edges to give it a subtle antiquey kind of feel.
Because of the glossy paper it really is very subtle, but if you used a darker colour it would show up much more.
3)Now we're ready to Mod Podge! Yay! My favourite easy thing to do! Just slap down a layer of Mod Podge onto your coaster.
4) Place your calendar pic on top and burnish down with your fingers to make sure you don't have any air bubbles underneath.
5) Add another layer of Mod Podge over top. Make sure to get right over the edges of the paper so that it's sealed right in.
6) I did two coats of Mod Podge and the coasters looked OK, but who goes to all this trouble to make something that's just OK? Instead, I decided to experiment a bit and added a third layer of Mod Podge using the Dimensional formula.
I used this Mod Podge when I made my Paper Jewellery and it worked great. Here's a great tip though, which I read on the back of the bottle right after I gave it a good shake...don't shake the bottle! It makes it bubble more.
Just squeeze out a little pool onto the middle of your coaster and then gently drag it across with a brush till almost the edge.
7)Now you just let them dry.
They'll have a milky look to them at first but don't worry, the Mod Podge will dry clear eventually.
This is a super simple craft but I'm a true believer in seeing beauty in the simple things in life. And oh my gosh....look at them.... they're so nice and super glossy!
Because I used multiple coats of Mod Podge I'm going to let them sit and cure for a few days before I use them. And then ...let the glasses of pink lemon-aide pour. (Yes, I still drink pink lemon-aide even though it's fall ~ )
You can check out other calendar art projects that I've done here and here .
If you not as neurotic as me and you've thrown away your old calendars try scrapbook paper or gift wrap or even wallpaper samples.
Leave a comment and let me know what you think. What are the simple things in life that you enjoy?
Don't forget to enter the 300 Follower Giveaway for your chance to win a gift certificate to buy your own craft molds at Mold Muse .
Have a great week everyone! See you on Monday for the linky party~


Very nice! They'll look awesome in your living room next to your sparkly butterfly pillow!
ReplyDeletethis is really awesome!!!!!
ReplyDeleteNot only are these beautiful, they are a great way to recycle! Good job!
ReplyDeletesee? never say never! these coasters looks amazing!!
ReplyDeleteI just pinned this. I always save old calendars thinking I'm going to do something with them and I never do. This is a great idea. Thanks!
ReplyDeleteShannon @ Imperfectly-Inspired
I know what you mean about not being able to throw away old calenders. Some of the pictures are just too lovely to lose. Now I know what I can do with mine - many thanks for the inspiration.
ReplyDeleteOMG! I'm a calendar pack rat, too! And, like you, I don't have any particular attachment to many of them. This is such a fabulous idea and an excellent tutorial. Thanks for sharing. I can guarantee I'll be using it!
ReplyDeleteThese are great. Seriously, Mod Podge is truly the best substance on earth, right?
ReplyDeleteThanks for visiting me over at A Mother Seeking!
~ Meredith From A Mother Seeking Come find me on my blog, A Mother Seeking...
These are beautiful! Can't wait to try it with my pictures of England!
ReplyDeleteThese are beautiful! I love the bright colors of the butterflies! Mod Podge is such a wonderful invention isn't it! I just pinned these. Thank you for a great project idea! Krista @ A Handful of Everything
ReplyDelete