I couldn't really figure out what I wanted to do with them so I decided to experiment with a little hodge podge of different techniques to see what I came up with.
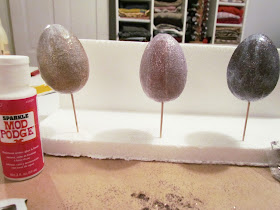
Here's what I used to make the first batch:
The eggs are styrofoam and I always try to keep a little piece of styrofoam from a box or something in case I need it for something like this. Just stick a toothpick in the egg, and the other end in the foam and you have a no mess way to paint and dry~
Steps:
1) Coat your eggs with glue.
2) Sprinkle some glitter on top.
I tried a few different colours and patterns:
3) Add a coat of Mod Podge (of course, I used my fav, Sparkle Mod Podge, because you can never have too much glitter).
I'll show you how they look dried later on.
Now for my next set, it's pretty much the same idea with a few different materials.
1) Paint the eggs with some acrylic paint. I used a lovely shade of tan. Not typical for Easter but I wanted all of the eggs to have some kind of matchiness to them.
The acrylic paint goes on quite sheer.
2) While your eggs are drying, head over to The Graphics Fairy and pick out some beautiful vintage images.
Print them out and cut around the edges. I should've made mine smaller. If you shrink down the image to somewhere around 1/6th of a page it'll probably be close to a good size to work with.
3) Wet the image with plain old water to make it more flexible.
4) Paint a coat of regular Mod Podge onto your painted egg. Adhere your image and paint another layer on top. I also added some more paint.
I know, they're looking pretty ugly right now but at this point I was hoping it would still all come together.
While those two were drying I decided to try to Mod Podge with a pretty napkin as well. Napkins work great with Mod Podge. Because they're so thin you can usually make them shape to almost anything.
When they were all dried I had to add one more layer of my favourite craft ingredient:
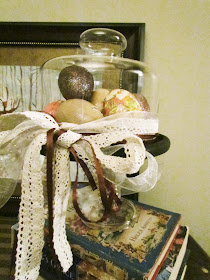
As everything was drying, I gathered up some pretty lace and ribbons, got out my cloche I made at Christmas time (made with a cheese dome thingy and a glass candle stick).
After everything was super dry, I just added them to the cloche, tied the ribbons along the bottom edge, and ooh la la, a collection of not so typical Easter eggs was born! And not as ugly as you thought they'd be~
I think I need to add some more glittery ones. Are you decorating for Easter? Leave a comment below and share your ideas on egg decorating techniques or just let me know what you think of this project.
I added a couple of new linky parties.
Check out the linky party tab and see if you can find them~
Also, don't forget, if you have a blog there's a chance for some free advertising
on the Follow My Friends Tab.
Have a great week everyone!


This is BEAUTIFUL! I seriously love it! I need to try something like this for a less kiddy approach to the decorating. Thanks!
ReplyDeleteSimply gorgeous! And I didn't know about sparkly Mod Podge! Might have to plan a visit to the craft store soon...
ReplyDeleteVisiting you today via Serenity Now!
~meri
These eggs look very easy to make with your great tutorial. They are simple, yet very elegant. I love them!
ReplyDeleteFound you thru your link at Fridays Unfolded Stuff and Nonsense. I did a post too, and would love for you to drop by and visit me!
Big TX Hugs,
Stephanie
Angelic Accents
So very crafty of you! Have you ever heard of German Glass Glitter? I only learned about it through blogging. It's amazing and has to be ordered online I believe. Anyway, I love you eggs, your blog, and I'm your newest follower! Stop by for a visit sometime.
ReplyDeletexoxo,
Kim
These turned out great and look fabulous inside that cloche. I like the idea of using styrofoam as a base so the eggs can dry. Brilliant.
ReplyDeleteI am so doing egg crafts this weekend. Love all of these eggs!
ReplyDeleteGreat ideas and techniques -- I also didn't know about sparkly Mod Podge! Thanks for sharing!
ReplyDeleteAwesome...LOVE the glitter eggs.
ReplyDeleteJessica
Very pretty. You will love your glitter eggs forever, I'm sure! I sure do!
ReplyDeleteThanks for linking up to Making It With Allie! I can't wait to see what you have for next week!
AllieMakes.Blogspot.com
I love these!!
ReplyDeleteAnd no you can NEVER have enough glitter!!!
So darn cute! I love this idea!
ReplyDelete:)
Your eggs turned out gorgeous! Thanks for sharing this week!
ReplyDeletethose eggs are so beautiful!! i love how you displayed them, too! you did a great job!
ReplyDeleteAll the different techniques are so fun! They look great in the dome. And who doesn't love glitter! Stopping by from TCB.
ReplyDeleteVery cute. I love them!
ReplyDelete~Heidi
Soooo cool! Mod podge sparkle is my favorite! I use it often. These are super fun. Thanks for sharing. I created some eggs using fabric strips and mod podge that are posted on my blog. You might like to check them out.
ReplyDeletexo,
Sena
These turned out so neat. Very vintage!
ReplyDeleteVery beautiful! Super job!
ReplyDeleteamber @ barbwired
I'd love for you to come link this up at my Tuesday Time Out Linky Party! The link is below!
ReplyDeleteSmiles,
Melanie
Reasons To Skip The Housework
Tuesday Time Out Link Up Party
Great idea! I love the vintage look and the way you displayed them.
ReplyDeleteCool eggs! Love the vintage and the glitter. Great combination!
ReplyDeleteI host a weekly linky party on Tuesdays called Terrfic Under Ten. It's for projects made for $10 or less. I would love to have you link up sometime!
That is SOOOO Pretty all together! Lovely display.
ReplyDeleteThose look fabulous! Lovin' the big bow on the cloche!
ReplyDeleteThose are really pretty! Thanks for sharing at Fantastic Friday. I hope that you will join us again this week.
ReplyDeleteSuch pretty eggs!! Thanks for the tute!
ReplyDeleteLove these!!! I love the whole display you used. So shabby-chic! Thanks for the tutorial!
ReplyDeleteWould love for you to join my linky party!
http://www.inspiringcreationsblog.com/2011/04/friday-favorites-linky-party_14.html
Beautiful, love the sparkle. Thanks so much for sharing at Beyond The Picket Fence!
ReplyDeleteThese are great! I love the sparkley ones :)
ReplyDeleteThanks for linking up to Your Whims Wednesday! Hope to see ya again later this week :)
Tamara-
ReplyDeleteThat Sparkle ModPodge is mandatory in every craft closet!
Thanks for linking up to Creative Juice! Hope to see you again this Thursday!
I most be the worst blogger ever since I've never used modge Podge..I don't even know how to spell it..lol...but I love what you did to your eggs..they are non traditional and actually very elegant. Thanks for sharing...I came hopping over from the Do Small Things with Love party!
ReplyDelete