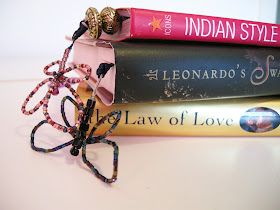
That means today we're going to make Butterfly Bookmarks!!
Here are the supplies you'll need:
 |
| Round nose pliers are optional. |
Body
1) Cut 1 piece of wire approximately 5" (13cm) long and gently bend it in half.
2) Thread two medium size beads onto the wire, meeting at the bend. Now create a loop in the bent end by twisting the wire.
 |
| This is the head of the butterfly. |
3) Thread 6-10 medium size beads onto both wires to create the body.
4) Twist the wire at the bottom of the beads, creating another larger loop. Secure the wire by twisting and winding.
Wings
1) To make the wings of your butterfly cut 1 piece of wire approximately 12.5" (32cm) long. Gently bend it in half and secure onto the butterfly body approximately 1/3 down the body.
2) On one side, thread approximately 40-50 small seed beads onto your wire.
3) Gently bend the wired (with the beads) to make the top wing. Twist the bottom of the wing near the body to secure the beads.
4) Now thread 30-40 more small seed beads onto the remaining wire to create the bottom wing.
5) Again, gently bend, twisting at the bottom to secure the beads. Make sure to leave a small bit of wire as a tail to secure the two wings together.
6) Repeat these steps on the other side.
7) Twist and wind the tails of wire together until you feel like everything is secure. Make sure to flatten out any sharp wire edges with your pliers. Cut off any excess.
Bookmark
1) Cut some ribbon approximately 25"-30" (65cm-76cm) long.
2) Thread your ribbon through the bottom wire loop of the butterfly and knot at the halfway mark.
2) You can stop here, but if you want to add a little extra pizazz, add one or two large beads and knot.
Make sure your beads have a large enough hole to accommodate your ribbon. If you have problems you can try twisting the ends of your ribbon together so it will fit through. Or, wrap the end with tape and cut it into a sharp point. If that doesn't work, you'll probably need to find larger beads.
3)Near the bottom of your ribbon tie another knot, add another bead, and then knot again.
And voila! You now have a very pretty Butterfly Bookmark!
It looks like alot of steps, but in reality it's very easy and goes by quickly.
You can get super creative and try different combinations of beads and ribbons. If you're a super perfectionist or true lepidopterist (someone who studies moths and butterflies), you may feel the need to get alot more symmetrical and colour accurate than I have.
Here are some other ones I've made:
So pretty, don't you think? They're a great handmade gift for book lovers. Leave a comment and let me know what colours you would make, or how you would add to this fun craft.
( For the record...next week we will not make anything with butterflies or bookmarks ;) )
Check out the great linky party tab up top. I've been trying out some new parties and am so happy that I'm getting lots of new visitors!


I have leftover beads from beading a dress and was wondering what to do with them. Now I know! They are clear, pale aqua, and pearls. Come to think of it, I have a small stash of beads so I can make several colors. Thanks for sharing.
ReplyDeleteBarb
These are so cute I am going to make some for my daughter, she love butterfly's and she loves to read. Thanks for sharing. Great tutorial.
ReplyDeleteOoooh! Sooooo pretty! :) Thanks for sharing!
ReplyDeleteThese are super cute!
ReplyDeletevery cute. a nice gift for all the readers I know.
ReplyDeletemegan
craftycpa.blogspot.com
OoooOooo...very nice! :)
ReplyDeleteSo pretty- these would make such great gifts too! thanks for linking up!
ReplyDeleteHi - saw you on today's creative blog. This is a really cute idea!
ReplyDeleteLOVE it!!! So pretty!
ReplyDeleteVisiting from Childmade :)
Rachel from sunscholars.blogspot.com
Great idea and so cute! I'd love for you to submit this to the M&T Spotlight: http://www.makeandtakes.com/spotlight
ReplyDeletethese are super pretty!! and what a great tutorial!! Thank you so much for linking up to Handmade Tuesdays @ Ladybug Blessings. www.ladybug-blessings.com (p.s. did you enter my giveaway for handstamped jewelry? It ends the 4th :)
ReplyDeletethanks for the tut !
ReplyDeleteI'm in love with these. In fact, I'm going to feature them this Sunday. Be sure to stop by and check it out.
ReplyDeleteJessica
myworldmadebyhand.blogspot.com
Thanks Jessica!
ReplyDeleteHere's the link...please stop by, check it out, grab a button :)
ReplyDeletehttp://myworldmadebyhand.blogspot.com/2011/03/sunday-stalker-3.html
Jessica
Great Tutorial! Thank You for sharing!
ReplyDeleteThanks for linking up to Making It With Allie! I can't wait to see what you have for next week!
AllieMakes.Blogspot.com
I have a passion about buterflies and those are so cute !
ReplyDeleteThanks for sharing tutorial :)
I love your blog with so many lovely works!
A hug from Lisboa-Portugal
Ana Lopes
lovecraft2012.blogspot.com