Mr. Hambleton empowered his students to be creative, to use their imaginations, and to make their own choices. When I look back on those years I can hardly believe the things he got us to do. Our class was doing pottery (painted and in a kiln) and macrame while the other classes were still using crayons.
One of the best, and most useful, crafts we did was Christmas stockings. So...if I could make this in Grade 2 then you can definitely do it now.
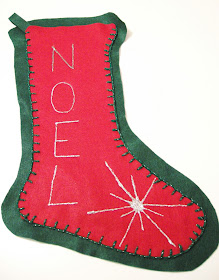
Here's the one that I made for my baby sister when I was in grade 3, the one I made for myself in grade 2 is lost in the mountain of Christmas stuff at my mom's house but I still use it every year.
The stitching is a bit wonky in some parts, but come one, I was only 8 years old~
If you're ready to make your own felt stocking here are the supplies that you'll need:
 |
| You might want to add some pins and a chalk pen or other erasable marker too. |
1)Decide which colour will be your front and which your back. Draw the outline of a stocking shape onto the piece of felt for your back. My felt pieces were .3 metres (12 inches) wide but you can make these any size you want.
While you're at it you can cut a small rectangle for a hanger. None of these measurements are exact. Mine is about 1" X 6".
2)Place your backing felt on top of the piece you will use for the front of your stocking. Trace around the back. Now measure an inch in so that this piece will be slightly smaller. Cut out the front of your stocking.
3) Stack your pieces with the front on top and the hanger in between in one corner.
4) This next step isn't really necessary, especially if you're doing this with kids, but I didn't want to be known my whole life for wonky stitches so I measured everything out for a blanket stitch. I measured a half inch in from the edge and marked it with my chalk pen, and then I placed a pin in the felt every half inch so that I'd known where to place my stitches.
You can find a blanket stitch tutorial here .
5)Now all that's left is to stitch it up with your yarn, (you'll need a needle with a big enough eye to fit the yarn though, a darning needle will usually work) and then decorate it with fabric paint. I used a nice glittery silver to pick up on the glittery green yarn I used.
 |
| It's still a little bit wonky but I think I'm getting better~ |
This is the first of a month full of Christmas crafting so make sure to come back each week for fun new Christmassy projects~
I'll be posting this project at the linky parties throughout the week so make sure to visit the linky party tab up top to check out all of the fun ideas.


Oh this is very sweet and we like "easy"!!
ReplyDeleteWould love for you to link up at Kids Get Crafty? It's every Wednesday over at Red Ted Art, current linky: http://www.redtedart.com/2010/12/01/kids-get-crafty-robots/
Hope to see you there!
Maggy
We have always had an orange in the toe of our stockings!! I was beginning to think my family was the only one that did that. When I got married I didn't really think about it, but was on the verge of tears Christmas morning when I realized that my husband didn't put an orange in my stocking....I explained why I was upset and have gotten an orange every year since.
ReplyDeleteI added this project and thumbnail to our site and linked to you. We are looking for more Christmas project as well as other projects, so if you have any similar projects please feel free to let me know.
ReplyDeleteJulia
jlitz@primecp.com
Editor, www.AllFreeChristmasCrafts.com
It turned out cute, I really like the blanket stitching - your former teacher would be proud.
ReplyDeleteVery sweet! And Very festive!
ReplyDeleteThanks for linking up to Making It With Allie! I can't wait to see what you have for next week!
AllieMakes.Blogspot.com