I've mentioned before that my home is very old and one of the great things about an old house is that standard rooms are rarely standard in size or character.
My washroom is rather grand by today's sizes. In all likelihood it was probably a bedroom at one time in its life. Right now it has a long make up table attached to the wall that needs a chair to make it a little more luxe.
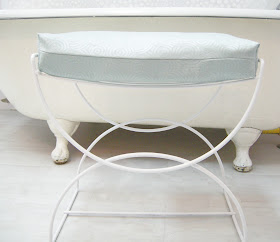
I found this stool at a flea market quite awhile ago for about $5. Even that was probably too much to pay for it but I could envision it the room and could see what it could be, so I handed over my $5 and promptly brought it home and painted it white (it used to be a lovely shade of flat brown~)
Today I'll show you how I made a cushion to add some style...and comfort.
Here are the supplies that I used:
 |
| Add some fibrefill or stuffing to this list to really make your cushion puffy. |
Steps:
1)Cut your foam to fit the seat of the chair or stool.
2)Lay the foam on top of your fabric and measure 2" all the way around.
3)Create notches at corners by measuring 5/8" from each edge of the foam and extending. Cut notches out.
4)Use your cut out piece of fabric as a pattern to cut out a second piece exactly the same size.
5)Sew long side seams together and one short end together with a 6/8" seam allowance.
-Don't worry that your seams aren't lining up right at the corner in the notches, they're not supposed to.
6)Pinch the corner and fold so that all edges are even and seams are matching. Stitch a 6/8" seam across.
8)Turn so that the right side of the fabric is on the outside and squeeze your foam inside through the opening on the end. I used 2" thick foam so I still have some wiggle room to add some fibrefill or stuffing to make it a little softer and fill the corners out better.
9)Slip stitch end to close the gap and....voila!
I love this method because you get nice crisp corners. You can see this on my grey wool bag that I showed you the other day in this weeks Show and Tell. The only drawback is the side seam but you can avoid this by wrapping the fabric so that you only have seams on three sides instead of all four.
Hopefully by the time the snow is flying and Christmas is here, the rest of the washroom will be done and I can share the whole shabang with you!
Let me know what you think. If you have more washroom crafting ideas make sure to leave a comment to let me know~
(This project will be posted throughout the week at the linky parties from the linky party tab above. Check out the sites for more great ideas!)
BetweenNapsonthePorch was my top referrer last week, so go visit Susan and
check out her site for other fab ideas!
As always, don't forget to check out Todays Creative Blog for more fun ideas.
BetweenNapsonthePorch was my top referrer last week, so go visit Susan and
check out her site for other fab ideas!
As always, don't forget to check out Todays Creative Blog for more fun ideas.


Oh so pretty! Just perfect for a bathroom! You did a lovely job with this little seat! =0)
ReplyDeleteJust lovely! Can't wait to see the entire makeover! GB
ReplyDeleteadorable! Great job!
ReplyDeleteSo pretty! I have a stool like this which holds a huge basket full of towels in my master bath, looks like I will be making a cushion following your excellent post. Thanks!
ReplyDeleteSuch a fun way to set yourself down. Great job.
ReplyDeleteGreat tutorial. Love the fabric with the white stool.
ReplyDeleteVery cute! I love the fabric! The stool has some great lines, I think it was probably worth the $5! I'm having a fun giveaway on my blog--hope you can join! alittleknickknack.blogspot.com
ReplyDeleteBeau-ti-ful! It's amazing what a difference a simple fabric change can make.
ReplyDeleteLOVE this! It is the perfect addition and I think you got a great deal in that little seat for $5! After you worked your magic....it is priceless!
ReplyDeleteLou Cinda:)
I'm so glad you guys think I got my $'s worth. Can't wait to show you the rest of the room!
ReplyDeleteWhat a great makeover and a sweet little stool. Thanks so much for sharing.
ReplyDeleteThe seat just makes it so cute!
ReplyDeleteThat will be perfect for your bathroom. It looks so pretty.
ReplyDeleteIt turned out beautiful! Love it!
ReplyDeletethat looks great, i am glad you saw past the brown color, and i think 5 bucks is ok. but, as a seat, is there support? i guess i think there should be some more bracing from the legs or something, but who cares. it's super cute (now).
ReplyDeletewww.thecapeonthecorner.blogspot.com
Good point, but yes there's still lots of support. I'm not a very big person and besides...if I fall it's not a very big drop ;)
ReplyDeleteJust wanted to let you know that I shared this on my blog today.
ReplyDeletehttp://adventuresofthemichelenafamily.blogspot.com/2010/10/feature-friday-7.html
This turned out great i love your vision!
ReplyDeleteThank you for linking to Sew Crafty Saturday over at Sew Chic and Unique hope you'll join the party tomorrow