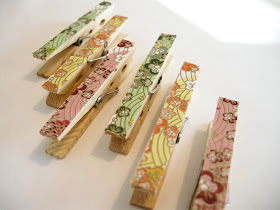
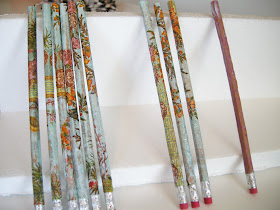
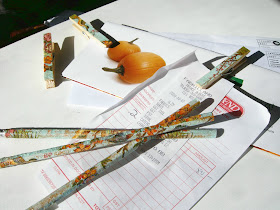
Not wanting to waste a good post that was already written I started to think about ways that I could add to it. So, here it is, the beginings of a very pretty deskset that I think we might be able to add onto in the next little while.
Because I did each part of the project separately, I'll show the steps separately for you, but I think this is something you could do all together at the same time and would probaby end up saving you time and clean up.
Part 1-Pretty Clips
Here are the materials you need:
(paint is optional)
1)Apply Modge Podge to one side of clothes pin and place onto wrong side of paper. If you line up one side of your clothes pin with the outside edge of the paper you don't have to make as many cuts.
2)Using a sharp blade cut your paper as close to the clothes pin as you can.
3)Apply another layer of Modge Podge on right side of paper for a nice sleek finish.
If you're really industrious and want something that looks uber professional you can paint the clothes pin. I decided that I liked the natural wood look....and painting seemed like it would get pretty messy.
I tried a few different kinds of paper (origami, tissue, scrapbooking) but had the best results with some beautiful paper napkins that I had.
You can adhere magnets on the back to use on magnetic surfaces like your filing cabinet or fridge or just use them to keep all of those important papers together. Try adding embellishments or using stamps. The possibilities are endless!
Now for Part 2!-Pretty Pencils
Here are the supplies you need:
 |
| After I took this photo I realized you might want to add a pencil or marker. |
1)Place your pencil onto the wrong side of your paper with the metal end at the bottom flush with the edge of the paper. Or, just measure the length with a ruler. Cut your paper the desired length. Don't worry if your off a bit, the pencil will need to get sharpened eventually so any extra won't even show.
2)Roll the paper around your pencil to figure out the width that you need. I used standard pencils and needed just over 1" but you should double check in case in your pencils are different. Cut your paper the desired width.
3)Cover the wooden portion of your pencil with Modge Podge
5)Apply another layer of Modge Podge to the right side of the paper to seal the seam and to give it a nice shiny finish. (I tried my new Sparkle Modge Podge for this step on some of the pencils and absolutely love, love, love the effect!)
6)Let Dry. I propped mine up against some styrofoam. Make sure whatever you use that your pencils don't stay stuck to it.
I found that the thinner the paper is, the easier it is to use. The scrapbooking paper was the most difficult to roll and to stay put.
So, here you go! The beginnings of a very pretty set of accessories for your desk at work or at home:
I did try sharpening the pencils and they still look beautiful...
These will make great stocking stuffers or thank you gifts throughout the year. What do you think? What else can you use them for? Don't be shy...leave a comment.
This weekend is Thanksgiving in Canada, so...Happy Thanksgiving everyone! Have a great weekend~
(This project will be posted throughout the week at the linky parties from the linky party tab above. Check out the sites for more great ideas!)
The Shabby Chic Cottage was my top referrer last week, so go visit Gina and
check out her site for other fab ideas!
As always, don't forget to check out Todays Creative Blog for more fun ideas.
The Shabby Chic Cottage was my top referrer last week, so go visit Gina and
check out her site for other fab ideas!
As always, don't forget to check out Todays Creative Blog for more fun ideas.


I really like the idea of making "custom pencils" - very pretty! Did you have any trouble with the paper peeling once they were sharpened? And of course the clips are always handy!
ReplyDeletea very great idea..it will sure brighten up the work desk!
ReplyDeleteHi Janet, I've been using my pencils and have had to sharpen them a couple of times already and so far absolutely no problems and no peeling at all.
ReplyDeleteThese are lovely! I am painting my art room and they would look so nice on my desk.
ReplyDeleteThanks for posting!
Too cute...I did this once for a party favor and everyone was calling me "Martha F'n Stewart"...they still call me that occasionally when I complete another project...lol
ReplyDeleteHave a great week, fondly, Roberta
These are so cute! My daughters would probably love to make some personalized pencils and clips for their desks! tfs Be blessed, Karyl =0)
ReplyDeletewonderful idea.Thanks for sharing
ReplyDeletethats so cute! i want to make myself matching sets now!
ReplyDeleteKimra
http://crafty-cove.blogspot.com
This is now on my to-do list...it's so cute. Thanks for sharing!
ReplyDeleteToo cute! I'd love to have some of these at work so everyone else in the office will be jealous! : )
ReplyDeleteHi Lisa, make sure to check back soon. I'll be having a giveaway in the next little while and if you've signed up as a follower...you just might win some!
ReplyDeleteWhat fun accessories. They turned out beautiful. I'm hosting We're Organized Wednesday until Saturday and would love for you to join the party. There's a great giveaway too. Hope to see you there.
ReplyDeleteHi there!!! I'm your newest follower from the weekend linky:) I love finding new blogs and yours is lovely:) You can find me at www.bouffeebambini.blogspot.com
ReplyDeleteThese are gorgeous!! I love them
Hi Hanna! Thanks so much for following. I'll definitely come visit you~
ReplyDeleteI'm going to have to make a ton of these pencils. My girls will love them. Thanks for linking to We're Organized Wednesday.
ReplyDeleteVery neat idea.
ReplyDeleteThanks for joining Get Your Craft on Thursday at Life As Lori!
super cute tutorial..i like it
ReplyDelete