Pages

Wednesday, February 29, 2012

Show and Tell: Pinstripe Pants

Yes, I may have been having a bit of an '80's moment when I made these high waisted dress pants.

I usually wear these with heels,
not my flat moccasin slippers as in this pic~
The idea is to create a nice long column silhouette so that you look extra tall.  I think these sort of do the trick.

I used this pattern:

with some polyester from the bargain bin.


They fit pretty good all things considered.


I'm trying hard to do the booty tooch but I don't have much booty to tooch~  (It's one of those weird Tyra Banks made up phrases).


I think waistlines got waaaaay too low there for awhile and this is much more comfortable.  What do you think?  Could you go back to a super high waist or do you like the butt bearing low riders?

By the way....Happy Leap Year!

Sunday, February 26, 2012

Make it Great Monday

Ack!  Only one more week of vacation left and then I have to start picking the features again all by myself.  Luckily, my friend Gen from Cabin Fevered Gem is here to help out.  Take it away Gen!

This week I was particularly inspired by spring projects ... and really starting to believe that it is on its way!

Love these vintage shutters from Ode to Inspiration:


and these Easter eggs by Pollyanna Reinvents are just perfect!
 
And now it's your turn!

Before you link and leave, please remember to only link:
1) Family friendly projects
2) Crafting, sewing, or recipes that you've made yourself
3) Maximum of 3 projects that you haven't link up before
4) Please, no shops or giveaways

Please stick around and visit one or two other links and don't be afraid to leave comments at eachother's blogs.  We all love comments don't we??

I have a new party button!


Etcetorize


You don't have to be a follower of Etcetorize, although it would really make my day if you are, but I do ask that you post my party button somewhere on your blog so that others can join in the fun~

Let's link!


Friday, February 24, 2012

Fabric Button Tacks

You guys know I like the simple things in life, and not just because they're easy, but because sometimes it's all you need to make an impact. 

Just like today's project, so easy, so simple, but so cute and pretty too!

Here's what you need:


Steps:
1) I bet a lot of you already know how to make your own fabric covered buttons so you can skip this first part, but if you don't already know how easy it is, just follow along. 

I often find packages of self covered buttons at the second hand store for next to nothing but you can still buy them in regular old fabric stores of today.


On the back, you'll find all of the directions, and see that series of circles?  Those are your patterns depending on which size you have.

2) Just cut out the corresponding circle, place it on your fabric (you really just need scraps), and cut out a circle the same size in your fabric.


3) Next, take the little tool thingey that comes in your kit, and make a little sandwich, white rubber cup on the bottom, fabric (face down), and metal button top (also face down).


4) Squish that all into the cup.  Your fabric will bunch up around the sides, that's OK.  Just tuck it in towards the centre.

5) Place your button back on top of the fabric, use the other piece of your tool to press it all together.  You'll feel a little snap when it all goes into place.


Now, if you were just making buttons, that would be it, you'd be done.  But we're going to make ours into tacks for all of those pretty pin boards that are out there.


6) Just fire up your glue gun and add a dab on top of your flat head tack.  Press the tack onto the back of the button above or below the shank.  (You can try to cut this off with wire cutters but I had no luck so I'm just going around it).


And now you are done! 


These are so easy.  You could use them for all sorts of things...like on barrettes, rings, jewellery, centres for fabric flowers.... the list goes on and on.

What will you use your new buttons for???

Thursday, February 23, 2012

Free Patterns: Amy Butler

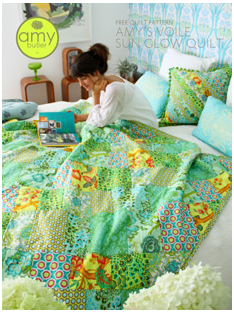
I can't end this series of Free Pattern posts without mentioning Amy Butler.  Amy designs beautiful fabrics which are now also textiles, stationary, towels, rugs, bedding, and even luggage!  You name it and you can probably get it with Amy's wonderful designs on it.

She also has several sewing books and patterns available.  And as an added bonus, from time to time, she posts FREE PATTERNS on her website. 

There are two links you can follow.  Go HERE and you'll find some super cute paper craft projects like these:


 But what I really enjoy are the FREE Sewing Patterns.

There are quite a few quilt patterns:


Each getting more gorgeous than the previous one.  Some look like they would be perfect for first time quilters:

It's not all quilts though.  Here are a few more fun and easy projects:


 There are even a few projects that you probably don't really need a pattern for, but for someone who's just starting to learn to sew it might be good practice to follow one:


I've sewn a few of her patterns and have a couple of her books and have always been pleased with the results.  Give one a try and let us all know how it turns out!

Wednesday, February 22, 2012

Show and Tell: Rusty Roses

You won't believe me but this really is a nice dress...it just doesn't photograph all that well.


The neckline is overlapped and makes it look sort of bulky in the photo, but in reality it looks quite pretty....really ... it does!


I used this Vogue pattern,


Best of all, I didn't cut the bottom hemline too short, like I usually do~

Sunday, February 19, 2012

Make it Great Monday

I am just so darn lucky!  Not only am I still on one totally wonderful, sunny, beachy holiday, but all of you still come to visit to share all of your great crafty ideas!  And on top of that, I've got someone else to help me pick out the features!  You don't know what a big job that is.

My lovely bloggy friend Khadija from Khadija's Creative Mind is here to tell you what caught her eye last week!  Take it away Khadija:

These are just perfect for the features! First up, this Cork Earings Display by Raising Oranges:


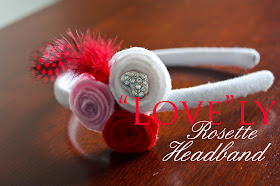
The second feature this week is this 'Love'ly Rosette Headband by Vixen Made:


Beautiful work ladies!

Make sure to stop by Khadija's Creative Mind to see her latest colourful crafts.  I don't know where she finds the time but she's always got something fun to share.

Henna Designed Box   DIY Necklace

And now it's your turn to share!

Before you link and leave, please remember to only link:
1) Family friendly projects
2) Crafting, sewing, or recipes that you've made yourself
3) Maximum of 3 projects that you haven't link up before
4) Please, no shops or giveaways

Please stick around and visit one or two other links and don't be afraid to leave comments at eachother's blogs.  We all love comments don't we??

I have a new party button!


Etcetorize


You don't have to be a follower of Etcetorize, although it would really make my day if you are, but I do ask that you post my party button somewhere on your blog so that others can join in the fun~

Are you ready?  Show us what you've got!


Friday, February 17, 2012

Pretty Beaded Pins

Here's a little weekend project for that night when someone else does all of your lovely household chores for you.  Letting you put your feet and your hair up so that you can head out enjoy a night on the town~

Today's project is super easy but hopefully will give you that little extra sparkle to make your evening out special.

Here's what you need:

Steps:
1) Using your wire cutters, cut a piece of wire around 8"-9" (20-23 cm).  This isn't exact because it depends on the length of your bobby pin and the size of beads that you're using.  A good estimate to use is about 3 times the length of your pin.


2) Wrap the end around the rounded end of the bobby pin a few times and squeeze it down with your straight nose pliers.  Make sure the wire isn't sticking towards the inside of the pin or it will catch on your hair.

3) Start adding your beads.  As you add beads wrap the wire around the pin, leaving the underside free of beads. 

Just keep adding and wrapping until you get to the bottom of your pin.


4) At the end just wrap the wire around itself 3 to 4 times and once again squeezing the end down with your fingers or straight nose pliers.

And that, my friends, is that!  So easy...but so pretty!


So easy, in fact, that I made another pair in one of my fav colour combo's...gold and pink!


And now I need to hear from you....my friend Gen has bet me that all my life I've been wearing my bobby pins upside down.  Which way to you wear your bobby pins?  Squiggly side up or down?  Leave a comment and let me know, I've got a box of bobby pins riding on this~