Pages

Tuesday, January 31, 2012

Leaving on a Jet Plane

This is it guys!  This is the week that I get to go on my long overdue extended vacation!

I will be spending the whole entire long glorious frigid cold deep freezer month of February here:

Yeah!  That will be me!
Maybe here:

And sure, why not, maybe here too!


Every couple of years I pack up my backpack and head off somewhere interesting in the world (you can see some photos from other amazing countries I've visited up top on the Inspiration Shot tab), usually in an attempt to avoid the cold Arctic winter here in Canada.  In case you don't recognize the above photos, this year I'm heading off to SOUTHERN THAILAND!!!!  Yay!

Even though I'll be very busy sitting on the beach, playing in the water, and finding amazing deals at the markets, you'll barely even notice that I'm gone.

#1- I've been busy and have scheduled regular posts throughout February for you, including the Make it Great Monday Linky party.
and
#2-You can join me on my trip!   Well, you can follow along at least.  I've set up an online Travel journal and you're all more than welcome to check in, leave a message in the guest book, and even subscribe for updates.  From time to time I'll post photos and short videos and let everyone know what I'm up to.  (I do this so that my mom doesn't worry about  me, but you're invited too!)

I don't leave for a few more days and it will take me a couple more days to reach Bangkok, so you probably won't see much in the journal until next week.

I hope you'll join me in this fun adventure but don't forget to check back here regularly for fun projects and inspiration too!

Sunday, January 29, 2012

Make it Great Monday

You guys blow me away each and every week!  I'm so happy that you all stop by to share your creativity!  You don't know how hard it is to only choose a couple of projects to feature. 

Have you seen this awesome Anthropologie knock-off from Abbie over at Five Days...5 Ways?

IMG_1301

She saved herself almost $1,300 by making them herself!  You have to go over there and check out the full post to believe it.

And I love Rebekah's version of the scarf top from Potholes and Pantyhose.


She has an excellent tutorial to show you how to make your own!

And the creativity doesn't end there...let's see what you've been working on this week.

Before you link and leave, please remember to only link:
1) Family friendly projects
2) Crafting, sewing, or recipes that you've made yourself
3) Maximum of 3 projects that you haven't link up before
4) Please, no shops or giveaways

Please stick around and visit one or two other links and don't be afraid to leave comments at eachother's blogs.  We all love comments don't we??

I have a new party button!


Etcetorize


You don't have to be a follower of Etcetorize, although it would really make my day if you are, but I do ask that you post my party button somewhere on your blog so that others can join in the fun~

All right...on your mark, get set, LINK!


Friday, January 27, 2012

Glitter Frame

I got the big pack of Martha Stewart Glitter for Christmas and have just started digging into it...yahoo!  It's a glitter fest!

Here's what you need for today's glitter party:

That's a glue pen below the frame, a must-have tool for this project~
 Steps:
1) Paint your wooden frame with some acrylic paint.  You'll most likely need to do at least two coats.  Don't forget to paint the sides and the inside edge.


2) With your glue pen, draw your design.  I'm making roses...because it's easy~


3) I just drew a couple of roses at a time so that my glue wouldn't dry out before I got to the next step, the fun part, adding the glitter!


4) Make your way around your frame, adding glue and glitter as you go.


I didn't seal mine, which I may regret, but I'll see how it stands up.


I have to say, I'm quite pleased with this.  It's been a project in my head for ages, I wasn't sure what it would look like in reality, surprisingly it's quite pretty!


You could go crazy using different colours or a contrasting colour to the paint.  You could even mod podge something first and then glitter the edges of a pattern!  Ooooh!  The wheels in my head are suddenly spinning!

Let me know what you think.  Do you have a glue pen?  What handy uses do you use it for?  Leave a comment~

Thursday, January 26, 2012

Free Patterns: Fabric.com

Stay tuned, because from now until the end of February, I'm going to show you were you can go for the best deals on sewing patterns from reliable, professional resources.  How good are the deals you ask?  Well, actually...they're FREE!

One of my favourite places to go for FREE sewing patterns is fabric.com.  That's right, they have more than just fabric, and you don't even have to pay!

Why do I like it there so much?  Because they have loads of FREE apparel patterns from HotPatterns.  HotPatterns has some of the coolest, most modern, and up to date styles out there, but they aren't cheap...unless you go to fabric.com.

This cute skirt/dress pattern is definitely on my list of things to make for this summer:

Cabriolet Wrap-Over Skirt/Dress
How about a stylish top:

Cool, Calm and Cowl-Necked Top

Or some retro style lingerie for nighttime?

Hot Patterns Loveable Retro Playsuit Pattern  Cupid Cami & Tap Pants

I even like their handbags!

                              Crepe Suzette Circular Clutch  Nomad Hobo Handbag

There's two whole pages full of free stuff there including knitting projects, Halloween costumes, and even a very cool looking beach pillow.

This is a great place for new sewers to get started.  Patterns can be pretty pricey, might as well start with something that you won't be afraid to cut.

Anyone else out there a fan of HotPatterns?  Leave a comment and let us know what you think!

Wednesday, January 25, 2012

Pinspired Creations: Gift Tags

Next to make from my Pinterest Board are some beautiful handmade gift tags.

I saw these ones made by Nancy at Tattered Treasures:


I even entered her contest in the hopes of winning some, but no such luck.

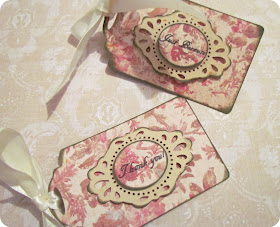
So I made my own!
DIY Gift Tags, Handmade Gift tags, Papercrafts

What caught my eye with Nancy's tags is the edging. I love that she uses colours besides brown and black. So, I used Olive green. I really need to work on my edging techniques but practice makes perfect, so I think I'll try my hand at a few more with some other colours.

I also spritzed mine with some pretty peach shimmer mist and used fat stick on thingies to create more texture and dimension.

I even made some for next Christmas with some paper scraps I had!  Sickening...I know.


I used a gold stamp pad for the edging on these ones.


These were the perfect addition to my Pinspired Crystal Candles when I gave them away as gifts.


What do you think? I hope it inspires you to try some of your own~

Thanks for the inspiration Nancy !

Tuesday, January 24, 2012

Follow My Friends: Grow Creative

There are so many of you who are new to Etcetorize that I thought I 'd better bring something to your attention.  Look up...waaaay up (Friendly Giant reference for all you Canadians out there).  See that little tab that says Follow My Friends?

Well, if you publicly follow Etcetorize through Google Friends Connect, that's where you can post your blog button if you want some free advertising and the possibility of a feature post from yours truly.

It's my way of saying thank you to all of you.

And today I'm saying thank you to Elise from Grow Creative.

Grow Creative


Elise seems to have a tiny bit of crafter's ADD ... just like me!  She does a little bit of everything, and shows you how you can do it too~

One of my favourite tutorials that she shares are these cute can lid crafts.  She uses these to make all kinds of pretty things!


If you go to her tutorials page you'll find all kinds of cool things to try.

Like these DIY cranberry stamps:


Starched Fabric Decals:


Mod Podge:


All that, and I haven't even mentioned yet that she's an artist!  Check out her gallery page to see some of the pretty items in her Etsy shop.  Here are just a couple:


Head on over to Grow Creative and tell Elise I said "Hi!".  Don't forget to come back here and let us all know what you found.

Have a great day everyone and don't forget to check out the rest of my friends on the Follow My Friends page up top~

Sunday, January 22, 2012

Make it Great Monday!

Hi everyone!  Time to start another great week off with some awesome crafting and sewing projects!  Even though there were more than a couple of technical glitches this week, I had a great time checking out all of your amazing work. 

So sorry if I wasn't able to leave a comment on your linky entry.  I'm being blocked left, right, and centre these days but I'm trying to find a fix. 

Anyway, onto something more positive.... like this super cool idea on how to make your own light table from Kelly over at Here Comes the Sun.


Kelly uses hers as a fun spot for her son to play on, but I can think of all kinds of other ways it would come in handy, like making stencils and tracing intricate patterns.  Love it!

Donatella over at Inspiration and Realization always has something amazing to share.  She gets inspired by beautiful, but crazy expensive, designer items, and then makes her own for a fraction of the cost...and shows you how you can do it too!  This week she shared this cool leather corsage necklace.


Both ladies have excellent tutorials to show you how you can make your own~

Speaking of your own...what have you been up to this week?  Before you link and leave, please remember to only link:
1) Family friendly projects
2) Crafting, sewing, or recipes that you've made yourself
3) Maximum of 3 projects that you haven't link up before
4) Please, no shops or giveaways

Please stick around and visit one or two other links and don't be afraid to leave comments (if you're able to) at eachother's blogs.  We all love comments don't we??

I have new buttons to share!  I was pretty attached to my old ones but I figured it's a new year, it's time for new buttons.  You can continue to use the old ones or you can update.


Etcetorize


Either way, you don't have to be a follower of Etcetorize, although it would really make my day if you are, but I do ask that you post my party button somewhere on your blog so that others can join in the fun~

All right, let's link!


Friday, January 20, 2012

The Easiest Belt Ever

Some of you may have made a resolution to drop a few pounds this new year, and if you're successful you're going to need something to keep your pants up!  Here's a super easy, super fast, and super stylish way to do just that.

You'll need:
These are enough supplies to  make two belts~
Steps:
1) Use ribbon that has some body to it so that it doesn't just fold over in your belt loops.  Grosgrain is great because there's no wrong side to it, but some beautiful velveteen ribbon works too.  First, wrap your ribbon around your mid section and add about 10-12 inches (measure lower if you're planning on wearing it with low rise pants).  Snip.

2) Fold over one end and iron down.


3) Place two D rings down on the end of your ribbon and fold it in.  Once you've decided how much to fold, remove your D rings and steam the fold down.


4) Place your D rings inside the fold and stitch down your ribbon close to the edge.

5) Fold the edge of the other end over twice and stitch down.  The trick to this step is to fold it towards the right side of the belt.  This end will double over and you'll see the back side on the outside.  Make sense?  Not really, but trust me, fold it forward.


That's basically it.  You're done!  Throw it on over a pretty blouse, sweater, or with some dress pants to add some razzamatazz to that blah boring outfit.


For velveteen ribbon I didn't even finish the ends.  I just used some Fray Check and stitched it down.  No ironing, it just crushes the velvet.  See?  Super simple!


DIY Belt, How to make a belt, Easy DIY, Make your own belt, Ribbon Belt, Grosgrain belt, velveteen belt

You actually don't even have to drop any pounds, you can just wear one of these to feel pretty~  (Go ahead, have that extra scoop of ice-cream, oooooh, I know, I'm a bad influence.)